Showing posts with label povray. Show all posts

03 August 2016

630. Making MO figures in gabedit using fchk files from gaussian on Windows XP

The goal is to show how to make pretty figures of MOs from Gaussian computations using GabEdit.

This is a write-up for a colleague whom is using Windows. The GabEdit bits work pretty much the same way on linux, although the povray stuff is a lot easier (in my opinion anyway) on that OS.

Anyway, Windows it is.


A. Optional: Install Gaussian (G09W)
If you have G09W you can install it. To use the formchk utility, add the location of your gaussian installation to path.

Do this by right-clicking on My Computer, select the Advanced tab, click on Environment Variables, and then click on the Path entry under System Variables. Click Edit, and add
;c:\g09w
if that's the correct path for you. The ";" is just to separate your entry from the previous one. If you need to add another entry afterwards (e.g. for povray), put a ";" after c:\g09w


Either way it's optional, as you will likely have access to formchk on the same computer/system that you ran your job on and can do the chk -> fchk conversion there.

Also, using formchk on a windows computer on a .chk file from a linux computer might not work (which was my case)

An alternative is to set up a smallish linux VM: https://verahill.blogspot.com.au/2016/08/631-small-linux-installation-in.html


B. Optional: Add option to open terminal using mouse
Following this: https://stackoverflow.com/questions/378319/windows-explorer-command-prompt-here/379804

Create a plain text file called context.reg


Edit it and put the following in it:

Windows Registry Editor Version 5.00
[HKEY_LOCAL_MACHINE\SOFTWARE\Classes\Folder\shell\cmd]
@="Open Command Prompt Here"
[HKEY_LOCAL_MACHINE\SOFTWARE\Classes\Folder\shell\cmd\command]@="cmd.exe /k pushd %L"

Like so...
Run it (i.e. double-click):
Yes!
You will now have an "Open Command Prompt Here" option when right-clicking on a folder in the file explorer.
Open terminal here
Why do this? Because it makes it easier to run either formchk or povray in the directory where you have your files.


C. Install gabedit
Got to https://sites.google.com/site/allouchear/Home/gabedit/download and get "The Gabedit installer for Windows (OpenGL)"

Run. It's that easy.

When running gabedit for the first time you may be asked lots of questions. You can probably just accept all the defaults. We'll change some of them below.

D. Install povray
Download http://www.povray.org/redirect/www.povray.org/ftp/pub/povray/Official/povwin-3.7-agpl3-setup.exe and also accept to install the editor dlls at the end of the installation.
Download povray
Once that's done, add povray to path. Go to My Computer, right-click, click on the Advanced tab, select Environment Variables, click on path under System Variables and then Edit. Add
;C:\Program Files\POV-Ray\v3.7\bin

Like So


Let's get going!

1. Optional: Convert chk to fchk using formchk
Didn't work for me, but you can always try (I convert the files under linux)

Either way, you must have the fchk file before going to gabedit


2. Open fchk file in gabedit
You need to do a bit of setting up:

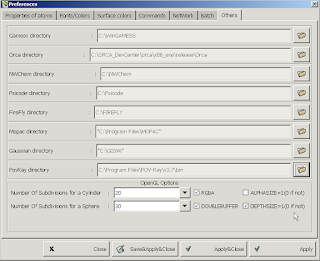
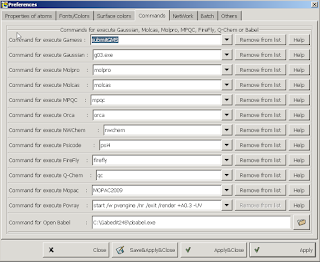
Set path and command for povray


To look at the fchk file:
a) Go to Display
Display Geometry/Orbitals/Density/Vibration


b) unset dipole (because otherwise you'll have an annoying arrow in your figure)
Untick dipole

c) Set desired atom colours.
In particular, I change N from dark blue to light blue so that it doesn't interfere with the orbital colours.
Atom colour

d) Set backgrounds (povray and screen) to white
Povray background

Window background


e) load fchk file
Go to Orbitals/Gaussian fchk


Open your fchk file


f) Set ball/stick parameters
Set Ball and Stick parameters
Apply

g) select level/MO
Note that you get the alpha OR beta orbitals. For a spin restricted system these are the same (apart from signage)

You should edit number of points. 65 is the default. 80 is slow but manageable. 90 is pushing it. Higher = smoother.

Computing...

"Get Isovalue" almost never works properly. Try 0.04-0.06.

Et voilá!
To select a different MO, go back to orbitals and click on Selection.
Selection

h) Edit surfaces
You can change colours and transparency
Transparency is an option

Adjust the transparency/opacity here
i) Export pov
To make a publication-worthy figure, export as pov
Export as Povray
Clicking 'Run' occasionally leads to crash, so it's safer to click on save. Make sure that the background in white.

Edit the command to +A0.01 instead of +A0.3 for less 'pixelated' figure on zooming in. Takes a bit longer to render though. The H/W values depend on your window shape.

Select save, not Run


3. Render povray
You now have a pov file (example.pov). The most straight-forward way to render it is to open the command prompt (terminal) in the same folder and run
pvengine +A0.01 +H604 +W620 example.pov
Rendering

assuming that the H/W values are the ones listed (or multiples of them) when you saved the pov file (it'll be listed in example.bat in the same folder).

And it looks like this:
A basic POV-Ray generated png


You can also run the .bat file associated with the pov file, but note that you'll have to put paths in "":
You need ""s
You can also render in the povray editor (open the povray with the editor):
Povray editor


Render Settings

The issue becomes the default H/W (resolution) values. Override using command line options: +HXXX +WYYY
You may have to associate .pov files with pvengine manually:

Edit -- but you'll be told that there's no program


Select a program to open


pvengine


Always use the selected program

20 May 2013

425. Briefly: Megapov

I want to use glow in a pov, and because of the number of objects it might be easier to use megapov than to add extra objects for each glowing one.

sudo mkdir /opt/megapov
sudo chown $USER:$USER /opt/megapov
wget http://megapov.inetart.net/packages/unix/megapov-1.2.1.tgz
tar xvf megapov-1.2.1.tgz
cd megapov-1.2.1/
./configure --prefix=/opt/megapov COMPILED_BY="me@here"
make
make install
cp /usr/share/povray/include/* /opt/megapov/share/megapov-1.2.1/include/

I chose make install instead of checkinstall since it was easier -- otherwise the ~/.megapov/1.2.1/povray.ini and povray.conf files weren't properly created (it wanted to put them in root).

17 May 2013

418. POVRay 3.7 on four-eight cores is several orders of magnitudes slower than serial POVRay 3.6

For some reason I get very poor performance when using POVRay 3.7, which can run rendering in parallel. In contrast, POVRay 3.6 -- which is serial -- renders much, much faster.

I had a particular job with partially transparent objects (similar type of job as set up here: http://verahill.blogspot.com.au/2013/05/415-briefly-making-polyhedral-figure-in.html) took

  • 2h 25 min (8694 seconds) using POVRay 3.6 running in serial
  • Smallest Alloc: 9 bytes Largest Alloc: 131080 bytes Peak memory used: 20730898 bytes Total Scene Processing Times Parse Time: 0 hours 0 minutes 0 seconds (0 seconds) Photon Time: 0 hours 0 minutes 0 seconds (0 seconds) Render Time: 2 hours 24 minutes 54 seconds (8694 seconds) Total Time: 2 hours 24 minutes 54 seconds (8694 seconds)
  •  14 hours 5 minutes in POVRay 3.7 rc 7 running in parallel (openmp)
  • Render Time:
      Photon Time:      No photons
      Radiosity Time:   No radiosity
      Trace Time:      14 hours  5 minutes 42 seconds (50742.481 seconds)
                  using 4 thread(s) with 201478.244 CPU-seconds total
    POV-Ray finished
    

on a four-core i5-2400 with 16 Gb RAM.

POVRay 3.7 took 16 hours 45 minutes on an eight core AMD FX 8150 with 32 Gb RAM.
Render Time: Photon Time: No photons Radiosity Time: No radiosity Trace Time: 16 hours 45 minutes 34 seconds (60334.108 seconds) using 8 thread(s) with 472419.334 CPU-seconds total POV-Ray finished
I rendered with
povray_3.7 +H1000 +W1000 +A0.01 scene.pov

The general trend applies to povray 3.7-rc6 and whatever povray version I was using in Arch a month ago. It also applies to all linux boxes I've tried it on.

I built povray 3.6 and 3.7 as shown here: http://verahill.blogspot.com.au/2013/05/413-povray-37-rc7-on-debian-wheezy.html

Googling I really only found this: http://news.povray.org/povray.beta-test/thread/%3C455a0770@news.povray.org%3E/?ttop=349052&toff=450
which is from 2006.
First problem!
Version 3.7.0.beta16 was MUCH slower. Version 3.6.1c took 4m46s, while Version3.7.0.beta16 took 7m43s... that's 60% more! Is there a better build or should I be using some different options?
It was never addressed.

I don't know if the performance of 3.7 is worse then 3.6, or if there's some difference in settings that's slowing things down i.e. whether there's something which I'm doing wrong.

A general list over changes between 3.7 and 3,6 is found here: http://wiki.povray.org/content/Documentation:Tutorial_Section_1#Changes_and_New_Features_Summary
but there's nothing that stands out to me.

11 September 2012

232. Compile parallel (threaded) povray 3.7-rc6 on Debian Wheezy

Update 13 May 2013: This build won't work with v3.7-rc7 on debian wheezy if you have libjpeg62 installed. See http://verahill.blogspot.com.au/2013/05/413-povray-37-rc7-on-debian-wheezy.html.

Remove libjpeg62 and it works fine though.

Original post
Expanding my little cluster has got me thinking about additional uses for it. The primary purpose is obviously work i.e. MD simulations using gromacs and ab initio calcs using NWChem and Gaussian. I'm also testing it with John the Ripper to see how well the users of the linux box in the lab are choosing their passwords.

At that point I realised that it'd be sweet to have at least an OMP capable version of povray to speed things up when polishing figures for those elusive journal covers.

Debian testing currently uses v. 3.6.1 of povray but

  POV-Ray 3.6 does not support multithreaded rendering. POV-Ray 3.7 does.

So compile we will although v 3.7 is beta, so be aware.
sudo mkdir /opt/povray
sudo chown $USER /opt/povray

wget http://povray.org/redirect/www.povray.org/beta/source/povray-3.7.0.RC6.tar.gz
tar xvf povray-3.7.0.RC6.tar.gz
cd povray-3.7.0.RC6/
sudo apt-get install libboost-all-dev libpng-dev libjpeg-dev libtiff-dev build-essential libsdl-dev

Note: libboost-all-dev is big. It might be enough with libboost-thread-dev

./configure --prefix=/opt/povray --program-suffix=_3.7 COMPILED_BY="me@here"
===============================================================================
POV-Ray 3.7.0.RC5 has been configured.

Built-in features:
  I/O restrictions:          enabled
  X Window display:          disabled
  Supported image formats:   gif tga iff ppm pgm hdr png jpeg tiff
  Unsupported image formats: openexr

Compilation settings:
  Build architecture:  x86_64-unknown-linux-gnu
  Built/Optimized for: x86_64-unknown-linux-gnu (using -march=native)
  Compiler vendor:     gnu
  Compiler version:    g++ 4.7
  Compiler flags:      -pipe -Wno-multichar -Wno-write-strings -fno-enforce-eh-specs -s -O3 -ffast-math -march=native -pthread

Type 'make check' to build the program and run a test render.
Type 'make install' to install POV-Ray on your system.

The POV-Ray components will be installed in the following directories:
  Program (executable):       /opt/povray/bin
  System configuration files: /opt/povray/etc/povray/3.7
  User configuration files:   $HOME/.povray/3.7
  Standard include files:     /opt/povray/share/povray-3.7/include
  Standard INI files:         /opt/povray/share/povray-3.7/ini
  Standard demo scene files:  /opt/povray/share/povray-3.7/scenes
  Documentation (text, HTML): /opt/povray/share/doc/povray-3.7
  Unix man page:              /opt/povray/share/man
===============================================================================

The way it is configured we can keep our debian version of povray and install the newer version (povray_3.7)

make
make install

Seems like -geometry 1000x1000 doesn't work anymore. Instead use -H1000 -W1000

I've played around with it a little bit and it does parallel (threaded) execution nicely.

wget http://www.ms.uky.edu/~lee/visual05/povray/fourcube7.pov
./povray_3.7 -H1000 -W1000 fourcube7.pov +A0.1
takes 9 seconds on an AMD II X3. The standard, serial Debian version takes 21 seconds.

01 March 2012

87. Polyoxometalate Molecules - povray images

Here's a bunch of povray generated figures of polyoxometalates. I've spent too much time on them not to share them. You may use them freely in posters, websites or talks.
Leave a comment if you want the original POV files.


alpha-Mo8

alpha-Mo8 -- octamolybdate

alpha Mo8 -- octamolybdate

beta-Mo8 -- octamolybdate

beta-Mo8 -- octamolybdate


Hexamolybdate -- Mo6O19

Decaniobate -- [Nb10O28]6-

Decaniobate -- [Nb10O28]6-

Eicosaniobate -- dodecaniobate --[Nb20O54]

Eicosaniobate -- dodecaniobate --[Nb20O54]

Hexaniobate -- lindqvist ion -- [Nb6O19]8-

Hexaniobate -- lindqvist ion -- [Nb6O19]8-

Peroxo- hexaniobate --[Nb6O13(O2)6]8-

Para-Mo7 -- para hepta molybdate

Para-Mo7 -- para hepta molybdate

Para-W7 -- para hepta tungstate

Para-W7 -- para hepta tungstate

Tetrasiliconiobate -- Si4Nb16

Tetrasiliconiobate -- Si4Nb16

Siliconiobate -- SiNb12 -- keggin ion

Siliconiobate -- SiNb12 -- keggin ion

Hexatantalate - [Ta6O19]8-

Superlindqvist -- [Ti12Nb6O44]10- 

[Ti2Nb8O28]8- -- dititanoniobate

[Ti2Nb8O28]8- -- dititanoniobate

[TiNb9O28]7- -- monotitanoniobate

[TiNb9O28]7- -- monotitanoniobate

W10 - decatungstate

W10 - decatungstate

W12 -- dodecatungstate

W12 -- dodecatungstate

W12 -- dodecatungstate

Hexamolybdate -- lindqvist ion -- [Mo6O19]8-