03 August 2013

489. Briefly: dvb-fe-tda10048-1.0.fw on debian

I have a Leadtek DTV 1000 S tv card. While it does work out of the box with e.g. me-tv, there's a fair bit of annoying stuff happening, such as failure to lock channels a couple of times per evening.

The first step is to put the following your /etc/modules:
options saa7134 tuner=48 card=175

If you check dmesg after boot you'll, however, notice the following as well:
[ 8.729961] tda10048_firmware_upload: waiting for firmware upload (dvb-fe-tda10048-1.0.fw)... [ 8.775721] tda10048_firmware_upload: Upload failed. (file not found?)
and this is how you fix that:
mkdir ~/tmp/tda10048 -p
cd ~/tmp/tda10048
wget http://steventoth.net/linux/hvr1700/HVR-12x0-14x0-17x0_1_25_25271_WHQL.zip
unzip HVR-12x0-14x0-17x0_1_25_25271_WHQL.zip 
dd if=Driver85/hcw85bda.sys of=dvb-fe-tda10048-1.0.fw bs=1 skip=667744 count=24878
sudo cp dvb-fe-tda10048-1.0.fw /lib/firmware/

If you unload and reload your saa7134 and saa7134_dvb modules and the firmware should load. At the very least it will on the next boot:
[ 8.929850] tda10048_firmware_upload: waiting for firmware upload (dvb-fe-tda10048-1.0.fw)... [ 8.967595] tda10048_firmware_upload: firmware read 24878 bytes. [ 8.967604] tda10048_firmware_upload: firmware uploading

02 August 2013

488. Screencasting on debian wheezy

Update II: An alternative to gnome-screencast + audacity is kazam, which is present in the jessie and sid repos, but NOT in the wheezy repos.

Update:
If you want to draw in a pdf presentation, Xournal is looking pretty good. You can turn off the toolbars as shown here:  http://sourceforge.net/p/xournal/feature-requests/75/

Original post:
It would be nice if we could use the gnome screencasting tool for this, but it doesn't record audio by default. While you can make it do so, there are issues with getting it to stop recording audio. In the end you end up with a continuously growing file even though you've stopped recording.

I had little luck with Istanbul. While it sort of worked, I had issues getting it to stop recording (clicking on the button in the gnome tray produced nothing) a lot of the time.

I also had little luck with recordmydesktop. While it recorded fine, and eventually stopped when asked to, it didn't record sound. You can probably sort that out without too much effort, but yesterday I had to quickly whip together a couple of screencasts for a class I'm teaching, and playing with sound can be an easy way of wasting an afternoon.

In my case I had to narrate a couple of .ps slides I'd prepared with latex.

I went for something less elegant, but which was quick and easy to get started with: gnome screencasting + audacity. I'm in no way the first person to use this, but here's what I did:

0. First install audacity, ffmpeg etc.
I suggest install the newer version of ffmpeg already from the beginning. See step six below to see how to get the newer version via the deb-multimedia repos.

1. Start audacity. Presuming you have your microphone configured and everything, you should be ready to hit record (you might want to set audacity to record mono rather than stereo to save space). Don't do anything at this point though.

2. Open you pdf or ps presentation in evince in another workspace and put it in presentation mode (F5 in evince)

3. Ready? Hit the record button in audacity and switch workspaces. Hit Alt+Ctrl+Shift +R to start recording the screen actions

Your mouse movements will be recorded, so you can point at things as you are talking.

I find it a lot easier to edit sound files than video, so I'd rather have audacity run a bit longer than the video and edit it afterwards.

4. Once you are done, stop the screen recording with Alt+Shift+Ctrl+R, switch back to Audacity and stop the recording. Re-touch your audio in audacity (e.g. trim the beginning and end to match the video), and go to file/export to save it as e.g. wav.


5. Combine sound and video
Merge your screencast (which is in webm format) with your audio:
ffmpeg -i example.wav -i example.webm merged.webm

It takes a while. You can run this in parallel, e.g.
ffmpeg -threads 8 -i example.wav -i example.webm merged.webm

At any rate, you now have a .webm file with sound and video -- this is a format that's handled by html 5, so it should be ok.

If you want to edit the video before merging with audio you can also use OpenShot to e.g. split off the end of the video. I never had much luck with pitivi.

If you know exactly where to cut you can do it very easily with ffmpeg:
ffmpeg -i example.webm -vcodec copy -acodec copy -ss 00:00:00 -t 00:11:39 example_chop.webm

Also, without confirming it, I think the newer versions of ffmpeg automatically run as multi-threaded, whereas the older ones just launch a single thread. Experiment and find out.

6. To make an flv file
To do this successfully I had to use ffmpeg version (1.0.7) in the deb-multimedia repository -- the ffmpeg version (0.8.6) in the wheezy repos is too old. You can use the newer one by adding this to your /etc/apt/sources.list,
deb http://www.deb-multimedia.org wheezy main non-free
followed by running
sudo apt-get update
sudo apt-get install deb-multimedia-keyring
sudo apt-get upgrade && sudo apt-get install ffmpeg

Finally, convert to flv using
ffmpeg -i merged.webm -vcodec libx264 example.flv

487. Version 7.0 of ECCE out now

What's new:
1. There's a whole new type of calculation added, called 'Condensed Phase Reaction Study':

The previous reaction module has been renamed 'Gas Phase Reaction Study'. The real difference between the two types is that the Condensed Phase module uses the plan wave module in NWChem and thus uses explicit solvation, while the Gas Phase reaction module uses DFT/MP2. The latter can obviously use implicit solvation if requested.

2. The Def2-series of basis sets (Weigen and Alrichs, Phys. Chem. Chem. Phys, 2005, 7, 3297-3305) have been added to ECCE, and tools for adding basis sets on your own are now distributed with the ECCE sources. One of them is based on http://sourceforge.net/projects/nwbas2ecce/ , the scripts of which have been renamed gbsNWChemConverter and gsbDescriber. To add new basis sets, look at scripts/gbs.README in the ecce source directory, or in apps/scripts/gbs.REAME in the installation directory.

3. The precision of basis sets explicitly defined using coefficients and exponents has been greatly increased. Before, the energies obtained using the implicit nwchem basis sets and those obtained by defining the basis set through exponents and coefficients in the input could differ by 0.1 milli-Hartree in extreme cases. That should no longer be the case.

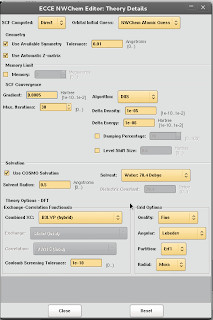
4. The COSMO parameter Rsolv can now be set in the Theory dialogue.

5. Other
There are other, non-obvious changes under the hood, such as an updated (2.2.25) apache httpd. The realease notes detail most of these.

Note that ECCE only runs on linux, and uses python 2.7. I haven't had much luck compiling it on Arch (due to python 3 seemingly being the default in Arch), but it runs fine on Debian Squeeze, Wheezy and Jessie, Fedora 18 and Scientific Linux 6.4 and Ubuntu something-or-other.


To install the binaries:

Note that there are only 64 bit binaries available. If you want to use ECCE on a 32 bit OS, you can, but you will have to compile the sources yourself. Luckily, this is very easy. Until I make a separate post, see here: http://verahill.blogspot.com.au/2013/01/325-compiling-ecce-64-on-debian-testing.html

To get the binaries (or sources) go to http://ecce.pnl.gov/using/download.shtml

Give your email and name so that the PNNL can track the number of users, as these things often impact on funding for different projects.

On the next page, select the version to download. Most likely you want the full binaries: install_ecce.v7.0.rhel5-gcc4.1.2-m64.csh

Download that file to e.g. ~/Downloads, and fire up your terminal -- in my case I'm doing an upgrade from a pre-release version of ECCE 7.0:
sudo apt-get install csh openjdk-7-jre
csh install_ecce.v7.0.rhel5-gcc4.1.2-m64.csh
Extracting ECCE distribution from install_ecce.v7.0.rhel5-gcc4.1.2-m64.csh... Main ECCE installation menu =========================== 1) Help on main menu options 2) Prerequisite software check 3) Full install 4) Full upgrade 5) Application software install 6) Application software upgrade 7) Server install 8) Server upgrade IMPORTANT: If you are uncertain about any aspect of installing or running ECCE at your site, please refer to the detailed ECCE Installation and Administration Guide at http://ecce.pnl.gov/docs/installation/2864B-Installation.pdf Hit at prompts to accept the default value in brackets. Selection: [1] Host name: [beryllium] New application installation directory: [/home/verahill/tmp/ecce/7.0-rc_final/ecce-v7.0/apps] Existing application directory to upgrade: New server installation directory: [/home/verahill/.ecce/e-v7.0b/server] Existing server directory to upgrade: Backup existing server user data (yes/no)? [yes] Yes ECCE v7.0 will be installed using the settings: Installation type: [full upgrade] Host name: [beryllium] Application installation directory: [/home/verahill/.ecce/ecce-v7.0b/apps] Application directory to upgrade: [/home/verahill/.ecce/ecce-v7.0/apps] Server installation directory: [/home/verahill/.ecce/ecce-v7.0b/server] Server directory to upgrade: [/home/verahill/.ecce/ecce-v7.0/server] Backup existing server user data: [yes] Are these choices correct (yes/no/quit)? [yes] Installing ECCE application software in /home/verahill/.ecce/ecce-v7.0b/apps... Extracting application distribution... Extracting NWChem distribution... Extracting client WebHelp distribution... Configuring application software... Configuring NWChem... Installing ECCE server in /home/verahill/.ecce/e-v7.0b/server... Extracting data server in /home/verahill/.ecce/e-v7.0b/server/httpd... Extracting data libraries in /home/verahill/.ecce/e-v7.0b/server/data... Extracting Java Messaging Server in /home/verahill/.ecce/e-v7.0b/server/activemq... Configuring ECCE server... Copying user data from server to be upgraded... Copying share data from server to be upgraded... ECCE installation succeeded. *************************************************************** !! You MUST perform the following steps in order to use ECCE !! -- Unless only the user 'verahill' will be running ECCE, start the ECCE server as 'verahill' with: /home/verahill/.ecce/e-v7.0b/server/ecce-admin/start_ecce_server -- To register machines to run computational codes, please see the installation and compute resource registration manuals at http://ecce.pnl.gov/using/installguide.shtml -- Before running ECCE each user must source an environment setup script. For csh/tcsh users add this to ~/.cshrc: if ( -e /home/verahill/.ecce/e-v7.0b/apps/scripts/runtime_setup ) then source /home/verahill/.ecce/e-v7.0b/apps/scripts/runtime_setup endif For sh/bash users, add this to ~/.profile or ~/.bashrc: if [ -e /home/verahill/.ecce/e-v7.0b/apps/scripts/runtime_setup.sh ]; then . /home/verahill/.ecce/e-v7.0b/apps/scripts/runtime_setup.sh fi ***************************************************************

Edit your ~/.bashrc and add the following lines (edited for your system):
export ECCE_HOME=/home/verahill/.ecce/ecce-v7.0b/apps alias stopecce='/home/verahill/.ecce/ecce-v7.0b/server/ecce-admin/stop_ecce_server' alias startecce='/home/verahill/.ecce/ecce-v7.0b/server/ecce-admin/start_ecce_server'
You can then start ecce by typing...ecce.