I switched to thunderbird about 6-12 months ago since I got fed up with certain issues, chief among which were:
* issues with syncing between google calendar and evolution calendar
* non-persistent calendar view -- back in the days you had the default calendar view, and that was that. You could change it temporarily, but it wouldn't persist between switching between mail and calendar.
Otherwise I've always found evolution 'prettier' than thunderbird, which gives me Eudora flashbacks, and works more seamlessly with PGP (thunderbird requires enigmail which works fine -- but it's still a plugin).
The only issue I've found so far was that I had to close and restart Evolution after adding my google calendar details before it would prompt me for the password and actually sync.
What I've noticed now:
* Calendar view (i.e. day/week/month) is persistent and remembers your preferences
* Sync between google and your local calendar works fine -- I had the appointment on my phone within a minute of entering it in Evolution
* The interface is cleaner, prettier (not sure whether anything has suffered from the deprecation syndrome most gnome-related software has been subject to recently)
* PGP required no set-up whatsoever -- an encrypted email was automatically decrypted without any set up at all. I'm not actually completely happy about that -- I'd prefer that to have been prompted for the password to unlock my key (I'd unlocked it for gajim a few hours earlier, and I guess it remained unlocked)
So while thunderbird has stood me well, I've historically been using Evolution since I switched to Linux (before that I used thunderbird on windows, and before that Pegasus Mail and Eudora) so I'm likely to switch back now that most of the things I were hung up on last time seem to have been fixed.
On the other hand, I'm noticing that I have to close and restart evolution any time I change account settings, which doesn't seem right, and which is fairly annoying.

Lindqvist - a blog about Linux and Science. Mostly.
29 March 2013
28 March 2013
373. Cracking Windows passwords if you are a Linux user
Cracking windows passwords is no more difficult than any other set of passwords that need to be cracked via brute force/rainbow table lookup -- it's all about getting your hands on the right files to begin with.
Note that Vista and Windows 7 are the same in terms of how the passwords are stored. XP is different. You'll need to appropriate hash tables when cracking using Ophcrack-- you can't use XP hashes to crack Vista/7 and vice versa.
Why?
I actually have a fairly legit reason for this, other than pure curiosity: the professors and lecturers who have Win 7 at this Uni aren't given administrator access, so that they need to make an appointment with IT staff everytime they want to install or upgrade something. In my opinion, that's taking things way, way too far, especially in light of OSX user and Linux users don't face the same restrictions (I requested my computer to be delivered blank, so not even the IT staff can gain access without physically accessing my hdd).
I've also twice been in situations where a lab computer was set up by a PhD student who had since left, but without telling anyone the BIOS password in one case (remove CMOS battery, drain the power by shorting) and NT 4 password in another case (boot using linux, replace the screensaver file with cmd, boot, then wait and you've got admin access). Adding a few more techniques to your arsenal makes you a more well rounded human being. Plus you might gain a bit more respect from the students. Maybe.
Windows files that you need
You'll need to copy two files from your Windows harddrive (most likely o C:\). Since you can't access those files from within windows, the easiest way to do that is to make a bootable USB with linux on it, boot, then mount the windows partition and copy the files. It does require that you know how to mount devices from the command line in linux (hint: read up on mount) but it's really quite easy.
See here for how to make a linux usb install:
Arch: http://verahill.blogspot.com.au/2013/02/331-full-linux-install-on-usb-stick.html
Debian: http://verahill.blogspot.com.au/2013/03/361-installing-debian-on-usb-stick-from.html
On Windows Vista and Windows 7 you need to copy
/Windows/System32/config/SAM
/Windows/System32/config/SYSTEM.
On Windows XP you need to copy
/WINDOWS/system32/config/system
/WINDOWS/system32/config/SAM.
Generating input
First set up your linux system and install bkhive and samdump2. On Arch you can get these from the AUR (here and here), and on Debian you can install it from the repos by doing
sudo apt-get install bkhive samdump2
Ophcrack
Ophcrack is one alternative for which you can download rainbow tables, while John the Ripper can do it via password lists and brute force. You can get Ophcrack from the Debian repos as well as AUR in ARch.
To crack with Ophcrack you'll need tables -- you can get them from here: http://ophcrack.sourceforge.net/tables.php
Start with Xp Free Small or Vista Free, depending on whether you're going after XP or Vista/Windows 7 passwords. If your passwords still won't break, you can always get a bigger table. Put your tables in e.g. /tmp/crack/xp and /tmp/crack/vista
Do (for xp -- point towards /tmp/crack/vista for vista/windows 7)
where -n 6 means to use 6 threads (use as many as you have cores). You can also launch ophcrack with a graphical user interface by simply typing ophcrack.
John the Ripper
On Arch you can get John the Ripper via the standard repos, and on Debian you can easily compile it.
You should get a good password list to guide your cracking -- rockyou is probably one of the best:
To crack XP passwords, run
john --wordlist=rockyoutxt --format=lm crack.list
To crack Vista or Windows 7 passwords, run
john --wordlist=rockyoutxt --format=nt crack.list
If you have compiled john the ripper with mpi support, just launch it along the lines of
mpirun -n 6 john --wordlist=rockyoutxt --format=nt crack.list
There's no guarantee that you'll successfully crack all passwords -- it simply depends on 1) how common the passwords are or 2) whether they are short enough to brute force. I've used the methods above to crack passwords on a couple of machines (even virtual ones).
If you're really lazy and want a fully automated cracking experience, just use the ophcrack live cd. The downside is that you'll be occupying the machine which holds the windows installation until you're done cracking. With the method here you can crack at your leisure on your own windows machine.
Note that Vista and Windows 7 are the same in terms of how the passwords are stored. XP is different. You'll need to appropriate hash tables when cracking using Ophcrack-- you can't use XP hashes to crack Vista/7 and vice versa.
Why?
I actually have a fairly legit reason for this, other than pure curiosity: the professors and lecturers who have Win 7 at this Uni aren't given administrator access, so that they need to make an appointment with IT staff everytime they want to install or upgrade something. In my opinion, that's taking things way, way too far, especially in light of OSX user and Linux users don't face the same restrictions (I requested my computer to be delivered blank, so not even the IT staff can gain access without physically accessing my hdd).
I've also twice been in situations where a lab computer was set up by a PhD student who had since left, but without telling anyone the BIOS password in one case (remove CMOS battery, drain the power by shorting) and NT 4 password in another case (boot using linux, replace the screensaver file with cmd, boot, then wait and you've got admin access). Adding a few more techniques to your arsenal makes you a more well rounded human being. Plus you might gain a bit more respect from the students. Maybe.
Windows files that you need
You'll need to copy two files from your Windows harddrive (most likely o C:\). Since you can't access those files from within windows, the easiest way to do that is to make a bootable USB with linux on it, boot, then mount the windows partition and copy the files. It does require that you know how to mount devices from the command line in linux (hint: read up on mount) but it's really quite easy.
See here for how to make a linux usb install:
Arch: http://verahill.blogspot.com.au/2013/02/331-full-linux-install-on-usb-stick.html
Debian: http://verahill.blogspot.com.au/2013/03/361-installing-debian-on-usb-stick-from.html
On Windows Vista and Windows 7 you need to copy
/Windows/System32/config/SAM
/Windows/System32/config/SYSTEM.
On Windows XP you need to copy
/WINDOWS/system32/config/system
/WINDOWS/system32/config/SAM.
Generating input
First set up your linux system and install bkhive and samdump2. On Arch you can get these from the AUR (here and here), and on Debian you can install it from the repos by doing
sudo apt-get install bkhive samdump2
Once you have bkhive and samdump, do
bkhive system sys.out
samdump2 SAM sys.out > crack.list
Cracking
I prefer John the Ripper, but ophcrack is in the repos.Ophcrack
Ophcrack is one alternative for which you can download rainbow tables, while John the Ripper can do it via password lists and brute force. You can get Ophcrack from the Debian repos as well as AUR in ARch.
To crack with Ophcrack you'll need tables -- you can get them from here: http://ophcrack.sourceforge.net/tables.php
Start with Xp Free Small or Vista Free, depending on whether you're going after XP or Vista/Windows 7 passwords. If your passwords still won't break, you can always get a bigger table. Put your tables in e.g. /tmp/crack/xp and /tmp/crack/vista
Do (for xp -- point towards /tmp/crack/vista for vista/windows 7)
ophcrack -n 6 -g -t /tmp/crack/xp -f crack.list
where -n 6 means to use 6 threads (use as many as you have cores). You can also launch ophcrack with a graphical user interface by simply typing ophcrack.
John the Ripper
On Arch you can get John the Ripper via the standard repos, and on Debian you can easily compile it.
You should get a good password list to guide your cracking -- rockyou is probably one of the best:
wget http://runamux.net/search/download/file/95wr2RdM/rockyoutxt.bz2
bunzip2 rockyoutxt.bz2
To crack XP passwords, run
john --wordlist=rockyoutxt --format=lm crack.list
To crack Vista or Windows 7 passwords, run
john --wordlist=rockyoutxt --format=nt crack.list
If you have compiled john the ripper with mpi support, just launch it along the lines of
mpirun -n 6 john --wordlist=rockyoutxt --format=nt crack.list
There's no guarantee that you'll successfully crack all passwords -- it simply depends on 1) how common the passwords are or 2) whether they are short enough to brute force. I've used the methods above to crack passwords on a couple of machines (even virtual ones).
If you're really lazy and want a fully automated cracking experience, just use the ophcrack live cd. The downside is that you'll be occupying the machine which holds the windows installation until you're done cracking. With the method here you can crack at your leisure on your own windows machine.
372. Leadtek DTV1000S on Arch linux
While this DVB-T card seems to work fine out of the box on Arch linux (using kaffeine, gnome-dvb-setup, me-tv, w_scan etc.) it is quite unstable -- you often get 'failed to lock channel' errors, and the picture gets corrupted after watching the same channel too long (1 hour). . In contrast, I've been using it for over a year on Debian without issues, so I decided to have a quick look at what I did back in the days to get it working, and realised I'd been a bit lazy setting things up (i.e. I had treated it like PnP).
To improve the stabilit of Leadtek DTV 1000S on Arch linux, do the following:
1. Edit /etc/modprobe.d/modprobe.conf
If you've noticed errors in dmesg/during boot-up relating to missing tda10048 firmware, install the dvb-fe-tda10048-1.0.fw firmware from AUR
To improve the stabilit of Leadtek DTV 1000S on Arch linux, do the following:
1. Edit /etc/modprobe.d/modprobe.conf
options saa7134 tuner=48 card=1752. Install the proper firmware driver
If you've noticed errors in dmesg/during boot-up relating to missing tda10048 firmware, install the dvb-fe-tda10048-1.0.fw firmware from AUR
wget https://aur.archlinux.org/packages/dv/dvb-fe-tda10048-1.0.fw/dvb-fe-tda10048-1.0.fw.tar.gz
tar xvf dvb-fe-tda10048-1.0.fw.tar.gz
cd dvb-fe-tda10048-1.0.fw
makepkg -s
sudo pacman -U dvb-fe-tda10048-1.0.fw-1-2-any.pkg.tar.xz
26 March 2013
371. Hashcat on debian
http://arstechnica.com/security/2013/03/how-i-became-a-password-cracker/ was just published, which made me want to have a look at hashcat.
Note that Hashcat is closed source. An open source alternative is John the Ripper .
Note also that there's a GPU-enabled version of hashcat, ocl-hashcat.
Why?
Whether you'll ever have a legitimate need for this stuff depends, but apart from the fun of it -- and the feelings of Power that cracking gives you -- being able to crack the odd password does serve as an eye opener to how easy this can be under the right circumstances. And who knows? You might find a justified use for it, especially if you're in academia where old computers and poor discipline abounds, and you are faced with computers that belong to you but were set up without any proper records.
Installation
Test run
Let's generate a file of simple passwords to crack:


Once it has finished, you can look at the output

If you want to compare with John the Ripper you could do e.g.
mpirun -n 6 run/./john test.list --wordlist=rockyoutxt --format=raw-md5
to do list-based cracking and
mpirun -n 6 run/./john test.list--format=raw-md5
for brute-force.
John the Ripper works well for windows passwords as well (might write about that in another post)
Linux passwords
To crack actual linux user passwords, you'll need to access /etc/shadow and only root should be able to do that. Looking at /etc/password we have for example
to a file, e.g. nutest.list
Do
Now run hashcat:
where 1800 means SHA-512 (do hashcat --help to see what code to use) and 6 is the number of threads (six core CPU). You should be able to easily crack this one...
Note that Hashcat is closed source. An open source alternative is John the Ripper .
Note also that there's a GPU-enabled version of hashcat, ocl-hashcat.
Why?
Whether you'll ever have a legitimate need for this stuff depends, but apart from the fun of it -- and the feelings of Power that cracking gives you -- being able to crack the odd password does serve as an eye opener to how easy this can be under the right circumstances. And who knows? You might find a justified use for it, especially if you're in academia where old computers and poor discipline abounds, and you are faced with computers that belong to you but were set up without any proper records.
Installation
sudo apt-get install p7zip-full
sudo mkdir /opt/hashcat -p
sudo chown $USER /opt/hashcat
cd /opt/hashcat
wget http://hashcat.net/files/hashcat-0.44.7z
wget http://hashcat.net/files/hashcat-gui-0.5.1.7z
wget http://runamux.net/search/download/file/95wr2RdM/rockyoutxt.bz2
7z x hashcat-0.44.7z
7z x hashcat-gui-0.5.1.7z
bunzip2 rockyoutxt.bz2
echo 'export PATH=$PATH:/opt/hashcat/hashcat-0.44:/opt/hashcat/hashcat-gui-0.5.1' >> ~/.bashrc
source ~/.bashrc
Test run
Let's generate a file of simple passwords to crack:
echo -n "city" | md5sum > test.list echo -n "n00b" | md5sum >> test.list echo -n "123654"| md5sum >> test.list echo -n "Chicago"| md5sum >> test.list cat test.listEdit the test.list file to remove all the ' - '. Note that you need to run hashcat-gui in your /opt/hashcat/hashcat-0.44/ folder. Start hashcat-gui:4ed5d2eaed1a1fadcc41ad1d58ed603e 16e029226d8960b2d7cba16cab5f7044 733d7be2196ff70efaf6913fc8bdcabf 9cfa1e69f507d007a516eb3e9f5074e2
cd /opt/hashcat/hashcat-0.44/
hashcat-gui64.bin


Once it has finished, you can look at the output
cat test.list.outUse the rule set best64 and it cracks all passwords and does it fast:733d7be2196ff70efaf6913fc8bdcabf:123654 9cfa1e69f507d007a516eb3e9f5074e2:Chicago 4ed5d2eaed1a1fadcc41ad1d58ed603e:city

My account password wasn't cracked by this though, but all that we can be certain that it means is that it would take someone more than 30 seconds to do so. Maybe 35 seconds, maybe 2 years -- we can't tell.733d7be2196ff70efaf6913fc8bdcabf:123654 9cfa1e69f507d007a516eb3e9f5074e2:Chicago 4ed5d2eaed1a1fadcc41ad1d58ed603e:city 16e029226d8960b2d7cba16cab5f7044:n00b
If you want to compare with John the Ripper you could do e.g.
mpirun -n 6 run/./john test.list --wordlist=rockyoutxt --format=raw-md5
to do list-based cracking and
mpirun -n 6 run/./john test.list--format=raw-md5
for brute-force.
John the Ripper works well for windows passwords as well (might write about that in another post)
Linux passwords
To crack actual linux user passwords, you'll need to access /etc/shadow and only root should be able to do that. Looking at /etc/password we have for example
I've made up the string above (using mkpasswd -m sha-512 -S MyySaltt which is salted using MyySaltt. ). Anyway, copy the hash, e.g.guest:$6$MyySaltt$eZXKl12CRRPZW1O/wKpodIB76f46NNVQ3o2Pyvh3m0QeHaW20WthUCkeLCZSPS6o9lks8g4Ua8v6OqbIXZw4r.:12567:0:88888:3:::
$6$MyySaltt$eZXKl12CRRPZW1O/wKpodIB76f46NNVQ3o2Pyvh3m0QeHaW20WthUCkeLCZSPS6o9lks8g4Ua8v6OqbIXZw4r.
to a file, e.g. nutest.list
Do
man cryptThe $6$ means that it's a SHA-512 hashed password.ID | Method --------------------------------------------------------- 1 | MD5 2a | Blowfish (not in mainline glibc; added in some | Linux distributions) 5 | SHA-256 (since glibc 2.7) 6 | SHA-512 (since glibc 2.7)
Now run hashcat:
hashcat-cli64.bin -n 6 -m 1800 nutest.list rockyoutxt -r /opt/hashcat/hashcat-0.44/rules/best64.rule
where 1800 means SHA-512 (do hashcat --help to see what code to use) and 6 is the number of threads (six core CPU). You should be able to easily crack this one...
25 March 2013
370. Compiling ECCE 6.4 on Scientific Linux 6.3 (Carbon; Red Hat; CentOS)
!NOTE! If you provide ECCE with 'localhost' as the hostname, be aware that this will block outside access: http://www.nwchem-sw.org/index.php/Special:AWCforum/st/id858/#post_3178
This build is almost identical to that on Fedora 18. I'm posting it as a separate post since I suspect a fair number of nwchem/ecce users are using Scientific Linux/CentOS/Red Hat. The main difference between fedora 18 and scientific linux 6.3 is that you don't have to worry about getops.pl errors on scientific linux. Yes, no manual patching, which probably reflects the more conservative approach in SL/RHEL than in fedora.
1. Get the files
Go to http://ecce.emsl.pnl.gov/using/download.shtml, fill out the form and download ecce-v6.4-src.tar.gz and put it in ~/tmp.
2. Install dependencies and build
Put the following in your ~/.bashrc:
Make sure that you hostname is in your hosts file, e.g.
4. Run.
You can now start ecce by doing
I've tested this on a headless box (small intel Atom with 512 Mb RAM) and it worked fine. I tried running calcs locally as well, and everything worked.
This build is almost identical to that on Fedora 18. I'm posting it as a separate post since I suspect a fair number of nwchem/ecce users are using Scientific Linux/CentOS/Red Hat. The main difference between fedora 18 and scientific linux 6.3 is that you don't have to worry about getops.pl errors on scientific linux. Yes, no manual patching, which probably reflects the more conservative approach in SL/RHEL than in fedora.
1. Get the files
Go to http://ecce.emsl.pnl.gov/using/download.shtml, fill out the form and download ecce-v6.4-src.tar.gz and put it in ~/tmp.
2. Install dependencies and build
sudo yum install vim csh gcc gcc-c++ gcc-gfortran java-1.7.0-openjdk-devel python-devel ant gtk2-devel libjpeg-turbo-devel libtool ImageMagick libXt-devel xterm mesa-libGLU-devel cd ~/tmp tar xvf ecce-v6.4-src.tar.bz2 cd ecce-v6.4/ export ECCE_HOME=`pwd` cd build/ ./build_ecceAnswer yesDo you want to skip these checks for future build_ecce invocations (y/n)?
./build_ecce3. InstallXerces built./build_ecceMesa OpenGL built./build_eccewxWidgets built./build_eccewxPython built./build_ecceApache HTTP server built./build_ecceCopying JMS server distribution jms_server.tar.bz2 Making server tar file ecce_server.tar Copying WebHelp tar file eccewebhelp.tar.bz2 Making combined tar file ecce.v6.4.tar Copying NWChem binary distribution nwchem-6.1.1-binary-rhel5-gcc4.1.2-m32.tar.bz2 Copying NWChem common distribution nwchem-6.1.1-binary-common.tar.bz2 Concatenating install script and combined tar file ecce.v6.4.tar create_ecce_bin finished ECCE built and distribution created in /home/me/tmp/ecce-v6.4
cp ~/tmp/ecce-v6.4/install_ecce.v6.4.csh ~/ cd ~ ./install_ecce.v6.4.cshExtracting ECCE distribution from ./install_ecce.v6.4.csh... hostname: Unknown host Main ECCE installation menu =========================== 1) Help on main menu options 2) Prerequisite software check 3) Full install 4) Full upgrade 5) Application software install 6) Application software upgrade 7) Server install 8) Server upgrade IMPORTANT: If you are uncertain about any aspect of installing or running ECCE at your site, please refer to the detailed ECCE Installation and Administration Guide at http://ecce.pnl.gov/docs/installation/2864B-Installation.pdf Hitat prompts to accept the default value in brackets. Selection: [1] 3 Host name: [localhost (could not successfully ping science!)] localhost Application installation directory: [/home/me/ecce-v6.4/apps] Server installation directory: [/home/me/ecce-v6.4/server] ECCE v6.4 will be installed using the settings: Installation type: [full install] Host name: [localhost] Application installation directory: [/home/me/ecce-v6.4/apps] Server installation directory: [/home/me/ecce-v6.4/server] Are these choices correct (yes/no/quit)? [yes] yes
Put the following in your ~/.bashrc:
and doexport ECCE_HOME=/home/me/ecce-v6.4/apps export PATH=${ECCE_HOME}/scripts:${ECCE_HOME}/scripts/parsers:$PATH alias stopecce='/home/me/ecce-v6.4/server/ecce-admin/stop_ecce_server' alias startecce='/home/me/ecce-v6.4/server/ecce-admin/start_ecce_server'
source ~/.bashrc
Make sure that you hostname is in your hosts file, e.g.
where science! is my hostname (I regret using ! in the hostname, but oddly I haven't actually had issues with it yet. Still, don't do it.). If it's not, you'll get a ton of errors.127.0.0.1 localhost localhost.localdomain localhost4 localhost4.localdomain4 science! ::1 localhost localhost.localdomain localhost6 localhost6.localdomain6
4. Run.
You can now start ecce by doing
startecce
ecce
I've tested this on a headless box (small intel Atom with 512 Mb RAM) and it worked fine. I tried running calcs locally as well, and everything worked.
24 March 2013
369. Compiling ECCE 6.4 on Fedora 18
UPDATE 16 April 2013:
The getops.pl issues has now been fixed in the latest release of ECCE
(http://www.nwchem-sw.org/index.php/Special:AWCforum/st/id756/Problem_with_httpd.html)
Original post
(there were initially some issues with getops.pl being deprecated. Fixed now)
This post on the NWChem/ECCE forum got me interested in trying to build ECCE on Fedora 18.
I'm presuming that you just clicked your way through the fedora 18 installation so that e.g. java-1.7.0-openjdk is already installed. Note that the default partitioning scheme in Fedora may lead to a very small (<1 Gb) /tmp partition, which may prevent you from building properly, so be aware.
Building form source will solve at the very least :
* the issues of there being no 32 bit binary (build your own)
* issues with ubuntu libraries (libXfixes) if you try to install an older 32 bit binary
You'll also have access to the source code which means that you could -- at least in theory -- contribute to the project by doing bug fixes.
Building is easy once you've got all dependencies figured out. The initial run of the build script misses the detection of two required sets of packages: openGL libs, and perl-Digest-MD5
Start here
1. Download
Go to http://ecce.emsl.pnl.gov/using/download.shtml, fill out the form, and download the source code on the next page (ecce-v6.4-src.tar.gz). Create the folder ~/tmp (mkdir ~/tmp) and put ecce-v6.4-src.tar.bz2 in ~/tmp
2. Prepare
(if you're doing this in virtualbox, the way to get openGL libs is via the virtualbox guest additions, and in order to build those you'll need the kernel headers (kernel-devel package) for the currently running kernel)
3. Build
The script will see if all the requirements are met by stating what version is needed and echoing the currently installed version of different dependencies. Presumably all of the requirements will be met after installing the dependencies in step 2. At the very end you'll be asked
Answer Y. The run build_ecce again and again...
4. Installation
You can now install ecce:
and follow the instructions. This post has an overview of the installation process, as do several of the posts here: http://verahill.blogspot.com.au/p/compilinginstalling-software-for.html
5. Patching
getops.pl has been deprecated in perl 5 -- see under incompatible changes on this page: http://fedoraproject.org/wiki/Features/perl5.16
Luckily, the fix is simple:
Assuming that you install ECCE in ~/ecce-v6.4
While getopts.pl has been deprecated, Getopt::Std supplies both a getop() and a getopts() function. I've done a little bit of testing (vib calcs, energy calcs) and so far everything looks great.
If you're still having issues, make sure that Getopt is in /usr/share/perl5
6. Run
You can now have fun with ECCE
The getops.pl issues has now been fixed in the latest release of ECCE
(http://www.nwchem-sw.org/index.php/Special:AWCforum/st/id756/Problem_with_httpd.html)
Original post
(there were initially some issues with getops.pl being deprecated. Fixed now)
This post on the NWChem/ECCE forum got me interested in trying to build ECCE on Fedora 18.
I'm presuming that you just clicked your way through the fedora 18 installation so that e.g. java-1.7.0-openjdk is already installed. Note that the default partitioning scheme in Fedora may lead to a very small (<1 Gb) /tmp partition, which may prevent you from building properly, so be aware.
Building form source will solve at the very least :
* the issues of there being no 32 bit binary (build your own)
* issues with ubuntu libraries (libXfixes) if you try to install an older 32 bit binary
You'll also have access to the source code which means that you could -- at least in theory -- contribute to the project by doing bug fixes.
Building is easy once you've got all dependencies figured out. The initial run of the build script misses the detection of two required sets of packages: openGL libs, and perl-Digest-MD5
Start here
1. Download
Go to http://ecce.emsl.pnl.gov/using/download.shtml, fill out the form, and download the source code on the next page (ecce-v6.4-src.tar.gz). Create the folder ~/tmp (mkdir ~/tmp) and put ecce-v6.4-src.tar.bz2 in ~/tmp
2. Prepare
tar xvf ecce-v6.4-src.tar.bz2
cd ecce-v6.4/
export ECCE_HOME=`pwd`
cd build/
sudo yum install vim csh gcc gcc-c++ gcc-gfortran java-1.7.0-openjdk-devel python-devel ant gtk2-devel libjpeg-turbo-devel libtool ImageMagick libXt-devel xterm mesa-libGLU-devel kernel-devel perl-Digest-Perl-MD5 perl-Digest-MD5
(if you're doing this in virtualbox, the way to get openGL libs is via the virtualbox guest additions, and in order to build those you'll need the kernel headers (kernel-devel package) for the currently running kernel)
3. Build
pwd/home/verahill/tmp/ecce-v6.4/build./build_ecce
The script will see if all the requirements are met by stating what version is needed and echoing the currently installed version of different dependencies. Presumably all of the requirements will be met after installing the dependencies in step 2. At the very end you'll be asked
Do you want to skip these checks for future build_ecce invocations (y/n)? Y
Answer Y. The run build_ecce again and again...
./build_ecceThis step will fail if you don't have openGL libs installed.Xerces built./build_ecceMesa OpenGL built./build_eccewxWidgets built
./build_ecceThis step will fail withrunning build_ext wxPython built./build_ecceApache HTTP server built./build_ecceMaking combined tar file ecce.v6.4.tar Copying NWChem binary distribution nwchem-6.1.1-binary-rhel5-gcc4.1.2-m64.tar.bz2 Copying NWChem common distribution nwchem-6.1.1-binary-common.tar.bz2 Concatenating install script and combined tar file ecce.v6.4.tar create_ecce_bin finished ECCE built and distribution created in /home/verahill/tmp/ecce-v6.4
if you don't have perl-Digest-MD5 installed.make[2]: Leaving directory `/home/verahill/tmp/ecce-v6.4/src/apps/vizthumbnail' make[1]: Leaving directory `/home/verahill/tmp/ecce-v6.4/src/apps' Can't locate Digest/MD5.pm in @INC (@INC contains: /usr/local/lib64/perl5 /usr/local/share/perl5 /usr/lib64/perl5/vendor_perl /usr/share/perl5/vendor_perl /usr/lib64/perl5 /usr/share/perl5 .) at /home/verahill/tmp/ecce-v6.4/build/create_ecce_bin line 37. BEGIN failed--compilation aborted at /home/verahill/tmp/ecce-v6.4/build/create_ecce_bin line 37.
4. Installation
You can now install ecce:
cd ..
./install_ecce.v6.4.csh
and follow the instructions. This post has an overview of the installation process, as do several of the posts here: http://verahill.blogspot.com.au/p/compilinginstalling-software-for.html
5. Patching
getops.pl has been deprecated in perl 5 -- see under incompatible changes on this page: http://fedoraproject.org/wiki/Features/perl5.16
Luckily, the fix is simple:
Assuming that you install ECCE in ~/ecce-v6.4
cd ~/ecce-v6.4/apps/scripts sed -i 's/require "getopts.pl";/use Getopt::Std;/g' *sed: couldn't edit codereg: not a regular fileset -i 's/Getopts/getops/g' * cd parsers/ sed -i 's/require "getopts.pl";/use Getopt::Std;/g' * set -i 's/Getopts/getops/g' *
While getopts.pl has been deprecated, Getopt::Std supplies both a getop() and a getopts() function. I've done a little bit of testing (vib calcs, energy calcs) and so far everything looks great.
If you're still having issues, make sure that Getopt is in /usr/share/perl5
6. Run
You can now have fun with ECCE
23 March 2013
368. Slow mouse and keyboard triggered by kworker running custom 3.8.0 kernel on debian wheezy on laptop SL410
Another update (8 Apr. 2013):
A fix is on the way to kernel 3.9 or 3.10.
https://patchwork.kernel.org/patch/2400621/
https://patchwork.kernel.org/patch/2402211/
Update: More links:
http://verahill.blogspot.com.au/2013/04/375-bisecting-kernel-looking-for-commit.html
https://bbs.archlinux.org/viewtopic.php?pid=1248190
https://bbs.archlinux.org/viewtopic.php?pid=1254285#p1254285
Update: it might be an issue in kernel 3.8 -- http://forums.gentoo.org/viewtopic-p-7278760.html#7278760. Seems related to intel graphics which would explain why I only see it on my laptop. Finally, disabling polling probably had no effect -- it was going back to stock kernel 3.2 that solved. The issue is still present in kernel 3.8.5. Awaiting fix in 3.9 or 3.10?
I compiled 3.8.5 and it has the same issue. Powertop shows:
Original post
I've rediscovered an annoying problem that I must have solved at some point with my old debian installation on my laptop (lenovo SL410): whenever kworker/u starts my mouse and keyboard become unresponsive. They work, but they lag horribly. The total cpu usage of kworker is only around 2-3%, and there's no excessive I/O, and it's consistent with the appearance of kworker in top.
When does kworker start? Whenever anything, anywhere happens e.g. if the fan goes on or if the fan goes off.
Unplugging mains power makes my USB keyboard and mouse behave strangely as well, although it's a bit more subtle. The fan off/mouse slowdown happens everytime though
I disabled kworker polling by editing /etc/default/grub
I also pulled in laptop-mode-tools, powertop and cpufrequtils. Not sure whether laptop-mode-tools could have a (positive) effect here, but from my reading it shouldn't kick in unless the laptop is running on battery. [update: DO NOT INSTALL laptop-mode-tools -- you'll have issues shutting down the laptop when it's on battery -- it'll reboot itself instead: http://verahill.blogspot.com.au/2013/04/379-thinkpad-sl410-reboot-instead-of.html]
The problem exists on both debian testing/wheezy (my own kernel 3.8) and arch linux (kernel 3.7.10-3.8).
After another reboot I have issues reproducing any sort of slowdown, and I don't seem to be able to reproduce it on the stock wheezy kernel (3.2). Maybe it's a kernel regression?
To anyone else with a similar issue:
Most likely your best bet is to downgrade the kernel to pre 3.8. For me, kernel 3.2 works fine, but I haven't tested e.g. 3.7.
If you don't think the kernel is the issues you can edit /etc/default/grub as shown above and see how that goes.
A fix is on the way to kernel 3.9 or 3.10.
https://patchwork.kernel.org/patch/2400621/
https://patchwork.kernel.org/patch/2402211/
Update: More links:
http://verahill.blogspot.com.au/2013/04/375-bisecting-kernel-looking-for-commit.html
https://bbs.archlinux.org/viewtopic.php?pid=1248190
https://bbs.archlinux.org/viewtopic.php?pid=1254285#p1254285
Update: it might be an issue in kernel 3.8 -- http://forums.gentoo.org/viewtopic-p-7278760.html#7278760. Seems related to intel graphics which would explain why I only see it on my laptop. Finally, disabling polling probably had no effect -- it was going back to stock kernel 3.2 that solved. The issue is still present in kernel 3.8.5. Awaiting fix in 3.9 or 3.10?
I compiled 3.8.5 and it has the same issue. Powertop shows:
I've since also compiled 3.7.10 and haven't yet experienced any issues. Still testing though.Usage Events/s Category Description 21.9 ms/s 1921.2 Interrupt [49] i915@pci:0000:00:02.0 1.8 ms/s 111.9 kWork od_dbs_timer
Original post
I've rediscovered an annoying problem that I must have solved at some point with my old debian installation on my laptop (lenovo SL410): whenever kworker/u starts my mouse and keyboard become unresponsive. They work, but they lag horribly. The total cpu usage of kworker is only around 2-3%, and there's no excessive I/O, and it's consistent with the appearance of kworker in top.
When does kworker start? Whenever anything, anywhere happens e.g. if the fan goes on or if the fan goes off.
Unplugging mains power makes my USB keyboard and mouse behave strangely as well, although it's a bit more subtle. The fan off/mouse slowdown happens everytime though
I disabled kworker polling by editing /etc/default/grub
GRUB_CMDLINE_LINUX_DEFAULT="quiet drm_kms_helper.poll=N"(don't forget to run sudo update-grub after you've made your changes) but while it makes things run smoothly as long as there's no system state change, fan on/fan off still makes things slow down occasionally. Still, the slowdowns are a lot less frequent and random than before.
I also pulled in laptop-mode-tools, powertop and cpufrequtils. Not sure whether laptop-mode-tools could have a (positive) effect here, but from my reading it shouldn't kick in unless the laptop is running on battery. [update: DO NOT INSTALL laptop-mode-tools -- you'll have issues shutting down the laptop when it's on battery -- it'll reboot itself instead: http://verahill.blogspot.com.au/2013/04/379-thinkpad-sl410-reboot-instead-of.html]
The problem exists on both debian testing/wheezy (my own kernel 3.8) and arch linux (kernel 3.7.10-3.8).
After another reboot I have issues reproducing any sort of slowdown, and I don't seem to be able to reproduce it on the stock wheezy kernel (3.2). Maybe it's a kernel regression?
To anyone else with a similar issue:
Most likely your best bet is to downgrade the kernel to pre 3.8. For me, kernel 3.2 works fine, but I haven't tested e.g. 3.7.
If you don't think the kernel is the issues you can edit /etc/default/grub as shown above and see how that goes.
21 March 2013
367. Some post-install steps on Debian Wheezy/Testing
-- Skip from here --
I lasted 9 days with Arch linux on my laptop, and I have now switched it back to Debian. I've still got Arch on my 'household' computer that we use to watch TV on though -- it's a fine distro, just like debian is a fine distro -- but it's not suitable for the particular work I use my laptop for.
The reasons for switching back aren't that dramatic -- I use my laptop for work.
In particular, I use it to do
* (computationally) light work at home (editing papers, generating figures, analyzing data) and
* I use it to give seminar talks at other universities.
I got a bit frustrated with the number of packages I had to get via AUR, and even more frustrated over the quality of some of the PKGBUILDS. Not frustrated in a terribly bad way -- I appreciate the time and effort that some of the maintainers put it (e.g. gdis and gcc-gcj) -- but frustrated enough that I appreciate the quality and availability of the packages in the debian repos. I needed to sort out a few quick things before sending off a manuscript:
* generate a structure with avogadro, then generate a pov file in gdis, then render it in povray
* I also needed to extract a couple of pages from a pdf using pdftk and send them to a collaborator
That took all evening. Avogadro installs fine via the repos, as did povray. There's a small issue with upstreams version of povray 3.7 in that it doesn't create any conf file in ~/.povray/3.7/, and there's no actual help when running povray --help, but even worse was that it rendered incredibly slow. I've compiled 3.7 myself before and my experience using the Arch packages were very different in terms of performance.
I had some issues with building gdis using the AUR PKGBUILD (the maintainer was extremely responsive to feedback and kudos to him/her), and that added an extra 20-30 minutes.
There are two AUR pdftk versions -- I first tried pdftk, which relies on gcc-gcj which is another AUR package. gcc-gcj wouldn't build, but someone beat me to submitting feedback. Again, the maintainer of gcc-gcj is extremely responsive and the issue has already been resolved, less than a day after reporting it.
I ended up giving and installing pdftk-bin and it's dependency (a re-tooled debian package!) which went fine.
All this is really in line with the stated nature of Arch - Arch is bleeding edge and will give you the newest, shiniest stuff. Debian is focused on stability and reliability (all your bugs will remain constant) but offers a middle-ground between Arch and Debian Stable in Debian Testing. And while the shiniest, newest stuff is what I'm looking for in a household computer or a desktop box, I need to go for reliability on my work computer.
So that's why I'm going back on my laptop -- I want to make sure that if I need to pull in a package in an emergency it should go fast and without issue. I also don't want to risk doing a -Syu and ending up with a borked system the morning of a talk.
It's pretty similar to some of the reasons one finds in this remarkably civilised thread: http://forums.debian.net/viewtopic.php?f=3&t=61004
Like a lot of the respondents, I have to agree that the Arch wiki is amazing. In contrast, I've taken to never using the debian guides since they feel horribly out of date (probably because I'm on testing), and may not be that well-written.
Interesting observation: Debian Testing starts (from grub menu to log in prompt) in 9-10 s (SSD), while a fresh Arch install with systemd takes 25s.
-- to here --
Anyway. I Installed debian again on my laptop hdd (using this post: http://verahill.blogspot.com.au/2013/03/361-installing-debian-on-usb-stick-from.html) and these are some of the first steps I went through:
0. What I installed in the chroot step
The basics:
sudo apt-get install locales sudo vim aide grub-pc linux-base linux-image-3.2.0-4-amd64 wicd-curses mutt mcabber elinks rcconf gnome firmware-atheros firmware-iwlwifi firmware-ralink firmware-realtek locate dkms openssh-server wicd-gtk screen less conky nautilus-open-terminal lm-sensors acpi gawk
I also used adduser to create the new user to get proper .profile and .bashrc generated.
Post-chroot:
1. Disable services
Run rcconf to disable network-manager, bluetooth, speech-dispatcher
Do
sudo service network-manager stop
if it's running or you won't be able to use it to configure wicd-curses
First time you run wicd-curses, make sure to set Preferences and pick the right interfaces. Note that wicd only handles one wired and one wireless interface. For anything a bit more challenging, use /etc/network/interfaces directly.
2. ssh, .gnupg, BankID, conky
SSH
Copy .ssh/id_[dr]sa and id_[dr]sa.pub from old installation to ~/.ssh on new installation. Make sure to
chmod 700 ~/.ssh
GPG
mkdir ~/.gnupg
chmod og-rwx ~/.gnupg -R
Copy gpa.conf, gpg.conf, pubring.gpg, pubring.kbx, random_seed, secring.gpg, trustdb.gpg
BankID
mkdir .personal
chmod 700 ~/.personal
copy ~/.personal/config/Personal.cfg and ~/.personal/store/*.npg
Conky
copy /etc/conky/conky.conf
3. apt-file and bash completion
sudo apt-get install apt-file bash-completion
sudo apt-file update
4. Data analysis
sudo apt-get install gnuplot octave maxima
5. Chemistry
sudo apt-get install gdis pymol povray bkchem avogadro
6. TeX
texmake texlive-science texlive-publishers texlive-bibtex-extra texlive-fonts-recommended latex-cjk-common latex-cjk-chinese
7. Internet/Network
sudo apt-get install chromium gajim filezilla flashplugin-nonfree
8. Misc
sudo apt-get install gnucash kate pdftk inkscape gimp keepassx sinfo saidar guake
9. multiarch
sudo dpkg --add-architecture i386
sudo apt-get update
10. GNOME
sudo apt-get install gnome-tweak-tool
Icons
mkdir ~/tmp/faenza -p
cd ~/tmp/faenza
wget https://faenza-icon-theme.googlecode.com/files/faenza-icon-theme_1.3.zip
unzip faenza-sources_1.3.tar.gz
sudo cp Faenza -R /usr/share/icons
frippery extensions
cd ~
wget http://intgat.tigress.co.uk/rmy/extensions/gnome-shell-frippery-0.4.1.tgz
tar xvf gnome-shell-frippery-0.4.1.tgz
Do alt+f2, r
then use gnome-tweak-tool
select e.g. bottom panel, move clock, applications menu.
Change default browser:
System/Details/Default Applications -> Chromium
autostart guake-- create ~/.config/autostart/guake.desktop
autostart conky -- create ~/.config/autostart/conky.desktop
[Desktop Entry]
Type=Application
Exec=conky
Hidden=false
X-GNOME-Autostart-enabled=true
Name=conky
Comment=conky
11. Dropbox
cd ~/Downloads
sudo apt-get install python-gpgme
wget https://linux.dropbox.com/packages/debian/dropbox_1.6.0_amd64.deb
sudo dpkg -i dropbox_1.6.0_amd64.deb
11. Truecrypt
cd ~/Downloads
wget http://www.truecrypt.org/download/truecrypt-7.1a-linux-x64.tar.gz
tar xvf truecrypt-7.1a-linux-x64.tar.gz
sudo sh truecrypt-7.1a-setup-x64
12. Keyboard
Go to keyboard in system setttings, click on the shortcuts tab.
Under Launchers, click on Explorer next to Home Folder so that it says New Accelerator...
Do shift+ctrl+left arrow
Do the same for web browser, with ctrl+shift+down arrow
Click on the plus (+), and set
Name: gnome terminal
Command: gnome-terminal
Click on Apply. Click on Disabled and set the shortcut to ctrl+shift+arrow up.
Do the same for gEdit, with ctrl+shift+arrow right.
Go to System settings, Region and Language. Click on the Layout tab, then on the Options button in the bottom right corner. Expand Compose Key Options. Tick Right+Alt.
13. BankID
See http://verahill.blogspot.com.au/2013/02/341-upgradinginstalling-bankid-on-64.html
12. Virtualbox
sudo apt-get install virtualbox virtualbox-dkms virtualbox-guest-dkms
14. Thunderbird
http://verahill.blogspot.com.au/2013/01/326-compiling-thunderbird-1702-on.html
Install the following addons: enigmail, lightning, provider for google calendar
Go to File, new, new calendar, and paste the ICAL string for google calendar
To look up the ical string, go to gmail in a web browser, click on calendar, select your calendar, click on the ICAL button for the private calendar.
15. Firefox
http://verahill.blogspot.com.au/2013/03/365-compile-firefox-19-on-debian.html
16. screenrc and vimrc
Add to /etc/vim/vimrc:
set number
set pastetoggle=<F3>
set spell
set wrap
Add to /etc/screenrc:
termcapinfo xterm|xterms|xs|rxvt ti@:te@
caption always "%{+b rk}%H%{gk} |%c %{yk}%d.%m.%Y | %72=Load: %l %{wk}"
hardstatus alwayslastline "%?%{yk}%-Lw%?%{wb}%n*%f %t%?(%u)%?%?%{yk}%+Lw%"
17. Skype
sudo apt-get install pulseaudio
Edit ~/.asoundrc:
pcm.!default.type pulse
ctl.!default.type pulse
Go to skype.com, download and get skype for debian 7.0 (multiarch)
sudo dpkg -i skype-debian_4.1.0.20-1_i386.deb
It will fail
sudo apt-get install -f
and now everything works.
18. wine
sudo apt-get install wine clamav
19. Tools for chroot
sudo apt-get install debootstrap x11-xserver-utils
http://verahill.blogspot.com.au/2013/01/316-briefly-automated-chrootsandbox.html
20. Tools for Kernel compile
21. Java support in browsers
Install the icedtea-plugin
22. Install apt-listbugs
If you're running testing you'll want to be aware of critical bugs before upgrading each time. Luckily apt-listbugs does that for you if installed -- it's run during each apt-get update if it is installed:
sudo apt-get install apt-listbugs
Links to this post:
http://schultkl.blogspot.fr/2013/06/configuring-debian-gnulinux-7-wheezy.html
I lasted 9 days with Arch linux on my laptop, and I have now switched it back to Debian. I've still got Arch on my 'household' computer that we use to watch TV on though -- it's a fine distro, just like debian is a fine distro -- but it's not suitable for the particular work I use my laptop for.
The reasons for switching back aren't that dramatic -- I use my laptop for work.
In particular, I use it to do
* (computationally) light work at home (editing papers, generating figures, analyzing data) and
* I use it to give seminar talks at other universities.
I got a bit frustrated with the number of packages I had to get via AUR, and even more frustrated over the quality of some of the PKGBUILDS. Not frustrated in a terribly bad way -- I appreciate the time and effort that some of the maintainers put it (e.g. gdis and gcc-gcj) -- but frustrated enough that I appreciate the quality and availability of the packages in the debian repos. I needed to sort out a few quick things before sending off a manuscript:
* generate a structure with avogadro, then generate a pov file in gdis, then render it in povray
* I also needed to extract a couple of pages from a pdf using pdftk and send them to a collaborator
That took all evening. Avogadro installs fine via the repos, as did povray. There's a small issue with upstreams version of povray 3.7 in that it doesn't create any conf file in ~/.povray/3.7/, and there's no actual help when running povray --help, but even worse was that it rendered incredibly slow. I've compiled 3.7 myself before and my experience using the Arch packages were very different in terms of performance.
I had some issues with building gdis using the AUR PKGBUILD (the maintainer was extremely responsive to feedback and kudos to him/her), and that added an extra 20-30 minutes.
There are two AUR pdftk versions -- I first tried pdftk, which relies on gcc-gcj which is another AUR package. gcc-gcj wouldn't build, but someone beat me to submitting feedback. Again, the maintainer of gcc-gcj is extremely responsive and the issue has already been resolved, less than a day after reporting it.
I ended up giving and installing pdftk-bin and it's dependency (a re-tooled debian package!) which went fine.
All this is really in line with the stated nature of Arch - Arch is bleeding edge and will give you the newest, shiniest stuff. Debian is focused on stability and reliability (all your bugs will remain constant) but offers a middle-ground between Arch and Debian Stable in Debian Testing. And while the shiniest, newest stuff is what I'm looking for in a household computer or a desktop box, I need to go for reliability on my work computer.
So that's why I'm going back on my laptop -- I want to make sure that if I need to pull in a package in an emergency it should go fast and without issue. I also don't want to risk doing a -Syu and ending up with a borked system the morning of a talk.
It's pretty similar to some of the reasons one finds in this remarkably civilised thread: http://forums.debian.net/viewtopic.php?f=3&t=61004
Like a lot of the respondents, I have to agree that the Arch wiki is amazing. In contrast, I've taken to never using the debian guides since they feel horribly out of date (probably because I'm on testing), and may not be that well-written.
Interesting observation: Debian Testing starts (from grub menu to log in prompt) in 9-10 s (SSD), while a fresh Arch install with systemd takes 25s.
-- to here --
Anyway. I Installed debian again on my laptop hdd (using this post: http://verahill.blogspot.com.au/2013/03/361-installing-debian-on-usb-stick-from.html) and these are some of the first steps I went through:
0. What I installed in the chroot step
The basics:
sudo apt-get install locales sudo vim aide grub-pc linux-base linux-image-3.2.0-4-amd64 wicd-curses mutt mcabber elinks rcconf gnome firmware-atheros firmware-iwlwifi firmware-ralink firmware-realtek locate dkms openssh-server wicd-gtk screen less conky nautilus-open-terminal lm-sensors acpi gawk
I also used adduser to create the new user to get proper .profile and .bashrc generated.
Post-chroot:
1. Disable services
Run rcconf to disable network-manager, bluetooth, speech-dispatcher
Do
sudo service network-manager stop
if it's running or you won't be able to use it to configure wicd-curses
First time you run wicd-curses, make sure to set Preferences and pick the right interfaces. Note that wicd only handles one wired and one wireless interface. For anything a bit more challenging, use /etc/network/interfaces directly.
2. ssh, .gnupg, BankID, conky
SSH
Copy .ssh/id_[dr]sa and id_[dr]sa.pub from old installation to ~/.ssh on new installation. Make sure to
chmod 700 ~/.ssh
GPG
mkdir ~/.gnupg
chmod og-rwx ~/.gnupg -R
Copy gpa.conf, gpg.conf, pubring.gpg, pubring.kbx, random_seed, secring.gpg, trustdb.gpg
BankID
mkdir .personal
chmod 700 ~/.personal
copy ~/.personal/config/Personal.cfg and ~/.personal/store/*.npg
Conky
copy /etc/conky/conky.conf
3. apt-file and bash completion
sudo apt-get install apt-file bash-completion
sudo apt-file update
4. Data analysis
sudo apt-get install gnuplot octave maxima
5. Chemistry
sudo apt-get install gdis pymol povray bkchem avogadro
6. TeX
texmake texlive-science texlive-publishers texlive-bibtex-extra texlive-fonts-recommended latex-cjk-common latex-cjk-chinese
7. Internet/Network
sudo apt-get install chromium gajim filezilla flashplugin-nonfree
8. Misc
sudo apt-get install gnucash kate pdftk inkscape gimp keepassx sinfo saidar guake
9. multiarch
sudo dpkg --add-architecture i386
sudo apt-get update
10. GNOME
sudo apt-get install gnome-tweak-tool
Icons
mkdir ~/tmp/faenza -p
cd ~/tmp/faenza
wget https://faenza-icon-theme.googlecode.com/files/faenza-icon-theme_1.3.zip
unzip faenza-sources_1.3.tar.gz
sudo cp Faenza -R /usr/share/icons
frippery extensions
cd ~
wget http://intgat.tigress.co.uk/rmy/extensions/gnome-shell-frippery-0.4.1.tgz
tar xvf gnome-shell-frippery-0.4.1.tgz
Do alt+f2, r
then use gnome-tweak-tool
select e.g. bottom panel, move clock, applications menu.
Change default browser:
System/Details/Default Applications -> Chromium
autostart guake-- create ~/.config/autostart/guake.desktop
[Desktop Entry]
Type=Application
Exec=/usr/bin/guake
Hidden=false
X-GNOME-Autostart-enabled=true
Name=guake
Comment=guake
Start guake in gnome, open preferences, and disable "Enable popup notification on startup"
autostart conky -- create ~/.config/autostart/conky.desktop
[Desktop Entry]
Type=Application
Exec=conky
Hidden=false
X-GNOME-Autostart-enabled=true
Name=conky
Comment=conky
11. Dropbox
cd ~/Downloads
sudo apt-get install python-gpgme
wget https://linux.dropbox.com/packages/debian/dropbox_1.6.0_amd64.deb
sudo dpkg -i dropbox_1.6.0_amd64.deb
11. Truecrypt
cd ~/Downloads
wget http://www.truecrypt.org/download/truecrypt-7.1a-linux-x64.tar.gz
tar xvf truecrypt-7.1a-linux-x64.tar.gz
sudo sh truecrypt-7.1a-setup-x64
12. Keyboard
Go to keyboard in system setttings, click on the shortcuts tab.
Under Launchers, click on Explorer next to Home Folder so that it says New Accelerator...
Do shift+ctrl+left arrow
Do the same for web browser, with ctrl+shift+down arrow
Click on the plus (+), and set
Name: gnome terminal
Command: gnome-terminal
Click on Apply. Click on Disabled and set the shortcut to ctrl+shift+arrow up.
Do the same for gEdit, with ctrl+shift+arrow right.
Go to System settings, Region and Language. Click on the Layout tab, then on the Options button in the bottom right corner. Expand Compose Key Options. Tick Right+Alt.
13. BankID
See http://verahill.blogspot.com.au/2013/02/341-upgradinginstalling-bankid-on-64.html
12. Virtualbox
sudo apt-get install virtualbox virtualbox-dkms virtualbox-guest-dkms
14. Thunderbird
http://verahill.blogspot.com.au/2013/01/326-compiling-thunderbird-1702-on.html
Install the following addons: enigmail, lightning, provider for google calendar
Go to File, new, new calendar, and paste the ICAL string for google calendar
To look up the ical string, go to gmail in a web browser, click on calendar, select your calendar, click on the ICAL button for the private calendar.
15. Firefox
http://verahill.blogspot.com.au/2013/03/365-compile-firefox-19-on-debian.html
16. screenrc and vimrc
Add to /etc/vim/vimrc:
set number
set pastetoggle=<F3>
set spell
set wrap
Add to /etc/screenrc:
termcapinfo xterm|xterms|xs|rxvt ti@:te@
caption always "%{+b rk}%H%{gk} |%c %{yk}%d.%m.%Y | %72=Load: %l %{wk}"
hardstatus alwayslastline "%?%{yk}%-Lw%?%{wb}%n*%f %t%?(%u)%?%?%{yk}%+Lw%"
17. Skype
sudo apt-get install pulseaudio
Edit ~/.asoundrc:
pcm.!default.type pulse
ctl.!default.type pulse
Go to skype.com, download and get skype for debian 7.0 (multiarch)
sudo dpkg -i skype-debian_4.1.0.20-1_i386.deb
It will fail
sudo apt-get install -f
and now everything works.
18. wine
sudo apt-get install wine clamav
19. Tools for chroot
sudo apt-get install debootstrap x11-xserver-utils
http://verahill.blogspot.com.au/2013/01/316-briefly-automated-chrootsandbox.html
20. Tools for Kernel compile
sudo apt-get install kernel-package fakeroot build-essential ncurses-binhttp://verahill.blogspot.com.au/2013/02/342-compiling-kernel-38-on-debian.html
21. Java support in browsers
Install the icedtea-plugin
22. Install apt-listbugs
If you're running testing you'll want to be aware of critical bugs before upgrading each time. Luckily apt-listbugs does that for you if installed -- it's run during each apt-get update if it is installed:
sudo apt-get install apt-listbugs
Links to this post:
http://schultkl.blogspot.fr/2013/06/configuring-debian-gnulinux-7-wheezy.html
366. nspluginwrapper on debian testing/wheezy
I only recently realised that nspluginwrapper wasn't in the debian wheezy/testing repos -- and it is absolutely necessary if you want to get BankID to work (here and here).
The easiest way to install nspluginwrapper in debian is to enable the stable repos. E.g. on my wheezy laptop I have the following /etc/apt/sources.list:
If that still makes you nervous, the second easiest option is simply to compile nspluginwrapper yourself. It's complicated a little bit by bug 682678.
Error 1:
make fails with complaints about
It's fixed by installig libc6-dev-i386
Error 2:
make fails with a message about
It's fixed by installing g++-multilib
The easiest way to install nspluginwrapper in debian is to enable the stable repos. E.g. on my wheezy laptop I have the following /etc/apt/sources.list:
deb http://ftp.au.debian.org/debian/ wheezy main contrib non-freeWhile normally you shouldn't mix different repos without some pretty strict apt-pinning policies, this works since apt automatically pulls in the newest version of each package -- and that'd be the package in wheezy which is the distro I'm using.
deb http://ftp.au.debian.org/debian/ squeeze main contrib non-free
If that still makes you nervous, the second easiest option is simply to compile nspluginwrapper yourself. It's complicated a little bit by bug 682678.
sudo apt-get install libc6-dev-i386 g++-multilib checkinstall libglib2.0-dev build-essential libgtk2.0-dev libcurl4-gnutls-dev libxt-dev
mkdir ~/tmp
cd ~/tmp
wget http://nspluginwrapper.org/download/nspluginwrapper-1.4.4.tar.gz
tar xvf nspluginwrapper-1.4.4.tar.gz
cd nspluginwrapper-1.4.4/
./configure
make
sudo checkinstall
Error 1:
make fails with complaints about
/usr/include/features.h -> bits/predefs.h
It's fixed by installig libc6-dev-i386
Error 2:
make fails with a message about
skipping incompatible libsupc++.a
It's fixed by installing g++-multilib
365. Compile firefox 19 on Debian Testing/Wheezy
There are issues with the official firefox binary since it's a 32 bit build and Wheezy isn't handling multiarch properly yet (plenty of conflicts between 32 and 64 bit packages)
So here's how to build a proper 64 bit firefox 19 on debian testing:
Start by running firefox19 from the terminal.
So here's how to build a proper 64 bit firefox 19 on debian testing:
sudo apt-get install bzip2 build-essential python zip unzip pkg-config libgtk2.0-dev gconf2 libdbus-1-dev libdbus-glib-1-dev yasm libasound2-dev libcurl4-gnutls-dev libxt-dev mesa-common-dev
mkdir ~/tmp/firefox -p
cd ~/tmp/firefox
wget ftp://ftp.mozilla.org/pub/firefox/releases/19.0.2/source/firefox-19.0.2.source.tar.bz2
rm mozilla-release -rf
tar xvf firefox-19.0.2.source.tar.bz2
mkdir buildfirefox19/
cd buildfirefox19/
../mozilla-release/./configure --prefix=$HOME/.firefox19
make
make install
echo "alias firefox19='$HOME/.firefox19/bin/firefox'" >> $HOME/.bashrc
source $HOME/.bashrc
Start by running firefox19 from the terminal.
20 March 2013
364. Setting up a new user on a ROCKS cluster
Because I keep forgetting about the rocks sync command...
From https://groups.google.com/forum/?fromgroups=#!topic/rocks-clusters/P6tvn_2Gk5Y
To add a new user to a ROCKS cluster and let them use Sun Grid Engine, do the following
where compchem is a usergroup I've set up to give everyone access to the executables they need.
The first login, using su above, creates the .ssh directory and rsa/dsa keys.
Finally, to force the user to change their password on first login, do
From https://groups.google.com/forum/?fromgroups=#!topic/rocks-clusters/P6tvn_2Gk5Y
To add a new user to a ROCKS cluster and let them use Sun Grid Engine, do the following
sudo useradd -m verahill sudo passwd verahill su verahill exit sudo usermod -a -G compchem verahill rocks sync users qconf -auser verahill1 name verahill 2 oticket 0 3 fshare 0 4 delete_time 0 5 default_project NONE
where compchem is a usergroup I've set up to give everyone access to the executables they need.
The first login, using su above, creates the .ssh directory and rsa/dsa keys.
Finally, to force the user to change their password on first login, do
chage -d 0 verahill
19 March 2013
363. Generating an image in PyMol
For some reason I needed to quickly generate a publication quality figure of a protein.
Deep View (SWiss PDB viewer) isn't available for linux anymore, and the old versions rely on 32 bit libs (which is increasingly a headache on debian). Rasmol is a classic, but I haven't used it properly since 1997 -- and all attempts at exporting png, jpg etc. failed on my debian wheezy box.
Jmol is awesome, and while I managed to make some pretty convincing figures I never quite got to where I wanted.
So I tried pymol
Pymol, like rasmol and jmol, has a visual interface which can be controlled via an integrated terminal. The learning curve is steep, but it's quick and easy to make figures once you've got the basics.
Install pymol from the repos in debian:
sudo apt-get install pymol
(on Archlinux you can get it via AUR -- you'll need to install python-pmw first)
Download 1SU4.pdb from here http://www.rcsb.org/pdb/explore.do?structureId=1su4
In the directory where your pdb file is, do
pymol 1SU4.pdb
 select helices, chain A


 select calcium, (res 995-996)
show spheres, calcium
Note that 'helices' and 'calcium' are just handles or aliases that I made up.

alter calcium, vdw=5
show spheres, calcium

color purple calcium
bg_color white

set antialias=1
set sphere_mode=5
where sphere_mode 5 means shading.

ray 1000,1000
save 1SU4.png

And here's the final figure:

Deep View (SWiss PDB viewer) isn't available for linux anymore, and the old versions rely on 32 bit libs (which is increasingly a headache on debian). Rasmol is a classic, but I haven't used it properly since 1997 -- and all attempts at exporting png, jpg etc. failed on my debian wheezy box.
Jmol is awesome, and while I managed to make some pretty convincing figures I never quite got to where I wanted.
So I tried pymol
Pymol, like rasmol and jmol, has a visual interface which can be controlled via an integrated terminal. The learning curve is steep, but it's quick and easy to make figures once you've got the basics.
Install pymol from the repos in debian:
sudo apt-get install pymol
(on Archlinux you can get it via AUR -- you'll need to install python-pmw first)
Download 1SU4.pdb from here http://www.rcsb.org/pdb/explore.do?structureId=1su4
In the directory where your pdb file is, do
pymol 1SU4.pdb


Click on the A(ction) by (helices), select preset/publication.


show spheres, calcium
Note that 'helices' and 'calcium' are just handles or aliases that I made up.

alter calcium, vdw=5
show spheres, calcium

color purple calcium
bg_color white

set antialias=1
set sphere_mode=5
where sphere_mode 5 means shading.

ray 1000,1000
save 1SU4.png

And here's the final figure:

18 March 2013
362. Sun Grid Engine: Limit number of running jobs for a user
I don't like copying a post verbatim, but I also want to make sure that I keep track of what I do on my shared cluster, and that I don't forget how to set user based job limits.
Andi Broka made an excellent post at https://lists.sdsc.edu/pipermail/npaci-rocks-discussion/2010-November/049905.html in which two methods were shown (see below).
Resource quota management in general is covered here these days: http://docs.oracle.com/cd/E19957-01/820-0698/gehwk/index.html
1. Number of running jobs: limit for ALL users
Modify the scheduler configuration:
The m in -msconf stands for modify, conf stands for configuration, and the s stands for scheduler.
2. Number of running jobs: limit for a particular user
Modify the resource quota set(s):
Again, the -m is for modify, and rqs is for resource quota set(s).
Note that slots are the number of processes and not nodes -- 40 slots allows me to use five 8-core nodes.
Andi Broka made an excellent post at https://lists.sdsc.edu/pipermail/npaci-rocks-discussion/2010-November/049905.html in which two methods were shown (see below).
Resource quota management in general is covered here these days: http://docs.oracle.com/cd/E19957-01/820-0698/gehwk/index.html
1. Number of running jobs: limit for ALL users
Modify the scheduler configuration:
qconf -msconfChange maxujobs from 0 (unlimited) to a suitable value.2 schedule_interval 0:0:15 3 maxujobs 0 4 queue_sort_method load
The m in -msconf stands for modify, conf stands for configuration, and the s stands for scheduler.
2. Number of running jobs: limit for a particular user
Modify the resource quota set(s):
qconf -mrqs1 { 2 name verahill 3 description "specific limitations for user verahill" 4 enabled TRUE 5 limit users verahill to slots=40 6 }
Again, the -m is for modify, and rqs is for resource quota set(s).
Note that slots are the number of processes and not nodes -- 40 slots allows me to use five 8-core nodes.
17 March 2013
361. Installing Debian on a USB stick (from a running Debian system)
Post 70 (Installing Debian on a USB stick -- live usb vs a true and full installation) is receiving a lot of traffic. While the method of installing debian used there -- using virtualbox -- works, it is slow and unnecessarily complex.
A better, faster and easier way is to use a chroot. Sure, it's a bit more command line oriented, but that doesn't necessarily make it harder.
You'll need an empty USB stick. Some sticks are faster than others, but they are all slower than spinning disks, and a lot slower than SSDs (never tried a USB3 stick though).
1. Prepare the USB stick
Attach the USB stick to a computer with Debian. Find out what device it is (do ls /dev/sd* before and after attaching the stick, and if it automounts, you can also check the output of df -h). In this case we'll assume that it's /dev/sdb.
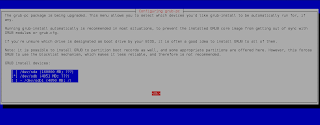
It really is that simple to set up the partition table. o wipes the previous table, n creates a new partition, and a makes it bootable. w writes the changes. Now prepare the file system:
Note that you can change between i386 and amd64, testing and stable and different mirrors, by editing the debootstrap line below. I'd recommend i386 since it will run on 64 bit machines as well, which is useful if you're traveling.
3. Basic setup
Edit the sources.list line as needed. The key is to enable non-free so you can install all the non-free firmware so that youre prepared for most types of hardware.
If you're going to travel with this, you may want to install AIDE to make sure that you're executables haven't been changed (you can also use tripwire). Of course, if anyone has the ability to regenerate the database, then this won't help you.
You will have to wait with generating the database until you're properly booted from the USB stick.
4. Make the usbstick bootable
Make sure to install grub to /dev/sdb so that you don't mess up your desktop.
You need to set up your /etc/fstab:
Edit /etc/fstab (your UUID will vary):
Run
At this point you've used ca 559 Mb.
5. Installing command line tools
The following installs a curses-based network connection manager, a mail program, a chat program and a browser. All of them work in the terminal:

You've now used ca 670 Mb.
To set up Mutt and Mcabber, see here: http://verahill.blogspot.com.au/2011/12/configuring-mutt-for-two-imap-accounts.html
http://verahill.blogspot.com.au/2011/12/linux-basics-google-talk-using-gajim-or.html
6. Installing a desktop
This is luckily very easy. The bad thing is that USB sticks are very slow, so starting a heavy desktop from a USB stick is going to lead to long boot times.
To install gnome (2340 Mb) do
To install lxde (523 Mb) do
and to install xfce (457 Mb) do
We installed rcconf to prevent network-manager to start if it has been installed:
Run
To reduce boot times, edit /etc/default/grub and change to
You will now have to start whatever desktop you installed manually by running
from the command line i.e. you only start the desktop if you really need it.
Clean your cache to free up some space:
With xfce4 and cleaning, you've now used a total of 951 Mb.
7. Pull in some extra firmware
In case you'll be using this usb stick on random computers you might want to pull in as many different firmware as you can stomach:
And so on.
You might also want to install programs such as clamav , but that's your business.
8. Unmounting your usbstick
Once you've installed everything you need:
Now you should be able to boot from the USB stick on any computer that supports boot from USB -- and that would be most boxes made in the past five years or so.
Done.
Note that you can generate initramfs manually in debian using
where VER e.g. 3.8.0 or 3.2.0-4-amd64 -- the name should be consistent with the vmlinuz, config and system.map suffixes.
Links to this post:
http://atomowki.net/dokuwiki/doku.php
http://andrewgudgel.com/cl-debian-usb.htm
A better, faster and easier way is to use a chroot. Sure, it's a bit more command line oriented, but that doesn't necessarily make it harder.
You'll need an empty USB stick. Some sticks are faster than others, but they are all slower than spinning disks, and a lot slower than SSDs (never tried a USB3 stick though).
1. Prepare the USB stick
Attach the USB stick to a computer with Debian. Find out what device it is (do ls /dev/sd* before and after attaching the stick, and if it automounts, you can also check the output of df -h). In this case we'll assume that it's /dev/sdb.
sudo apt-get install util-linux e2fsprogs
sudo umount /dev/sdb*
sudo fdisk /dev/sdb
Command (m for help): o
Building a new DOS disklabel with disk identifier 0x209d6329.
Changes will remain in memory only, until you decide to write them.
After that, of course, the previous content won't be recoverable.

Warning: invalid flag 0x0000 of partition table 4 will be corrected by w(rite)

Command (m for help): p

Disk /dev/sdb: 4051 MB, 4051697664 bytes
125 heads, 62 sectors/track, 1021 cylinders, total 7913472 sectors
Units = sectors of 1 * 512 = 512 bytes
Sector size (logical/physical): 512 bytes / 512 bytes
I/O size (minimum/optimal): 512 bytes / 512 bytes
Disk identifier: 0x209d6329

   Device Boot      Start         End      Blocks   Id  System

Command (m for help): n
Partition type:
   p   primary (0 primary, 0 extended, 4 free)
   e   extended
Select (default p):
Using default response p
Partition number (1-4, default 1):
Using default value 1
First sector (2048-7913471, default 2048):
Using default value 2048
Last sector, +sectors or +size{K,M,G} (2048-7913471, default 7913471):
Using default value 7913471

Command (m for help): a
Partition number (1-4): 1

Command (m for help): w
The partition table has been altered!

Calling ioctl() to re-read partition table.
Syncing disks.
It really is that simple to set up the partition table. o wipes the previous table, n creates a new partition, and a makes it bootable. w writes the changes. Now prepare the file system:
sudo mkfs.ext4 /dev/sdb12. Mount and bootstrap the USB stickmke2fs 1.42.5 (29-Jul-2012) Filesystem label= OS type: Linux Block size=4096 (log=2) Fragment size=4096 (log=2) Stride=0 blocks, Stripe width=0 blocks 247504 inodes, 988928 blocks 49446 blocks (5.00%) reserved for the super user First data block=0 Maximum filesystem blocks=1015021568 31 block groups 32768 blocks per group, 32768 fragments per group 7984 inodes per group Superblock backups stored on blocks: 32768, 98304, 163840, 229376, 294912, 819200, 884736 Allocating group tables: done Writing inode tables: done Creating journal (16384 blocks): done Writing superblocks and filesystem accounting information: done
Note that you can change between i386 and amd64, testing and stable and different mirrors, by editing the debootstrap line below. I'd recommend i386 since it will run on 64 bit machines as well, which is useful if you're traveling.
sudo apt-get install debootstrap coreutils mkdir ~/tmp/usbstick -p sudo mount /dev/sdb1 ~/tmp/usbstick sudo debootstrap --arch i386 testing $HOME/tmp/usbstick http://ftp.au.debian.org/debian/I: Retrieving InRelease I: Checking Release signature I: Valid Release signature (key id 9FED2BCBDCD29CDF762678CBAED4B06F473041FA) I: Retrieving Packages [..] I: Configuring tasksel... I: Configuring tasksel-data... I: Base system installed successfully.
sudo mount -t proc none $HOME/tmp/usbstick/proc
sudo mount --bind /sys $HOME/tmp/usbstick/sys
sudo mount --bind /dev $HOME/tmp/usbstick/dev
sudo cp /etc/resolv.conf $HOME/tmp/usbstick/resolv.conf
sudo chroot $HOME/tmp/usbstick/
3. Basic setup
Edit the sources.list line as needed. The key is to enable non-free so you can install all the non-free firmware so that youre prepared for most types of hardware.
rm /etc/apt/sources.list
echo 'deb  http://ftp.au.debian.org/debian/ testing main contrib non-free' >> /etc/apt/sources.list
apt-get update
apt-get install locales sudo vim
echo 'export LC_ALL="C"'>>/etc/bash.bashrc
echo 'export LANG="C"'>>/etc/bash.bashrc
echo '127.0.0.1 usbstick >> /etc/hosts'
source /etc/bash.bashrc
useradd -m traveller
passwd traveller
usermod -G sudo -a traveller
If you're going to travel with this, you may want to install AIDE to make sure that you're executables haven't been changed (you can also use tripwire). Of course, if anyone has the ability to regenerate the database, then this won't help you.
apt-get install aide
You will have to wait with generating the database until you're properly booted from the USB stick.
4. Make the usbstick bootable
Make sure to install grub to /dev/sdb so that you don't mess up your desktop.
grep -v rootfs /proc/mounts > /etc/mtab
sudo apt-get install grub-pc linux-base linux-image-3.2.0-4-686-pae

You need to set up your /etc/fstab:
blkid /dev/sdb1 -o export|head -n 1 > /etc/fstab
Edit /etc/fstab (your UUID will vary):
UUID=24056f3d-d0c5-4297-adc4-40b2d2007412 / ext4 errors=remount-ro,user_xattr 0 1
Run
update-grubGenerating grub.cfg ... Found linux image: /boot/vmlinuz-3.2.0-4-686-pae Found initrd image: /boot/initrd.img-3.2.0-4-686-pae done
At this point you've used ca 559 Mb.
5. Installing command line tools
The following installs a curses-based network connection manager, a mail program, a chat program and a browser. All of them work in the terminal:
sudo apt-get install wicd-curses mutt mcabber elinks rcconf

You've now used ca 670 Mb.
To set up Mutt and Mcabber, see here: http://verahill.blogspot.com.au/2011/12/configuring-mutt-for-two-imap-accounts.html
http://verahill.blogspot.com.au/2011/12/linux-basics-google-talk-using-gajim-or.html
6. Installing a desktop
This is luckily very easy. The bad thing is that USB sticks are very slow, so starting a heavy desktop from a USB stick is going to lead to long boot times.
To install gnome (2340 Mb) do
sudo apt-get install gnome rcconf
To install lxde (523 Mb) do
sudo apt-get install lxde rcconf
and to install xfce (457 Mb) do
sudo apt-get install xfce4 rcconf
We installed rcconf to prevent network-manager to start if it has been installed:
Run
rcconfAnd unstar whatever you don't want to launch at boot.
To reduce boot times, edit /etc/default/grub and change to
RunGRUB_CMDLINE_LINUX_DEFAULT="quiet text"
update-grub
You will now have to start whatever desktop you installed manually by running
startx
from the command line i.e. you only start the desktop if you really need it.
Clean your cache to free up some space:
apt-get clean
With xfce4 and cleaning, you've now used a total of 951 Mb.
7. Pull in some extra firmware
In case you'll be using this usb stick on random computers you might want to pull in as many different firmware as you can stomach:
apt-get install firmware-atheros firmware-iwlwifi firmware-ralink firmware-realtek
And so on.
You might also want to install programs such as clamav , but that's your business.
8. Unmounting your usbstick
Once you've installed everything you need:
exit
sudo umount $HOME/tmp/usbstick/sys
sudo umount $HOME/tmp/usbstick/dev
sudo umount $HOME/tmp/usbstick/proc
sudo umount $HOME/tmp/usbstick/
Now you should be able to boot from the USB stick on any computer that supports boot from USB -- and that would be most boxes made in the past five years or so.
Done.
Note that you can generate initramfs manually in debian using
sudo mkinitramfs -o /boot/initrd.img-VER -v VER
where VER e.g. 3.8.0 or 3.2.0-4-amd64 -- the name should be consistent with the vmlinuz, config and system.map suffixes.
Links to this post:
http://atomowki.net/dokuwiki/doku.php
http://andrewgudgel.com/cl-debian-usb.htm
16 March 2013
360. Screenshots from a desktop based Scientific Linux installation
This is a pretty basic post, but linux users span a wide range of skill levels.
I was originally planning to do post 359 via a chroot in Scientific Linux, but decided that doing it via Debian was..well..more convenient (the approach can easily be translated to any distro which has yum, and that includes e.g. Arch, in addition to the obvious suspects)
Anyway, as part of all that I decided to grab some screenshots of the installation process, and since I have them I might as well share them. I did this in virtualbox since I was originally planning on testing out the whole thing there before going to physical hardware.
So, here's Scientific Linux. The easiest approach is just to get whole dvd:
Launch the installation:


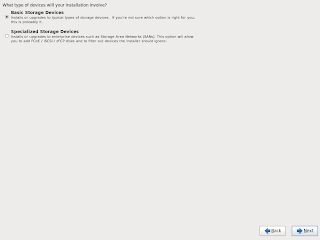


 Once the installation finishes, restart/


 Click on the network icon in the top right corner, and then click on the desired network interface.
Open a terminal and do yum upgrade.

I was originally planning to do post 359 via a chroot in Scientific Linux, but decided that doing it via Debian was..well..more convenient (the approach can easily be translated to any distro which has yum, and that includes e.g. Arch, in addition to the obvious suspects)
Anyway, as part of all that I decided to grab some screenshots of the installation process, and since I have them I might as well share them. I did this in virtualbox since I was originally planning on testing out the whole thing there before going to physical hardware.
So, here's Scientific Linux. The easiest approach is just to get whole dvd:
wget http://ftp1.scientificlinux.org/linux/scientific/6.3/x86_64/iso/SL-63-x86_64-2012-08-02-Install-DVD.iso
Launch the installation:


Open a terminal and do yum upgrade.

Subscribe to:
Posts (Atom)