03 August 2016

631. Small linux installation in virtualbox on windows for formchk usage

This post is for windows users (it's written for a colleague).

In https://verahill.blogspot.com.au/2016/08/630-making-mo-figures-in-gabedit-using.html I mentioned that g09w doesn't seem to handle my .chk files for linux (G09D).

If you have gaussian for linux (e.g. G09D), then you can set up a small linux installation on windows, install gaussian there and run formchk in the linux environment.

The guide assumes that you don't really know much about linux, or virtual machines. There are plenty of screenshot -- probably too many -- but if you work through them one by one it should be easy to get set up.


1. Install virtualbox
Go to https://www.virtualbox.org/wiki/Downloads

Download "VirtualBox 5.1.2 for Windows hosts"

Download the "VirtualBox 5.1.2 Oracle VM VirtualBox Extension Pack" as well.

It doesn't have to be version 5.1.2. Download whatever the latest version is.

Run the installation file for virtual box.


2. Install linux in the virtual machine
Assuming that you have cheap and fast internet, download the netinst version of debian.
https://www.debian.org/CD/netinst/

You'll want the AMD64 iso file: http://cdimage.debian.org/debian-cd/8.5.0/amd64/iso-cd/debian-8.5.0-amd64-netinst.iso

You can also download this via bittorrent: http://cdimage.debian.org/debian-cd/8.5.0/amd64/bt-cd/debian-8.5.0-amd64-netinst.iso.torrent

Start virtualbox and set up a new machine.


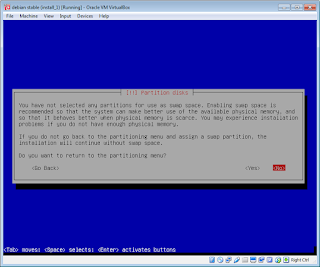
Then install linux: Note that at no point are any changes made to your Windows harddrive. All changes are made to a file that virtualbox uses as a harddrive for the virtual machine (i.e. your linux installation)


NO changes are made to your 'real' harddrive, so don't panic.


3. Install gaussian in the linux virtual machine
For this you will need to figure out how to transfer files between the machines. The easiest, most dependable way is via sftp.

To do this you will need to download and install filezilla: https://filezilla-project.org/download.php?type=client
Do that. It's easy.

Next, configure your virtual machine to set up port forwarding.

Start your linux installation (e.g. hit the Start button in VirtualBox)
First figure out what your IP address is. Log in using the username and password you created when you installed linux.

 Then type ip addr
ip addr
The output you're looking for is the ip address for interface eth0 -- look for the value after inet, i.e. 10.0.2.15

Next configure virtualbox: (leave linux running in the background)


Now start Filezilla:
 You want to connect to sftp:/127.0.0.1 and port 2222. Use the username and password you set up for linux.
Hit connect

Sure
Yes

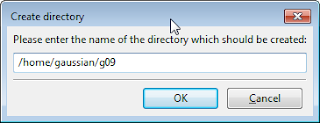
Create a new directory on the linux computer


It should now look like this (look at the right column)

Transfer your files (navigate to the correct directory in the left column, select files and drag them across)
Select and drag
We're only copying formchk here. That's all we need.
Copied
 In the linux computer, change to the correct directory e.g.
cd ~/g09

Then run
chmod ug+x formchk

Check


4. Transfer .chk files from windows host to linux guest

You'll transfer the files using filezilla as shown before. Connect to sftp://127.0.0.1, port 2222, and go to the g09 directory where your formchk file is.

Like so


5. Convert .chk files to .fchk files
In the linux computer, change directory to g09 and run formchk
./formchk example.chk
4. Transfer .chk files from windows host to linux guestThe ./ before formchk is important

running formchk


Then transfer the file back using filezilla:

refresh


See the files


6. Shutdown linux
E.g. by running
sudo shutdown -h now

shutdown

All in all the linux install takes about 1.1 Gb -- this could probably be cut down to 100-200 Mb, and the set up can be improved quite easily. However, this is the most straightforward set-up that I can think of without having to do customisation.

+1.1 Gb


630. Making MO figures in gabedit using fchk files from gaussian on Windows XP

The goal is to show how to make pretty figures of MOs from Gaussian computations using GabEdit.

This is a write-up for a colleague whom is using Windows. The GabEdit bits work pretty much the same way on linux, although the povray stuff is a lot easier (in my opinion anyway) on that OS.

Anyway, Windows it is.


A. Optional: Install Gaussian (G09W)
If you have G09W you can install it. To use the formchk utility, add the location of your gaussian installation to path.

Do this by right-clicking on My Computer, select the Advanced tab, click on Environment Variables, and then click on the Path entry under System Variables. Click Edit, and add
;c:\g09w
if that's the correct path for you. The ";" is just to separate your entry from the previous one. If you need to add another entry afterwards (e.g. for povray), put a ";" after c:\g09w


Either way it's optional, as you will likely have access to formchk on the same computer/system that you ran your job on and can do the chk -> fchk conversion there.

Also, using formchk on a windows computer on a .chk file from a linux computer might not work (which was my case)

An alternative is to set up a smallish linux VM: https://verahill.blogspot.com.au/2016/08/631-small-linux-installation-in.html


B. Optional: Add option to open terminal using mouse
Following this: https://stackoverflow.com/questions/378319/windows-explorer-command-prompt-here/379804

Create a plain text file called context.reg


Edit it and put the following in it:

Windows Registry Editor Version 5.00
[HKEY_LOCAL_MACHINE\SOFTWARE\Classes\Folder\shell\cmd]
@="Open Command Prompt Here"
[HKEY_LOCAL_MACHINE\SOFTWARE\Classes\Folder\shell\cmd\command]@="cmd.exe /k pushd %L"

Like so...
Run it (i.e. double-click):
Yes!
You will now have an "Open Command Prompt Here" option when right-clicking on a folder in the file explorer.
Open terminal here
Why do this? Because it makes it easier to run either formchk or povray in the directory where you have your files.


C. Install gabedit
Got to https://sites.google.com/site/allouchear/Home/gabedit/download and get "The Gabedit installer for Windows (OpenGL)"

Run. It's that easy.

When running gabedit for the first time you may be asked lots of questions. You can probably just accept all the defaults. We'll change some of them below.

D. Install povray
Download http://www.povray.org/redirect/www.povray.org/ftp/pub/povray/Official/povwin-3.7-agpl3-setup.exe and also accept to install the editor dlls at the end of the installation.
Download povray
Once that's done, add povray to path. Go to My Computer, right-click, click on the Advanced tab, select Environment Variables, click on path under System Variables and then Edit. Add
;C:\Program Files\POV-Ray\v3.7\bin

Like So


Let's get going!

1. Optional: Convert chk to fchk using formchk
Didn't work for me, but you can always try (I convert the files under linux)

Either way, you must have the fchk file before going to gabedit


2. Open fchk file in gabedit
You need to do a bit of setting up:

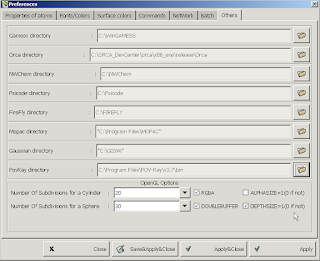
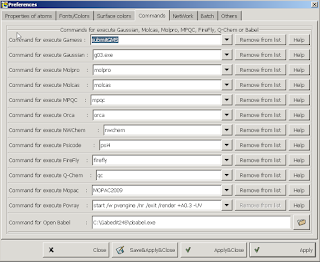
Set path and command for povray


To look at the fchk file:
a) Go to Display
Display Geometry/Orbitals/Density/Vibration


b) unset dipole (because otherwise you'll have an annoying arrow in your figure)
Untick dipole

c) Set desired atom colours.
In particular, I change N from dark blue to light blue so that it doesn't interfere with the orbital colours.
Atom colour

d) Set backgrounds (povray and screen) to white
Povray background

Window background


e) load fchk file
Go to Orbitals/Gaussian fchk


Open your fchk file


f) Set ball/stick parameters
Set Ball and Stick parameters
Apply

g) select level/MO
Note that you get the alpha OR beta orbitals. For a spin restricted system these are the same (apart from signage)

You should edit number of points. 65 is the default. 80 is slow but manageable. 90 is pushing it. Higher = smoother.

Computing...

"Get Isovalue" almost never works properly. Try 0.04-0.06.

Et voilá!
To select a different MO, go back to orbitals and click on Selection.
Selection

h) Edit surfaces
You can change colours and transparency
Transparency is an option

Adjust the transparency/opacity here
i) Export pov
To make a publication-worthy figure, export as pov
Export as Povray
Clicking 'Run' occasionally leads to crash, so it's safer to click on save. Make sure that the background in white.

Edit the command to +A0.01 instead of +A0.3 for less 'pixelated' figure on zooming in. Takes a bit longer to render though. The H/W values depend on your window shape.

Select save, not Run


3. Render povray
You now have a pov file (example.pov). The most straight-forward way to render it is to open the command prompt (terminal) in the same folder and run
pvengine +A0.01 +H604 +W620 example.pov
Rendering

assuming that the H/W values are the ones listed (or multiples of them) when you saved the pov file (it'll be listed in example.bat in the same folder).

And it looks like this:
A basic POV-Ray generated png


You can also run the .bat file associated with the pov file, but note that you'll have to put paths in "":
You need ""s
You can also render in the povray editor (open the povray with the editor):
Povray editor


Render Settings

The issue becomes the default H/W (resolution) values. Override using command line options: +HXXX +WYYY
You may have to associate .pov files with pvengine manually:

Edit -- but you'll be told that there's no program


Select a program to open


pvengine


Always use the selected program

06 February 2016

629. Google drive with rclone on debian jessie

My free dropbox account has 6Gb storage, whereas my google drive has 15Gb. Dropbox pro is way too expensive, so here's what you can do to get your google drive to work ok-ish with linux.

To set up rclone, do:
cd ~/Downloads
wget http://downloads.rclone.org/rclone-current-linux-amd64.zip
unzip rclone-current-linux-amd64.zip
cd rclone-v1.27-linux-amd64
sudo cp rclone /usr/bin/
rclone config
No remotes found - make a new one n) New remote q) Quit config n/q> n name> google_drive What type of source is it? Choose a number from below 1) amazon cloud drive 2) b2 3) drive 4) dropbox 5) google cloud storage 6) swift 7) hubic 8) local 9) onedrive 10) s3 11) yandex type> 3 Google Application Client Id - leave blank normally. client_id> Google Application Client Secret - leave blank normally. client_secret> Remote config Use auto config? * Say Y if not sure * Say N if you are working on a remote or headless machine or Y didn't work y) Yes n) No y/n> y If your browser doesn't open automatically go to the following link: http://127.0.0.1:53682/auth Log in and authorize rclone for access Waiting for code... Got code -------------------- [google_drive] client_id = client_secret = token = {"access_token":"y**5","token_type":"Bearer","refresh_token":"1/o**T","expiry":"2016-02-06T18:41:22.167889627+11:00"} -------------------- y) Yes this is OK e) Edit this remote d) Delete this remote y/e/d> y Current remotes: Name Type ==== ==== google_drive drive e) Edit existing remote n) New remote d) Delete remote q) Quit config e/n/d/q> q

Syncing is a bit of an issue as you can't sync based on last changed file. So, my solution is that each device has it's own folder that it syncs up to, and each device syncs down all other folders. For my two devices, nb and be, I have thus set it up like this:

Create new dirs and sync:
mkdir ~/gdrive/nbdrive -p
mkdir ~/gdrive/bedrive

On Nb the crontab looks like this:
*/2 *    * * * rclone sync /home/me/gdrive/nbdrive google_drive:/nbdrive
*/10 *   * * * rclone sync google_drive:/bedrive /home/me/gdrive/bedrive

and on Be it looks like this:
*/10 *    * * * rclone sync google_drive:/nbdrive /home/me/gdrive/nbdrive 
*/2 *   * * * rclone sync /home/me/gdrive/bedrive google_drive:/bedrive 

If I do work on a file on Be I then copy it to bedrive, and edit it. To edit it late on Nb I copy it from bedrive to nbdrive and edit it. Of course I could always sync manually and avoid this, but the above is a solution for people who might not feel comfortable working on the command line or if you want everything automated.

20 January 2016

628. Very briefly: Crystalmaker in debian jessie with wine-staging (1.9)

Update:
 I am seeing consistent crashes with files containing multiple structures (e.g. multi-xyz or multi-cif files). They open fine in a virtualbox instance of crystalmaker.

The terminal shows
fixme:shell:check_flags Unsupported flags: 2414
Before buying crystalmaker, make sure to try it extensively first as there is a free demo version available.

Original post:
This is a brief and somewhat incomplete post.
I recently bought a crystalmaker license, knowing that it had no support under linux. I figured that I'd live with running it in an XP VM. My allergies to all things windows made me very unhappy with that solution, however.

So I tried to install crystalmaker using wine in jessie (1.6.2) and the current (1.50.1) version of Crossover. The installation worked fine for both, but running the software lead to crashes.

I then installed the winehq-staging version (1.9):
sudo apt-get install apt-transport-https
wget https://dl.winehq.org/wine-builds/Release.key
sudo apt-key add Release.key

I edited /etc/apt/sources.list
deb https://dl.winehq.org/wine-builds/debian/ jessie main
sudo apt-get update
sudo sudo apt-get install winehq-staging

Same issue.

I then finally actually read the crash message, which mentioned that
wine: Unimplemented function msvcp120.dll.?_Throw_C_error@std@@YAXH@Z called at address 0x7b83a70c (thread 004e), starting debugger...
That lead me to install vcrun2013 using winetricks:
winetricks -q vcrun2013 gdiplus

Crystalmaker now works perfectly (as far as I can see) under wine. Saving graphics as PNG works too. I haven't tried anything else as I'm not familiar with crystalmaker.


[NOTE: by running WINEPREFIX=~/.cxoffice/crystalmaker winetricks vcrun2013 I later got it to work in crossover. I haven't tried wine 1.6.2 again.]

[Note 2: gdiplus is needed to fix messages of the type
fixme:gdiplus:Gdip<...> graphics object has no HDC]