FOR GNOME/GNOME-SHELL 3.4 see this as well: http://verahill.blogspot.com.au/2012/06/gnome-34-frippery-extensions-in-debian.html
Here are a few quick fixes to make Gnome 3/gnome-shell work and look a bit better:
An example of my desktop as it looks today (April 201) is shown below:
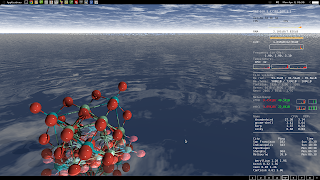 |
| My desktop, in response to a comment below.. |
And here a rough indication of what is done with the gnome-shell extensions below:
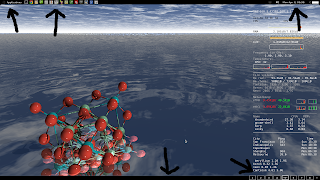 |
| From top left, clockwise: applications menu, panel favourites (with faenza icons), move-clock, bottom panel and static workspaces. The information on the right hand side is done via conky. |
Index:
1. gnome-shell extensions
2. Getting maximize, minimize and close back
3. prettier icon theme --faenza
4. Using conky instead of gnome applets to monitor computer
1. gnome-shell extensions
NOTE: download the .tgz file to your home folder e.g. /home/me/ or the files won't go to the right place on tar -xvf
The Gnome-shell Frippery extensions ("for grumpy old sticks in the mud") are what you're looking for:
http://intgat.tigress.co.uk/rmy/extensions/index.html
a) For
gnome/gnome-shell 3.0:
In /home/me/
wget http://intgat.tigress.co.uk/rmy/extensions/gnome-shell-frippery-0.2.8.tgz
tar -xvf gnome-shell-frippery-0.2.8.tgz
That's it! The extensions will only be installed for the user doing the untar-ing.
b) For
gnome-shell 3.2:
UPDATE: 1/2/2012 -- Wheezy upgraded to gnome-shell 3.2.2.1 on 31/1/2012. Here's how to get a useful desktop environment again:
Either:
Use
iceweasel/firefox, and visit the following pages:
https://extensions.gnome.org/extension/13/applications-menu/
https://extensions.gnome.org/extension/3/bottom-panel/
https://extensions.gnome.org/extension/12/static-workspaces/
https://extensions.gnome.org/extension/2/move-clock/
https://extensions.gnome.org/extension/4/panel-favorites/
https://extensions.gnome.org/extension/14/shut-down-menu/
All of the frippery extensions are listed here:
https://extensions.gnome.org/accounts/profile/rmyorston
Install the extensions by settting on the slider icon to ON.
OR:
In /home/me/ (replacing 'me' with your username)
wget http://intgat.tigress.co.uk/rmy/extensions/gnome-shell-frippery-0.3.6.tgz
tar -xvf gnome-shell-frippery-0.3.6.tgz
IF the shell extensions don't show up -- make sure that they are in /home/me/.local/share/gnome-shell/extensions/ -- if not you may want to extract and put the files there manually.
Either way, once you installed using firefox or in the terminal:
Log in and out of gnome-shell -- alt+f2 + r only enabled the applications-menu, bottom-panel and static workspaces, but the other extensions wouldn't work. This is based on a case of installing the extensions immediately after dist-upgrading to install gnome-shell v 3.2.2.1
You can now open
gnome-tweak-tool (install it as shown below under "
2. Getting max/min/close back") -- in the gnome-shell activities/launchers window or whatever they call it it shows up as Advanced Settings or start it using alt+f2 or terminal (
gnome-tweak-tool). Click on Shell Extensions, and enable everything.
OR open firefox/iceweasel and go to https://extensions.gnome.org/local/ to enable/disable extensions.
Note:
The extensions.gnome.org versions of Frippery's Shutdown menu, move clock and panel favourites wouldn't work with 3.2 on a first try, nor would the extensions downloaded by wget and untared -- logging in and out of gnome-shell solved that.
Trying to find something on the extensions.gnome.org website is at the moment hopeless - hopefully they'll implement a useful search function soon.
2. Getting maximize, minimize and close back
Install gnome-tweak-tool
sudo apt-get install gnome-tweak-tool
Start it. Go to Shell. Under 'arrangement of buttons on title bar' select all.
3. prettier icon theme --faenza
I've never been a fan of the default icon themes for gnome. I used the linux lex icons (
http://linuxlex.cz/en/?option=com_phocadownload&view=file&id=2:linuxlex-8-icon-theme&Itemid=350) for gnome 2.x/compiz
In my opinion the blockier icons in faenza work better with gnome3/gnome-shell than the fancy linux lex icons.
So...
Install the gnome-tweak-tool
sudo apt-get install gnome-tweak-tool
To get faenza
mkdir ~/tmp
cd ~/tmp
wget http://www.deviantart.com/download/173323228/faenza_icons_by_tiheum-d2v6x24.zip
unzip faenza_icons_by_tiheum-d2v6x24.zip
./INSTALL
cd ~/.icons
mkdir faenza
mv * faenza/
Now start gnome-tweak-tool. Under Interface --> Icon Theme -- select faenza
Do alt+f2 and type r, hit enter to restart.
4. Using conky instead of gnome applets to monitor computer
conky is a lot more flexible and capable than any single gnome-applet. But then conky doesn't sit quietly on a panel but is instead overlaid on top of you desktop.
To install
sudo apt-get install conky
Edit configuration file
sudo vim /etc/conky/conky.conf
Here's a sample conky.conf
-------------------------
alignment top_right
double_buffer yes
background yes
border_width 1
cpu_avg_samples 2
default_color white
default_outline_color white
default_shade_color white
draw_borders no
draw_graph_borders yes
draw_outline no
draw_shades no
use_xft yes
xftfont DejaVu Sans Mono:size=12
gap_x 20
gap_y 60
minimum_size 5 5
net_avg_samples 2
no_buffers yes
out_to_console no
out_to_stderr no
extra_newline no
own_window yes
own_window_class Conky
own_window_type desktop
own_window_transparent yes
stippled_borders 0
update_interval 1.5
uppercase no
use_spacer none
show_graph_scale no
show_graph_range no
TEXT
${execi 60 acpi |gawk '{print $3,$4,$5}'|sed 's/\,/\t/g'}
${addr eth0}/${addr wlan0}
$hr
${color grey}Uptime:$color $uptime
CPU:$alignc $cpu%
$alignc $color ${cpugraph 15,200 ffff00 ff0000 -l -t}
RAM:$alignc $mem/$memmax
$alignc$color ${memgraph 15,200 ffff00 ff0000 -t}
I/O:$alignc $diskio_read/$diskio_write
$alignc$color ${diskiograph 15,200 ffff00 ff0000 -t}
${color grey}Frequency (in GHz):$color
${freq_g 1} ${freq_g freq_g2}
$color CPU: $alignr${acpitemp}°C
$color Fan(rpm): $alignr${execi 1.5 sensors|grep fan1|cut -c12-18}
#${color grey}CPU Usage: ${cpubar 10,100 ffffff ff0000 -l -t} $cpu%
${cpugraph cpu1 15,100 ffff00 ff0000 -t} ${cpugraph cpu2 15,100 ffff00 ff0000 -t}
$hr
${color grey}File systems:
/ $color${fs_used /}/${fs_size /}
/home $color${fs_used /home}/${fs_size /home}
${color grey}eth0 ${color red} ${upspeed eth0}/${color green} ${downspeed eth0} ${color grey}
${color grey} ${upspeedgraph eth0 15,100 550000 ff0000 -l -t} ${color grey} ${downspeedgraph eth0 15,100 0000ff 00ff00 -l -t} ${color grey}
${color grey}wlan0 ${color red} ${upspeed wlan0}/${color green} ${downspeed wlan0} ${color grey}
${color grey} ${upspeedgraph wlan0 15,100 550000 ff0000 -l -t} ${color grey} ${downspeedgraph wlan0 15,100 0000ff 00ff00 -l -t} ${color grey}
$hr
${color grey}Name CPU% MEM%
${color} ${top name 1} ${top cpu 1} ${top mem 1}
${color} ${top name 2} ${top cpu 2} ${top mem 2}
${color} ${top name 3} ${top cpu 3} ${top mem 3}
$hr
${font Arial:bold:size=12}${color Tan1}WORLD TIME ${color DarkSlateGray}
$font${color}San Francisco ${execi 60 ping -c 1 berkeley.edu | grep icmp_req |gawk '{print $8}'| cut -c6- } ms$alignr${tztime America/Los_Angeles %H:%M}
$font${color}Melbourne ${execi 60 ping -c 1 rmit.edu.au | grep icmp_req |gawk '{print $8}'| cut -c6- } ms$alignr${tztime Australia/Melbourne %H:%M}
-----
You can get more information about available objects here:
http://conky.sourceforge.net/variables.html
To make conky start up every time you start your computer, start
gnome-session-properties, and add conky. That works most of the time but is the old gnome 2.3 way of doing things. Here's a post on gnome-shell specifically and how to add start-up applications:
http://linuxandfriends.com/2011/06/01/how-to-add-startup-programs-in-gnome-3/


