17 May 2013

420. Setting up a FreeBSD virtual machine

I don't have any free hardware to make a proper install on at the moment, but have a few things I'd like to try out on Free BSD (basically -- how similar/different is the build process from e.g. debian) so I've decided to set up a virtual machine to play around with.

Not difficult, but someone else might benefit from the screenshots as well.


1. Get the installation medium:
Go to ftp://ftp.freebsd.org/pub/FreeBSD/releases/amd64/amd64/ISO-IMAGES/9.1/ and download what you need. Interestingly there's an image meant for USB sticks as well.

I went for the CD iso which is around 686 Mb:
cd ~/Downloads
wget ftp://ftp.freebsd.org/pub/FreeBSD/releases/amd64/amd64/ISO-IMAGES/9.1/FreeBSD-9.1-RELEASE-amd64-disc1.iso


2. Set up the virtual machine


 You need to change the CPU type from the default (http://forums.freebsd.org/showthread.php?t=25032):


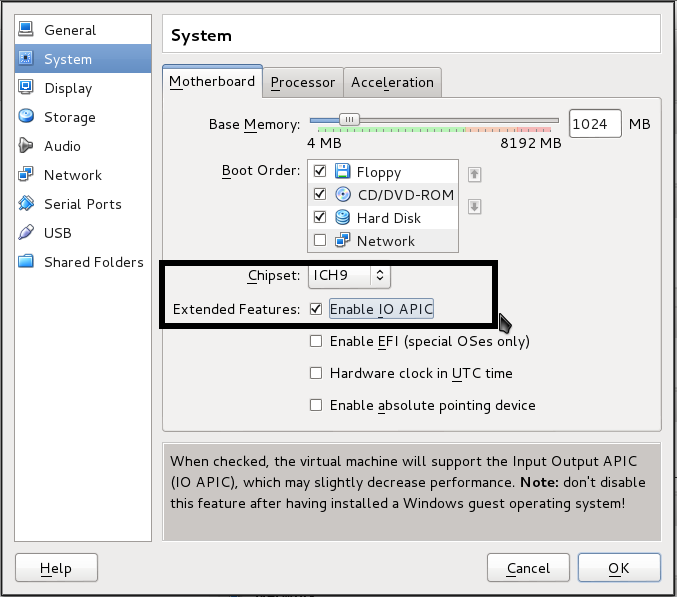
If you don't change the CPU type you'll encounter the following on boot:


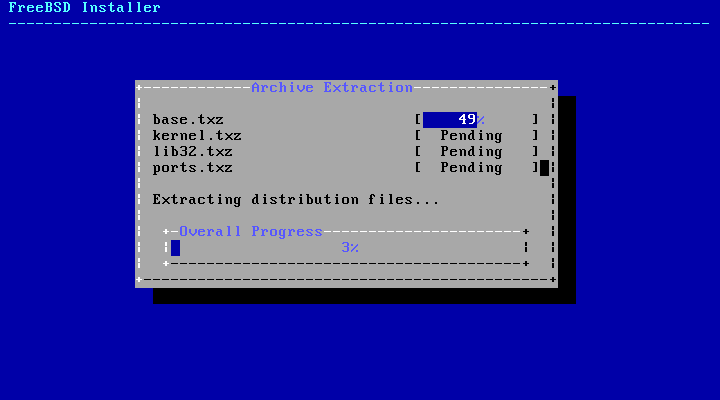
3. Start the installation


4. Final touches
I don't want to have to launch and work in VM via the virtualbox GUI. Instead, we want to launch the VM from the command line, and log in via ssh. I've covered this in part before in post 94. We set up port forwarding in the Virtualbox GUI:


Start the VM
VBoxHeadless -s FreeBSD
Oracle VM VirtualBox Headless Interface 4.2.12 (C) 2008-2013 Oracle Corporation All rights reserved. VRDE server is listening on port 3389.

Wait ca 30-60 seconds for the VM to boot (you won't get any feedback), then
ssh verahill@localhost -p 6534
Password: Last login: Fri May 17 13:50:03 2013 FreeBSD 9.1-RELEASE (GENERIC) #0 r243825: Tue Dec 4 09:23:10 UTC 2012 Welcome to FreeBSD! Before seeking technical support, please use the following resources: o Security advisories and updated errata information for all releases are at http://www.FreeBSD.org/releases/ - always consult the ERRATA section for your release first as it's updated frequently. o The Handbook and FAQ documents are at http://www.FreeBSD.org/ and, along with the mailing lists, can be searched by going to http://www.FreeBSD.org/search/. If the doc package has been installed (or fetched via pkg_add -r lang-freebsd-doc, where lang is the 2-letter language code, e.g. en), they are also available formatted in /usr/local/share/doc/freebsd. If you still have a question or problem, please take the output of `uname -a', along with any relevant error messages, and email it as a question to the questions@FreeBSD.org mailing list. If you are unfamiliar with FreeBSD's directory layout, please refer to the hier(7) manual page. If you are not familiar with manual pages, type `man man'. Edit /etc/motd to change this login announcement. $

5. Basic set-up of FreeBSD
I'm a sudo-addict, and I can't live without vim. Log in as ROOT:
pkg
The package management tools is not yet installed on your system. Do you want to fetch and install it now ? [y/N]: Y Bootstrapping pkg, please wait.
pkg update
Updating repository catalogue
pkg_add -r sudo vim echo 'verahill ALL=(ALL) ALL' >> /usr/local/etc/sudoers

If you want a graphical environment, you can follow this page: http://www.freebsd.org/doc/en/books/handbook/x11-wm.html
I installed xfce:
pkg_add -r xfce4
pkg_add -r xorg
echo "/usr/local/bin/startxfce4" > /home/verahill/.xinitrc
chown verahill:verahill /home/verahill/.xinitrc
echo 'hald_enable="YES"' >> /etc/rc.conf
echo 'dbus_enable="YES"' >> /etc/rc.conf


Restart and log in. You can launch XFCE with startx, which opens XFCE at tty9
Note that the terminal emulator didn't work properly out of the box.

sudo pkg_add -r virtualbox-ose-additions
sudo pw groupmod wheel -m verahill
sudo su
#echo 'vboxguest_enable="YES"' >> /etc/rc.conf
#echo 'vboxservice_enable="YES"' >> /etc/rc.conf
sudo shutdown -r now


Links to this post:
http://forum.opensource-srbija.org/topic/1870-freebsd-u-virtual-box-u/

419. Talking to Myself in Public: DKMS, your own kernel and Virtualbox

Brief version:
check your /lib/modules/KERNEL/build symmlinks if you compile your own kernel.

Original post:
A while back I installed the Oracle-packaged version Virtualbox 4.2 on my system since I had issues with the debian version when going above kernel 3.6 (http://verahill.blogspot.com.au/search?q=kernel+virtualbox)

It's been a bit annoying since I've had to run
sudo service vboxdrv setup

manually every time I upgrade the kernel, but it's not that much hassle. However, I've been seeing error messages such as

Error! Could not locate dkms.conf file. File: does not exist.

In addition, I've just upgraded the kernel from 3.8.8-ck1 to 3.9.2-ck1, but not rebooted, so there's no vboxdrv module for the running kernel at the moment. Both kernels were compiled on the machine they were running on.
Anyway, typically I should be able to solve that by doing
sudo dkms autoinstall -k 3.8.8-ck1

but again I get the above error about no dksm.conf file.

Troubleshooting:

The debian version
virtualbox-dkms belongs to the debian version and isn't needed for the oracle version -- installing it removes the Oracle version. Anyway, to remind myself of why I wasn't using the debian version (4.1.18-dfsg-2+deb7u1)) in Wheezy I did
sudo apt-get install virtualbox-dkms

which remove the oracle version and installed the debian one.
Building initial module for 3.9.2-ck1 Error! Bad return status for module build on kernel: 3.9.2-ck1 (x86_64) Consult /var/lib/dkms/virtualbox/4.1.18/build/make.log for more information. dpkg: error processing virtualbox-dkms (--configure): subprocess installed post-installation script returned error exit status 10
dmesg shows
[704511.419271] vboxdrv: disagrees about version of symbol module_layout
OK. False starts.

I then purged virtualbox and reinstalled the debian version:
sudo apt-get purge virtualbox
sudo apt-get install virtualbox-dkms

Same problem.
Looking at https://bbs.archlinux.org/viewtopic.php?id=151965
for i in /var/lib/dkms/*/[^k]*/source; do [ -e "$i" ] || echo "$i";done
/var/lib/dkms/vboxhost/4.1.10/source /var/lib/dkms/vboxhost/4.2.8/source
sudo rm /var/lib/dkms/vboxhost/4.1.10/source sudo rm /var/lib/dkms/vboxhost/4.2.8/source

sudo apt-get install virtualbox-dkms
Error! Bad return status for module build on kernel: 3.9.2-ck1 (x86_64) Consult /var/lib/dkms/virtualbox/4.1.18/build/make.log for more information. dpkg: error processing virtualbox-dkms (--configure):

sudo less /var/lib/dkms/virtualbox/4.1.18/build/make.log
CC [M] /var/lib/dkms/virtualbox/4.1.18/build/vboxdrv/r0drv/linux/memobj-r0drv-linux.o /var/lib/dkms/virtualbox/4.1.18/build/vboxdrv/r0drv/linux/memobj-r0drv-linux.c: In function ‘rtR0MemObjNativeMapUser’: /var/lib/dkms/virtualbox/4.1.18/build/vboxdrv/r0drv/linux/memobj-r0drv-linux.c:1451:38: error: ‘VM_RESERVED’ undeclared (first use in this function) /var/lib/dkms/virtualbox/4.1.18/build/vboxdrv/r0drv/linux/memobj-r0drv-linux.c:1451:38: note: each undeclared identifier is reported only once for each function it appears in make[2]: *** [/var/lib/dkms/virtualbox/4.1.18/build/vboxdrv/r0drv/linux/memobj-r0drv-linux.o] Error 1 make[1]: *** [/var/lib/dkms/virtualbox/4.1.18/build/vboxdrv] Error 2 make: *** [_module_/var/lib/dkms/virtualbox/4.1.18/build] Error 2 make: Leaving directory `/home/me/tmp/linux-3.9.2'

The issues is known
http://siduction.org/index.php?name=PNphpBB2&file=viewtopic&t=3097
http://www.mail-archive.com/debian-bugs-dist@lists.debian.org/msg1086030.html
http://forums.linuxmint.com/viewtopic.php?f=47&t=52496

The oracle version
I gave up and downloaded the newest oracle version again:
wget http://download.virtualbox.org/virtualbox/4.2.12/virtualbox-4.2_4.2.12-84980~Debian~wheezy_amd64.deb
sudo dpkg -i virtualbox-4.2_4.2.12-84980~Debian~wheezy_amd64.deb
Trying to register the VirtualBox kernel modules using DKMS:Error! Your kernel headers for kernel 3.8.8-ck1 cannot be found. Please install the linux-headers-3.8.8-ck1 package, or use the --kernelsourcedir option to tell DKMS where it's located Failed, trying without DKMS ... failed! Recompiling VirtualBox kernel modules:. Starting VirtualBox kernel modules: modprobe vboxdrv failed. Please use 'dmesg' to find out why ... failed!

That last 'failed' is actually ok -- I think it built, but only for 3.9.2-ck1 while the running kernel is 3.8.8-ck1.

So, good enough to use, but not good enough for a blog post, since we're back to square one.
Hmm...
ls /lib/modules/3.8.8-ck1/build -lah
/lib/modules/3.8.8-ck1/build -> /home/me/tmp/ck-kernel/linux-3.8.8

Sure, that where I built it, but it should be pointing at /usr/src/linux-headers-3.8.8-ck1
sudo rm /lib/modules/3.8.8-ck1/build
sudo ln -s /usr/src/linux-headers-3.8.8-ck1/ /lib/modules/3.8.8-ck1/build

I then did the whole purge/install dance again:
sudo apt-get purge virtualbox-4.2
sudo dpkg -i virtualbox-4.2_4.2.12-84980~Debian~wheezy_amd64.deb
Trying to register the VirtualBox kernel modules using DKMS:. Starting VirtualBox kernel modules:.
dkms status
nvidia, 304.88, 3.8.0, x86_64: installed nvidia, 304.88, 3.8.8-ck1, x86_64: installed nvidia, 304.88, 3.8.8, x86_64: installed nvidia, 304.88, 3.9.2-ck1, x86_64: installed vboxhost, 4.2.12, 3.8.8-ck1, x86_64: installed
sudo rm /lib/modules/3.9.2-ck1/build sudo ln -s /usr/src/linux-headers-3.9.2-ck1/ /lib/modules/3.9.2-ck1/build sudo dkms autoinstall -k 3.9.2-ck1 dkms status
nvidia, 304.88, 3.8.0, x86_64: installed nvidia, 304.88, 3.8.8-ck1, x86_64: installed nvidia, 304.88, 3.8.8, x86_64: installed nvidia, 304.88, 3.9.2-ck1, x86_64: installed vboxhost, 4.2.12, 3.8.8-ck1, x86_64: installed vboxhost, 4.2.12, 3.9.2-ck1, x86_64: installed
Happy again. And no dkms.conf errors anymore!

418. POVRay 3.7 on four-eight cores is several orders of magnitudes slower than serial POVRay 3.6

For some reason I get very poor performance when using POVRay 3.7, which can run rendering in parallel. In contrast, POVRay 3.6 -- which is serial -- renders much, much faster.

I had a particular job with partially transparent objects (similar type of job as set up here: http://verahill.blogspot.com.au/2013/05/415-briefly-making-polyhedral-figure-in.html) took

  • 2h 25 min (8694 seconds) using POVRay 3.6 running in serial
  • Smallest Alloc: 9 bytes Largest Alloc: 131080 bytes Peak memory used: 20730898 bytes Total Scene Processing Times Parse Time: 0 hours 0 minutes 0 seconds (0 seconds) Photon Time: 0 hours 0 minutes 0 seconds (0 seconds) Render Time: 2 hours 24 minutes 54 seconds (8694 seconds) Total Time: 2 hours 24 minutes 54 seconds (8694 seconds)
  •  14 hours 5 minutes in POVRay 3.7 rc 7 running in parallel (openmp)
  • Render Time:
      Photon Time:      No photons
      Radiosity Time:   No radiosity
      Trace Time:      14 hours  5 minutes 42 seconds (50742.481 seconds)
                  using 4 thread(s) with 201478.244 CPU-seconds total
    POV-Ray finished
    

on a four-core i5-2400 with 16 Gb RAM.

POVRay 3.7 took 16 hours 45 minutes on an eight core AMD FX 8150 with 32 Gb RAM.
Render Time: Photon Time: No photons Radiosity Time: No radiosity Trace Time: 16 hours 45 minutes 34 seconds (60334.108 seconds) using 8 thread(s) with 472419.334 CPU-seconds total POV-Ray finished
I rendered with
povray_3.7 +H1000 +W1000 +A0.01 scene.pov

The general trend applies to povray 3.7-rc6 and whatever povray version I was using in Arch a month ago. It also applies to all linux boxes I've tried it on.

I built povray 3.6 and 3.7 as shown here: http://verahill.blogspot.com.au/2013/05/413-povray-37-rc7-on-debian-wheezy.html

Googling I really only found this: http://news.povray.org/povray.beta-test/thread/%3C455a0770@news.povray.org%3E/?ttop=349052&toff=450
which is from 2006.
First problem!
Version 3.7.0.beta16 was MUCH slower. Version 3.6.1c took 4m46s, while Version3.7.0.beta16 took 7m43s... that's 60% more! Is there a better build or should I be using some different options?
It was never addressed.

I don't know if the performance of 3.7 is worse then 3.6, or if there's some difference in settings that's slowing things down i.e. whether there's something which I'm doing wrong.

A general list over changes between 3.7 and 3,6 is found here: http://wiki.povray.org/content/Documentation:Tutorial_Section_1#Changes_and_New_Features_Summary
but there's nothing that stands out to me.

16 May 2013

417. Briefly: Patching kernel 3.9 with the CK patchset: 3.9-ck-1

Nothing strange here -- basically the same as http://verahill.blogspot.com.au/2013/04/395-ck-kernel-on-debian-and-patching.html but with updated links.

I haven't found a good and succinct description of what the -ck patch set does and that I could link to here, but here's what it says on the Arch -ck page:
"..many Archers elect to use this package for the BFS' excellent desktop interactivity and responsiveness under any load situation. Additionally, the bfs imparts performance gains beyond interactivity"

I don't know if there are objective benchmarks that one can use to demonstrate an improvement in 'responsiveness and interactivity'. Subjectively, however, I feel that there's a slight improvement. You decide for yourself.

Begin here

sudo apt-get install kernel-package fakeroot build-essential ncurses-dev
mkdir ~/tmp
cd ~/tmp
wget https://www.kernel.org/pub/linux/kernel/v3.x/linux-3.9.2.tar.xz
tar xvf linux-3.9.2.tar.xz
cd linux-3.9.2/
wget http://ck.kolivas.org/patches/3.0/3.9/3.9-ck1/patch-3.9-ck1.bz2
bunzip2 patch-3.9-ck1.bz2
patch -p1 < patch-3.9-ck1
patching file arch/powerpc/platforms/cell/spufs/sched.c patching file Documentation/scheduler/sched-BFS.txt patching file Documentation/sysctl/kernel.txt patching file fs/proc/base.c patching file include/linux/init_task.h patching file include/linux/ioprio.h patching file include/linux/sched.h Hunk #6 succeeded at 2738 (offset -10 lines). patching file init/Kconfig patching file init/main.c patching file kernel/delayacct.c patching file kernel/exit.c patching file kernel/posix-cpu-timers.c patching file kernel/sysctl.c patching file lib/Kconfig.debug patching file include/linux/jiffies.h patching file drivers/cpufreq/cpufreq.c patching file drivers/cpufreq/cpufreq_ondemand.c patching file drivers/cpufreq/cpufreq_conservative.c patching file kernel/sched/bfs.c patching file kernel/sched/Makefile patching file include/uapi/linux/sched.h patching file include/linux/sched/rt.h patching file kernel/stop_machine.c patching file include/linux/swap.h patching file mm/memory.c patching file mm/swapfile.c patching file mm/vmscan.c patching file arch/x86/Kconfig patching file kernel/Kconfig.hz patching file kernel/Kconfig.preempt patching file Makefile
make-kpkg clean cat /boot/config-`uname -r`>.config make oldconfig

You might now be asked a long series of questions about how the kernel should be configured (or you might not be -- depending on what kernel version you're currently running). In MOST cases you can select the default option (i.e. hit enter) but you should still read each question and consider it. Making a mistake won't break your computer, so don't be scared.

Next, start the compilation (will take a while):

time fakeroot make-kpkg -j4 --initrd kernel_image kernel_headers
sudo dpkg -i ../linux*3.9-ck*.deb

where 4 is the number of cores on your machine (note: it only has to do with compiling -- you can use the compiled binaries on any number of cores).

Anyway, that's all -- you've now patched, compiled and installed a new kernel. And it didn't even hurt.

416. Compiling Wine 1.5.30 in a chroot (fixed)

Update 2, 22 May 2013: Thanks to the Anonymous poster who pointed out that wine 1.5.30 was broken! Anyway, I've updated this post with instructions how to patch the wine 1.5.30 sources so that it includes libwine in the final .deb package.

(I normally attached a screenshot of the winecfg about tab, but not this time -- had I done that I would've realised something was wrong. )

It's fixed now. Wine 1.5.30 is OK again.


Update 22 May 2013: libwine.so.1 doesn't get included in the deb package, which causes severely reduced functionality. I've confirmed that Wine 1.5.28 built as shown in http://verahill.blogspot.com.au/2013/04/387-compiling-wine-1528-in-i386-chroot.html works fine though.

I'll update here when I've figured out why the compiled libraries don't get included.

It's similar to what is mentioned in these bug reports:
https://bugs.archlinux.org/task/35189
https://bugs.archlinux.org/task/35190
https://bugs.archlinux.org/task/35191

There's a fix here: http://bugs.winehq.org/attachment.cgi?id=44422


Original post:
While it'd be absolutely fair to accuse me of recycling posts, I have a reasonably good reason for doing so: posting build instructions for the latest version -- even if identical to instructions for earlier versions -- confirms that it 'works'. Also, it shows that the instructions are current.

I'm too much of a hoarder to go back and update old posts.

Anyway, here's a generic way of building wine which works for 1.5.30 (and 1.5.28 and everything in between). And yes, I've copy/pasted from my old 1.5.28 post...

See here for information about 3D acceleration using libGL/U: http://verahill.blogspot.com.au/2013/05/429-briefly-wine-libglliubglu-blender.html

Getting started:
If you set up a chroot to build 1.5.28 before, you don't need to set up a new chroot to build 1.5.30. In that case, skip the set-up step below and instead re-enter your existing chroot like this:
sudo mount -o bind /proc wine32/proc
sudo cp /etc/resolv.conf wine32/etc/resolv.conf
sudo chroot wine32
su sandbox
cd ~/tmp

Setting up the Chroot
sudo apt-get install debootstrap
mkdir $HOME/tmp/architectures/wine32 -p
cd $HOME/tmp/architectures
sudo debootstrap --arch i386 wheezy $HOME/tmp/architectures/wine32 http://ftp.au.debian.org/debian/
sudo mount -o bind /proc wine32/proc
sudo cp /etc/resolv.conf wine32/etc/resolv.conf
sudo chroot wine32

You're now in the chroot:
apt-get update
apt-get install locales sudo vim
echo 'export LC_ALL="C"'>>/etc/bash.bashrc
echo 'export LANG="C"'>>/etc/bash.bashrc
echo '127.0.0.1 localhost beryllium' >> /etc/hosts
source /etc/bash.bashrc
adduser sandbox
usermod -g sudo sandbox
echo 'Defaults !tty_tickets' >> /etc/sudoers
su sandbox
cd ~/

Replace 'beryllium' with the name your host system (it's just to suppress error messages)

Building Wine
While still in the chroot, continue (the i386 is ok; don't worry about it -- you don't actually need it):

sudo apt-get install libx11-dev:i386 libfreetype6-dev:i386 libxcursor-dev:i386 libxi-dev:i386 libxxf86vm-dev:i386 libxrandr-dev:i386 libxinerama-dev:i386 libxcomposite-dev:i386 libglu-dev:i386 libosmesa-dev:i386 libglu-dev:i386 libosmesa-dev:i386 libdbus-1-dev:i386 libgnutls-dev:i386 libncurses-dev:i386 libsane-dev:i386 libv4l-dev:i386 libgphoto2-2-dev:i386 liblcms-dev:i386 libgstreamer-plugins-base0.10-dev:i386 libcapi20-dev:i386 libcups2-dev:i386 libfontconfig-dev:i386 libgsm1-dev:i386 libtiff-dev:i386 libpng-dev:i386 libjpeg-dev:i386 libmpg123-dev:i386 libopenal-dev:i386 libldap-dev:i386 libxrender-dev:i386 libxml2-dev:i386 libxslt-dev:i386 libhal-dev:i386 gettext:i386 prelink:i386 bzip2:i386 bison:i386 flex:i386 oss4-dev:i386 checkinstall:i386 ocl-icd-libopencl1:i386 opencl-headers:i386 libasound2-dev:i386 build-essential
mkdir ~/tmp
cd ~/tmp
wget http://prdownloads.sourceforge.net/wine/wine-1.5.30.tar.bz2
tar xvf wine-1.5.30.tar.bz2
cd wine-1.5.30/
wget http://bugs.winehq.org/attachment.cgi?id=44422 -O diff.patch
patch -p1 < diff .patch
patching file configure patching file configure.ac patching file libs/wine/Makefile.in
./configure time make -j3 sudo checkinstall --install=no
checkinstall 1.6.2, Copyright 2009 Felipe Eduardo Sanchez Diaz Duran This software is released under the GNU GPL. The package documentation directory ./doc-pak does not exist. Should I create a default set of package docs? [y]: Preparing package documentation...OK Please write a description for the package. End your description with an empty line or EOF. >> wine 1.5.30-2 >> ***************************************** **** Debian package creation selected *** ***************************************** This package will be built according to these values: 0 - Maintainer: [ root@beryllium ] 1 - Summary: [ wine 1.5.30-2 ] 2 - Name: [ wine ] 3 - Version: [ 1.5.30-2 ] 4 - Release: [ 1 ] 5 - License: [ GPL ] 6 - Group: [ checkinstall ] 7 - Architecture: [ i386 ] 8 - Source location: [ wine-1.5.30 ] 9 - Alternate source location: [ ] 10 - Requires: [ ] 11 - Provides: [ wine ] 12 - Conflicts: [ ] 13 - Replaces: [ ]
Compilation took ca 13 minutes with three threads. Checkinstall takes a little while (In particular this step: 'Copying files to the temporary directory...').

Installing Wine

Exit the chroot
sandbox@beryllium:~/tmp/wine-1.5.30$ exit
exit
root@beryllium:/# exit
exit
me@beryllium:~/tmp/architectures$ 

On your host system
 Enable multiarch* and install ia32-libs, since you've built a proper 32 bit binary:

sudo dpkg --add-architecture i386
sudo apt-get update
sudo apt-get install ia32-libs

*At some point I think ia32-libs may be replaced by proper multiarch packages, but maybe not. So we're kind of doing both here.

 Copy the .deb package and install it
sudo cp wine32/home/sandbox/tmp/wine-1.5.30/wine_1.5.30-1_i386.deb .
sudo chown $USER wine_1.5.30-1_i386.deb
sudo dpkg -i wine_1.5.30-1_i386.deb

15 May 2013

415. Briefly: making a polyhedral molecular figure in gdis

This post is mainly directed towards a particular PhD student, hence the specificity in terms of workflow.

The example I use, http://www.crystallography.net/information_card.php?cif=4308402, is random, however.

0. Install stuff
sudo apt-get install gdis openbabel wget

Also turns out that there's no povray in Debian anymore! Instead, compile it as shown here: http://verahill.blogspot.com.au/2013/05/413-povray-37-rc7-on-debian-wheezy.html

1. Get the CIF
wget http://www.crystallography.net/cif/4/30/84/4308402.cif

2. Open the cif
gdis 4308402.cif


3. Optional: Trim the content and save as xyz
Select parts to delete (e.g. counter-ions and solvent) by left-clicking and dragging, then delete by hitting the Del key. Hold right-click and drag the mouse to rotate.

It doesn't need to be perfect at this stage.

Save as xyz by going to Save.. and selecting XYZ as the format.

You can also edit the xyz by hand at this point to remove e.g. all sodium ions etc.

4. Open the XYZ file you just saved

5. Delete the remaining undesirable atoms.


6. Optional: If there are bonds missing
An atom needs to bond to six other atoms for gdis to render it as an octahedral polygon, so make sure that all the bonds are there.

Open Tools/Building/Editing. Click on Add Single Bonds.
This bit is a bit frustrating -- mark one atom, then mark another. You mark by double left-clicking (don't hold shift), which sounds easy enough, but actually managing to select an atom can be frustratingly difficult sometimes and zooming doesn't help for some reason.

Note: all bonds will be gone as soon as you close gdis...

7. Turn it into polyhedral representation
Go to View/Display Properties.Click on Polyhedral
8. Generate POV file
Click on the POVRay tab. Make sure to UNCHECK the "Delete intermediate files..." button. To save time, check 'Create files, then stop'.

Click on Render. Looks like nothing happened, but a dummy_0.pov file was written to the working directory.

If the rendered image doesn't 'fit', you might have to zoom out in gdis before hitting render.

9. Render the POV file.
Run
povray +W1000 +H1000 +A0.01 dummy_0.pov

to generate a 1000x1000 png image with anti-aliasing (the lower the number following A, the 'nicer' the figure)
Final image


Appendix

* Changing Colour
1. The permanent way: edit /usr/share/gdis/gdis.elements
gksu gedit /usr/share/gdis/gdis.elements

Find the element you want to change, e.g. Selenium:
341 %gdis_elem 342 symbol: Se 343 name: Selenium 344 number: 34 345 weight: 78.959999 346 cova: 1.220000 347 vdw: 2.000000 348 charge: 4.000000 349 colour: 65535 52860 59880 350 %gdis_end

Change the colour block -- it's a simple RGB (Red:Green:Blue) 16 bit formula which ranges from 0 to 65535. 655365 655365 65535 is white, 0 0 0 is black, and 0 20000 0 is a dark green.

Using octave you can automatically convert HTML RGB codes:
octave:1> rgb = @ (a) 257.*[hex2dec(a(1:2)), hex2dec(a(3:4)) ,hex2dec(a(5:6))] rgb = @(a) 257 .* [hex2dec(a (1:2)), hex2dec(a (3:4)), hex2dec(a (5:6))] octave:2> rgb('FFB00F') ans = 65535 45232 3855 octave:3>
Make your changes and save. Now open the XYZ file you want to work with and the colours should be 'right'.

2. The temporary way
If you've already generate a POV and/or you don't want to make all those single bonds again, you can edit the POV directly. It does take a bit of script-fu, but isn't unreasonably difficult:

A. First figure out what colours are actually used:
cat dummy_0.pov |grep -v '#'|grep RGB|uniq|sort
texture_list { RGB_2899 RGB_2899 RGB_2899 }} texture_list { RGB_32040 RGB_32040 RGB_32040 }} texture_list { RGB_32040 RGB_32040 RGB_32040 }} texture_list { RGB_32382 RGB_32382 RGB_32382 }} texture_list { RGB_32382 RGB_32382 RGB_32382 }} texture_list { RGB_3637 RGB_3637 RGB_3637 }} texture_list { RGB_3637 RGB_3637 RGB_3637 }}

We have four colour formulae: 2899, 32040, 32382 and 3637 (the spaces are important below).

B. Take a look at the colours:
cat dummy_0.pov |grep '#'|egrep 'RGB_2899 | RGB_32040 |RGB_32382 |RGB_3637 '
#declare RGB_2899 = texture{pigment{color rgb <0.064516,0.838710,0.612903> } finish { Phong_Shiny } } #declare RGB_3637 = texture{pigment{color rgb <0.096774,0.548387,0.677419> } finish { Phong_Shiny } } #declare RGB_32040 = texture{pigment{color rgb <1.000000,0.290323,0.258065> } finish { Phong_Shiny } } #declare RGB_32382 = texture{pigment{color rgb <1.000000,0.612903,0.967742> } finish { Phong_Shiny } }
Looking at the colours and comparing with gdis/elements I'd say that the elements are in this order: Cerium, Tungsten, Oxygen, Arsenic

C. Rename all instances of RGB_2899 to Cerium etc. Note that this can't be undone if you make a mistake.
sed -i 's/RGB_2899/Cerium/g' dummy_0.pov
sed -i 's/RGB_3637/Tungsten/g' dummy_0.pov
sed -i 's/RGB_32040/Oxygen/g' dummy_0.pov
sed -i 's/RGB_32382/Arsenic/g' dummy_0.pov

D. Change the colours by opening dummy_0.pov with e.g. vim, and editing the declare lines, e.g.
#declare Tungsten = texture{pigment{color rgb <1.0,1.0,0.0> } finish { Phong_Shiny } }

You can use the rgb script above to calculate the colour values from hex codes:
octave:3> [rgb('FFB00F')]./65535 ans = 1.000000 0.690196 0.058824

E. Then render:
I accidentally screwed up the sed step and couldn't be bothered to make all the bonds again so the polyhedra look awful.
* Transparent polyhedra
Note that this increases rendering times by orders of magnitude.

Anyway, it's simple to set up: just change from rgb to rgbf, e.g.
#declare Tungsten = texture{pigment{color rgb <1.0,1.0,0.0> } finish { Phong_Shiny } }
to
#declare Tungsten = texture{pigment{color rgbf <1.0,1.0,0.0,0.5> } finish { Phong_Shiny } }
With rgbf you have four values <a,b,c,d>, where the higher the value of d, the more transparent the object. d=0 means that it's completely opaque.

414. Frequency vs cores? Crude benchmarking on AMD FX 8150

I'm thinking about building my next computational node, and one issue which is preoccupying me is whether to go for lots of cores (e.g. a dual sock mobo with two 16 core 2.1 GHz cpus) or for a balance of cores and frequency (e.g. single-socket mobo with a 3.8 GHz 8 core cpu). Remember, this is built with private money -- not research grants -- so the budget is tight.

I mean, I can't look at something like this without wanting to buy it: http://www.newegg.com/Product/Product.aspx?Item=N82E16819113036. The question is whether I'm better off buying another one or two fx8150 for the price of 16x2 down-clocked cores.

Benchmarking with the FX 8150 actually makes some sense here if one of the newegg reviewers is to be believed, since the Opteron 6272 is described as two 8150s glued together and down-clocked.

The system: 32 gb ram, fx 8150, nwchem 6.1.1 with acml 5.3.1 (gfortran,int64, fma4) and openmpi.

Short of finding benchmarks for the type of applications that interest me (nwchem, mostly), I figure I could get a rough idea by throttling the frequency of my eight-core FX8150 and compare with unthrottled runs where the number of cores is limited.

Two things to take into account when looking at the times below:
  • modern processors are complex beasts -- I don't claim to fully understand threads vs virtual threads and integer vs FPU. In the FX8150 there are four fpus but eight cores. What this really means in practical terms when doing these particular test calculations, I don't know.
  • This isn't my job, and I need my nodes for running job-related calcs, so by necessity I had to use a short test job. There's inevitably some variability in the results, and using longer test jobs might affect the results somewhat.
  • The execution times vary A LOT for 'identical' conditions (see raw data), hence why I repeated the runs in bold ten times at 3.6 GHz to get reasonably solid comparison values. Still not perfect since the distribution isn't properly gaussian.

The specific question I wanted answered is:
Are 8 threads at 2.1 GHz significantly better than 4 threads at 3.6 GHz?
Short answer: No.
Looks like I won't be investing in 2 x 16 core 2.1 GHz cpus after all.


Optimization
c/f     3.60    3.30    2.70    2.10    1.40
8       44/3    49/6    58/1    75/6    110/5  
7       48/3                     72
6       52/1                    106
5       59/4            85       97
4       67/8            93     113/10    156
3       85/7
2      117/10
1      237/24
c=number of cores; f= frequency in GHz.

(times in seconds. 44/3 means 44 s +/- 3 s)

The way I read this is that it's better to have a 4-core 3.6 GHz cpu than an 8-core 2.1 GHz CPU. The whole 4 FPU/8 cores has me confused though, so I'm not sure whether that's affecting the results in a significant way.

The other thing to take into account is that there isn't normally a linear relationship between number of cores and execution times anyway -- doubling the number of cores doesn't normally lead to a halving of the execution time, so 16 cores at 2.10 GHz wouldn't necessarily be anywhere near 75/2=37 s. (again, that's ignoring the 2 cores/1 fpu issue)

-------------
c/f: raw data
--------------
8/3.6: 37.7,47.4,46.9,38.8, 46.8, 42.4,46.6, 43.9,44.7,42.8 => 44+/-3 s
7/3.6: 41.3,48.7,47.9,48.8,47.0,48.8,50.8,42.4,52.1,47.9 => 48+/-3 s
6/3.6: 49.5,53.4,50.5,53.4,52.4,53.3,51.3,53.4,52.5,53.55 => 52+/-1 s
5/3.6: 54.1,57.1, 67.7,52.2,59.6,58.4,59.8,57.6,59.4,58.6 => 59+/-4 s
4/3.6: 83.1,63.5,73.7,70.0,68.6,58.1,58.1,67.2,69.9,58.2 => 67 +/-8 s
3/3.6: 89.5, 86.0, 82.8, 97.9, 74.4,86.2,89.7, 86.3, 74.5, 86.2 => 85 +/-7 s
2/3.6: 114.1,137.4, 118.6, 108.3, 116.3, 123.6, 104.4,124.3,104.7, 120.6 => 117+/-10 s
1/3.6: 242.6,201.9,232.9,242.7, 233.2,202.0,233.1,265.2, 278.9,233.5 => 237+/- 24
8/3.3: 51.9, 42.4,42.7,55.3,43.3,55.8,54.6,48.1,42.4,48.1 => 49+/-6 s
8/2.7: 59.4, 57.3,59.1,57.8,58.9,56.8,59.0,58.5,59.2,56.9 => 58+/-1
8/2.1: 75.6,82.9,73.7,65.1,76.9,84.3,65.4,73.9,76.4,78.1 => 75+/-6 s
8/1.4: 112.5,110.5,112.1,108.6,113.1,114.4,112.4,109.1,97.9 => 110+/-5
4/2.1: 124.9,103.7,104.1, 92.4, 117.6,115.5,117.5,120.1,115.6,120.2 => 113+/-10 s

An alternative would be to report the fastest time (out of e.g. 10 tries) since it represents maximum capacity.


optimization input
scratch_dir /scratch
start benzeneopt 

geometry units angstroms
C  0.100  1.396  0.000
C  1.209  0.698  0.000
C  1.209 -0.698  0.000
C  0.000 -1.396  0.000
C -1.209 -0.698  0.000
C -1.209  0.698  0.000
H  0.000  2.479  0.000
H  2.147  1.240  0.000
H  2.147 -1.240  0.000
H  0.000 -2.479  0.000
H -2.147 -1.240  0.000
H -2.147  1.240  0.000
end

basis
 H library "6-31+g*" 
 c library "6-31+g*"
end
dft
 direct
end

task dft optimize


Setting frequency
The following script was called with the frequency in GHz, e.g. sudo setfreq 3.6

setfreq
/usr/bin/cpufreq-set -c 0 -g userspace
/usr/bin/cpufreq-set -c 1 -g userspace
/usr/bin/cpufreq-set -c 2 -g userspace
/usr/bin/cpufreq-set -c 3 -g userspace
/usr/bin/cpufreq-set -c 4 -g userspace
/usr/bin/cpufreq-set -c 5 -g userspace
/usr/bin/cpufreq-set -c 6 -g userspace
/usr/bin/cpufreq-set -c 7 -g userspace
/usr/bin/cpufreq-set -c 0 -f $1G
/usr/bin/cpufreq-set -c 1 -f $1G
/usr/bin/cpufreq-set -c 2 -f $1G
/usr/bin/cpufreq-set -c 3 -f $1G
/usr/bin/cpufreq-set -c 4 -f $1G
/usr/bin/cpufreq-set -c 5 -f $1G
/usr/bin/cpufreq-set -c 6 -f $1G
/usr/bin/cpufreq-set -c 7 -f $1G

13 May 2013

413. Povray 3.7-rc7 on debian wheezy

Update 15/5/2013: Seems like povray has been removed from debian! http://packages.debian.org/search?keywords=povray This means it's even safer to remove libjpeg62

Original post:
The latest beta version of povray, povray 3.7-rc7 will only build if you don't have libjpeg62 installed. Luckily, not much seems to rely on libjpeg62 anymore other than the debian version of povray.

If you want both the debian version and this version of povray installed at the same time, use a chroot environment to build.

The main reason for wanting to build your own povray 3.7 is that it supports parallel processing and so can speed up rendering significantly.

Note: you can compile povray 3.6 using the same instructions. Download it from here: http://www.povray.org/redirect/www.povray.org/ftp/pub/povray/Official/Unix/povray-3.6.tar.bz2

Building povray 3.7-rc7
sudo mkdir /opt/povray
sudo chown $USER /opt/povray 

mkdir ~/tmp
cd ~/tmp
sudo apt-get autoremove libjpeg62
sudo apt-get install libboost-all-dev libpng-dev libjpeg8-dev libtiff-dev build-essential checkinstall libsdl-dev

wget http://www.povray.org/redirect/www.povray.org/beta/source/povray-3.7.0.RC7.tar.bz2
tar xvf povray-3.7.0.RC7.tar.bz2
cd povray-3.7.0.RC7/
./configure --prefix=/opt/povray --program-suffix=_3.7 COMPILED_BY="me@here
make 
sudo checkinstall
0 - Maintainer: [ root@boron ] 1 - Summary: [ povray 3.7-rc7 ] 2 - Name: [ povray ] 3 - Version: [ 3.7.0.RC7 ] 4 - Release: [ 1 ] 5 - License: [ GPL ] 6 - Group: [ checkinstall ] 7 - Architecture: [ amd64 ] 8 - Source location: [ povray-3.7.0.RC7 ] 9 - Alternate source location: [ ] 10 - Requires: [ ] 11 - Provides: [ povray ] 12 - Conflicts: [ ] 13 - Replaces: [ ]
echo 'export PATH=$PATH:/opt/povray/bin' >> ~/.bashrc source ~/.bashrc

And that's it. Note that we added a suffix to the binary, so you'll have to call it with 'povray_3.7' instead of just 'povray'.

10 May 2013

412. system-config-samba on debian

I don't use samba anymore, but I do remember that Ubuntu had a very simple tool for setting up samba shares (turns out it's by redhat, not canonical). While it might be better in the long run to craft your own smb.conf, system-config-samba is convenient for quickly setting things up.

Anyway, someone at forums.debian.net asked for it, which got me thinking about making a post:

sudo apt-get install build-essential gfortran checkinstall python-all-dev cdbs debhelper quilt intltool python-central rarian-compat pkg-config gnome-doc-utils samba python-libuser libuser1 python-glade2
mkdir ~/tmp
cd ~/tmp
wget https://launchpad.net/ubuntu/+archive/primary/+files/system-config-samba_1.2.63.orig.tar.gz
tar xvf system-config-samba_1.2.63.orig.tar.gz
wget https://launchpad.net/ubuntu/+archive/primary/+files/system-config-samba_1.2.63-0ubuntu5.diff.gz
gunzip system-config-samba_1.2.63-0ubuntu5.diff.gz
patch -p0 < system-config-samba_1.2.63-0ubuntu5.diff
cd system-config-samba-1.2.63/
dpkg-buildpackage -uc -us
sudo dpkg -i ../system-config-samba_1.2.63-0ubuntu5_all.deb
sudo touch /etc/libuser.conf
gksu system-config-samba

And here we go:
i.e. it at the very least reads my /etc/samba/smb.conf accurately.

To make system-config-samba show up in your gnome menus, add it via Main Menu. Make sure to include gksu in the command to launch it.


411. Attempt at OPENMP enabled NWChem 6.1.1 -- not successful...

Update 4 June 2013:
I might return to this later and have a look at how to make the parallel executable in the bin/LINUX64 folder.

Original post:
This is another addition to my growing list over unsuccessful, abandoned or only partially successful builds.
(see e.g.
http://verahill.blogspot.com.au/2013/05/409-failed-attempt-at-compiling-gamess_10.html
http://verahill.blogspot.com.au/2013/05/409a-failed-attempt-at-compiling-gamess.html
http://verahill.blogspot.com.au/2012/08/compiling-dalton-qm-on-debian-in.html
http://verahill.blogspot.com.au/2012/07/quantum-espresso-on-rocks-543-centos-56.html)

In other words -- yes, it builds. But no, it is unusable.

I can build nwchem with openmp support, and it does run in parallel -- but the wall time is enormous since most of the time only a single thread is running.

Maybe someone will read this and see what's missing, or feel inspired to make their own attempt

What I did
ACML libraries were installed as shown in e.g. http://verahill.blogspot.com.au/2013/05/409-failed-attempt-at-compiling-gamess_10.html

Nwchem was downloaded:
sudo mkdir /opt/nwchem
sudo chown $USER:$USER /opt/nwchem
cd /opt/nwchem
wget http://www.nwchem-sw.org/download.php?f=Nwchem-6.1.1-src.2012-06-27.tar.gz
tar xvf Nwchem-6.1.1-src.2012-06-27.tar.gz
cd nwchem-6.1.1-src/

Next I edited src/config/makefile.h
2363 ifdef OPTIMIZE 2364 FFLAGS = $(FOPTIONS) $(FOPTIMIZE) 2365 CFLAGS = $(COPTIONS) $(COPTIMIZE) -fopenmp 2366 else 2367 # Need FDEBUG after FOPTIONS on SOLARIS to correctly override optimization 2368 FFLAGS = $(FOPTIONS) $(FDEBUG) 2369 CFLAGS = $(COPTIONS) $(CDEBUG) -fopenmp 2370 endif 2371 INCLUDES = -I. $(LIB_INCLUDES) -I$(INCDIR) $(INCPATH) 2372 CPPFLAGS = $(INCLUDES) $(DEFINES) $(LIB_DEFINES) 2373 LDFLAGS = $(LDOPTIONS) -L$(LIBDIR) $(LIBPATH) 2374 LIBS = $(NW_MODULE_LIBS) $(CORE_LIBS) -lgomp 2375
I then built using the following build script:
export LARGE_FILES=TRUE export TCGRSH=/usr/bin/ssh export NWCHEM_TOP=`pwd` export NWCHEM_TARGET=LINUX64 export NWCHEM_MODULES="all" export PYTHONVERSION=2.7 export PYTHONHOME=/usr export BLASOPT="-L/opt/acml/acml5.3.1/gfortran64_fma4_mp_int64/lib -lacml_mp -lpthread" export USE_OPENMP=y export LIBRARY_PATH="$LIBRARY_PATH:/opt/acml/acml5.3.1/gfortran64_fma4_mp_int64/lib" cd $NWCHEM_TOP/src make clean make nwchem_config make FC=gfortran 2> make.err 1>make.log cd $NWCHEM_TOP/contrib export FC=gfortran ./getmem.nwchem
So far so good.

Where it fails
A picture is probably in order:
Note that while this is a short run, it is perfectly representative of what I'm seeing with 'real' jobs too -- I get eight threads auto-spawning (as seen by top), but only one thread is active most of the time.

Basically, most of the time only one core is running at 100% (i.e. showing as 12.5 % here since I have 8 cores), with the other cores occasionally kicking in (the 'spikes').

The wall times is 63 seconds, and the 'cpu time' is 83.1 seconds. Ideally, for a fully parallel run the cpu time should be as close to the wall time multiplied with eight for a shared run like this (but is always smaller).

As a comparison, here's an mpi-enabled binary:
Here all cores are active over most of the (short) run. The cpu time was 9.9 seconds and the wall time 11.8 seconds. For an mpi run the wall time should be as close to the cpu time as possible (but is always larger)

So it's not particularly 'parallel' in the OMP case -- but I don't know why. Maybe nwchem 6.1.1 isn't quite ready for OMP yet? I've noticed that it's one of the areas where the upcoming release is supposed to have been improved.


'profiling' with sar -- how-to
sudo apt-get install syssstat

Edit /etc/default/sysstat:
8 # will be overwritten by debconf! 9 ENABLED="true" 10
sudo service sysstat restart

Before launching the run, set sar to run in another windows and collect data before immediately launching the run you want to monitor in a different window:

sar 1 180 >> run.log
collects data every 1 seconds and repeats it 180 times (i.e. 181 seconds) and stores the data in run.log.

09 May 2013

410. Compiling LAMMPS on Debian (with GPU support)

MM/MD scares me a lot -- it requires experience, expertise and intuition to set up an MD simulation properly, especially if you need to parametrise a new system. In comparison, while DFT of course can easily yield wildly inaccurate results as a function of using the wrong method/functional/basis set or by simply asking the 'wrong' question, I find it easier to understand and to implement based on previous literature (i.e. if I read the computational details in a paper I often know how to repeat the experiments. With MD I often don't).

Anyway, a friend who is an expert in the field is using LAMMPS, and learning by imitation is better than not learning at all, so I've decided to invest a little bit of time familiarizing myself with this software.

The reasons he cited are it's more barebones, and it's C++ (advantage for some, disadvantage for others), and very modular so easy to extend (he's a theoretical chemist rather than a computational one). Finally, it has GPU support. I'm not really qualified to comment one way or the other.


Compilation

Voro++
First compile voro++ which is used for Vorono tesselation.
mkdir ~/tmp
cd ~/tmp
wget http://math.lbl.gov/voro++/download/dir/voro++-0.4.5.tar.gz
tar xvf voro++-0.4.5.tar.gz
cd voro++-0.4.5/
make
sudo make install

Note that it uses optimisation level 3 which makes me nervous in general -- edit the Makefile to change to O2 if you prefer that.

OpenKIM api
Next compile the OpenKIM api. Note that you can't run make in parallel.

sudo mkdir /opt/kimdir
sudo chown $USER:$USER /opt/kimdir
cd /opt/kimdir
wget http://s3.openkim.org/openkim-api-v1.1.1.tgz
tar xvf openkim-api-v1.1.1.tgz
cd openkim-api-v1.1.1/
export KIM_DIR=`pwd`
echo "export KIM_DIR=`pwd`" >> ~/.bashrc
source ~/.bashrc
make examples
make

LAMMPS
Grab the lammps source code. You can get it directly from Sandia national labs, or via sourceforge.

sudo apt-get install openmpi-bin libopenmpi-dev fftw3-dev build-essential gfortran
mkdir ~/tmp
cd ~/tmp
wget http://aarnet.dl.sourceforge.net/project/lammps/lammps-2Feb13.tar.gz
tar xvf lammps-2Feb13.tar.gz
cd lammps-2Feb13/src/
cp MAKE/Makefile.openmpi MAKE/Makefile.verahill
Edit MAKE/Makefile.verahill
 53 FFT_PATH =
 54 FFT_LIB =       -lfftw3
 55 

make verahill

text data bss dec hex filename 6111696 11448 17024 6140168 5db108 ../lmp_verahill make[1]: Leaving directory `/opt/lammps/lammps-2Feb13/src/Obj_verahill'
This compiles a binary in src/ called lmp_verahill. Note that it only enables a few modules.
make package-status
Installed NO: package ASPHERE Installed NO: package BODY Installed NO: package CLASS2 Installed NO: package COLLOID Installed NO: package DIPOLE Installed NO: package FLD Installed NO: package GPU Installed NO: package GRANULAR Installed NO: package KIM Installed YES: package KSPACE Installed YES: package MANYBODY Installed NO: package MC Installed NO: package MEAM Installed YES: package MOLECULE Installed NO: package OPT Installed NO: package PERI Installed NO: package POEMS Installed NO: package REAX Installed NO: package REPLICA Installed NO: package RIGID Installed NO: package SHOCK Installed NO: package SRD Installed NO: package VORONOI Installed NO: package XTC Installed NO: package USER-MISC Installed NO: package USER-ATC Installed NO: package USER-AWPMD Installed NO: package USER-CG-CMM Installed NO: package USER-COLVARS Installed NO: package USER-CUDA Installed NO: package USER-EFF Installed NO: package USER-OMP Installed NO: package USER-MOLFILE Installed NO: package USER-REAXC Installed NO: package USER-SPH
Additional packages.
 To enable additional packages, after doing make verahill, do e.g.
make yes-body yes-dipole
Installing package body Installing package dipole
Again, note that you'll need the proper dependencies installed (e.g. KIM and Voro++ -- and for KIM make sure that you've got KIM_DIR set in your ~/.bashrc as shown above) Next, compile all the libs you need. The easiest approach is to do the following (assuming you're in the src directory):

export LD_LIBRARY_PATH=$LD_LIBRARY_PATH:/usr/lib/openmpi/include/
cd ../lib/reax
make -f Makefile.gfortran

Important: Edit Makefile.lammps:
3 reax_SYSINC = 4 reax_SYSLIB = -lgfortran #-lifcore -lsvml -lompstub -limf 5 reax_SYSPATH = #-L/opt/intel/fce/10.0.023/lib
cd ../poems
make -f Makefile.g++
cd ../meam
make -f Makefile.gfortran
cd ../linalg
make -f Makefile.gfortran
cd ../colvars
make -f Makefile.g++
cd ../../src/
make yes-asphere yes-body yes-class2 yes-colloid yes-dipole yes-fld yes-granular yes-kim yes-mc yes-meam yes-opt yes-peri yes-poems yes-reax yes-replica yes-rigid yes-shock yes-voronoi yes-xtc

Finish by running
make clean-all
make verahill

to properly set things up.

GPU/CUDA
Make sure you've installed the CUDA toolkit -- on debian it's the nvidia-cuda-toolkit package.

 I'll only show the GPU package here -- there's also USER_CUDA. Read up on the difference on your own.

 Edit lib/gpu/Makefile.linux to set the correct sm value, which depends on the GPU compute capability version (you can look this up at e.g. https://developer.nvidia.com/cuda-gpus and http://www.geeks3d.com/20100606/gpu-computing-nvidia-cuda-compute-capability-comparative-table/ ).

 For GPU compute capability 3.0 you set CUDA_ARCH to sm_30. If your card supports double precision, use -D_DOUBLE_DOUBLE
6 CUDA_HOME = /usr 7 NVCC = nvcc 8 9 # Tesla CUDA 10 #CUDA_ARCH = -arch=sm_21 11 # newer CUDA 12 CUDA_ARCH = -arch=sm_30 13 # older CUDA 14 #CUDA_ARCH = -arch=sm_10 -DCUDA_PRE_THREE 15 16 CUDA_PRECISION = -D_SINGLE_SINGLE 17 CUDA_INCLUDE = -I$(CUDA_HOME)/include 18 CUDA_LIB = -L$(CUDA_HOME)/lib
and edit Makefile.lammps
3 gpu_SYSINC = 4 gpu_SYSLIB = -lcudart -lcuda 5 gpu_SYSPATH = #-L/usr/local/cuda/lib64
then do
make -f Makefile.linux
cd ../../src
make yes-gpu
make verahill

More on GPU compute capability version If you use an sm_XX value which is too high, e.g. sm_30 with GeForce 210 (v 1.2) you get:
LAMMPS (2 Feb 2013)
ERROR: GPU library not compiled for this accelerator (gpu_extra.h:40)
Cuda driver error 4 in call at file 'geryon/nvd_device.h' in line 116.
*** The MPI_Abort() function was called after MPI_FINALIZE was invoked.
*** This is disallowed by the MPI standard.
If you use sm_12 with GF210, you get to this point.
- Using GPGPU acceleration for pppm: - with 1 proc(s) per device. -------------------------------------------------------------------------- GPU 0: GeForce 210, 16 cores, 0.98/1 GB, 1.4 GHZ (Single Precision) -------------------------------------------------------------------------- Initializing GPU and compiling on process 0...Done. Initializing GPUs 0-1 on core 0...Done. ERROR: Double precision is not supported on this accelerator (gpu_extra.h:42)
There's more about this in lib/gpu/README:
124 NOTE: Double precision is only supported on certain GPUs (with
125       compute capability>=1.3). If you compile the GPU library for
126       a GPU with compute capability 1.1 and 1.2, then only single
127       precision FFTs are supported, i.e. LAMMPS has to be compiled
128       with -DFFT_SINGLE. For details on configuring FFT support in
129       LAMMPS, see http://lammps.sandia.gov/doc/Section_start.html#2_2_4
To do that, edit (in this case) src/MAKE/Makefile.verahill and set -DFFT_SINGLE and make sure to link to a single precision library (I built that as part of gromacs 4.5.5. See e.g. http://verahill.blogspot.com.au/2012/03/building-gromacs-with-fftw3-and-openmpi.html):
52 FFT_INC = -DFFT_FFTW3 -DFFT_SINGLE 53 FFT_PATH = 54 FFT_LIB = /opt/fftw/fftw-3.3.2/single/lib/libfftw3f.a
and recompiling everything (make clean-all && make verahill).

Note that I am in now way implying that a GeForce 210 is a suitable test card -- if you are serious about GPU calculations then there are serious cards out there, for serious money. I'm currently designing my next compute node, and while I probably won't go the GPU route anytime soon, I'm thinking about getting a mobo with multiple PCI-E slots for multiple cards. But I really don't have much experience.


Testing
You can test it by e.g. changing directory to examples/indent
cd ../examples/indent
mpirun -n 2 ../../src/./lmp_verahill < indent.in

Installation
You can move lmp_verahill to e.g. /opt/lammps and add it to PATH for easier execution. In my particular example I did
sudo mkdir /opt/lammps
sudo chown $USER /opt/lammps
mv ~/tmp/lammps-2Feb13 /opt/lammps
ln -s /opt/lammps/lammps-2Feb13/src/lmp_verahill /opt/lammps/lammps
echo 'export PATH=$PATH:/opt/lammps' >> ~/.bashrc
source ~/.bashrc