17 February 2012

70. Bug in Debian version of Gnuplot 4.4.0

The symptom:

Gnuplot 4.4.0-1.1 (the current Debian version) can't handle numbers smaller than 10**(-9) properly
e.g.
me@beryllium:~/Dropbox$ gnuplot
G N U P L O T
Version 4.4 patchlevel 0
last modified March 2010
System: Linux 3.2.0-1-amd64
Copyright (C) 1986-1993, 1998, 2004, 2007-2010
Thomas Williams, Colin Kelley and many others
gnuplot home:     http://www.gnuplot.info
faq, bugs, etc:   type "help seeking-assistance"
immediate help:   type "help"
plot window:      hit 'h'
Terminal type set to 'wxt'
gnuplot> print 10**(-9)
1e-09
gnuplot> print 10**(-10)
7.09186959928599e-10
gnuplot> print 10**(-11)
8.22536045240377e-10

It's not related to set zero.

gnuplot> set zero 1e-20
gnuplot> print 10**(-11)
8.22536045240377e-10
gnuplot> print 10**(-10)
7.09186959928599e-10
gnuplot> print 10**(-9)
1e-09
gnuplot> 

Currently, I'm using version 4.4.0-1.1 -- which is used in all versions of Debian.


me@beryllium:~$ apt-cache showpkg gnuplot
Package: gnuplot
Versions:
4.4.0-1.1 (/var/lib/apt/lists/ftp.au.debian.org_debian_dists_testing_main_binary-amd64_Packages) (/var/lib/apt/lists/ftp.au.debian.org_debian_dists_stable_main_binary-amd64_Packages) (/var/lib/apt/lists/ftp.au.debian.org_debian_dists_unstable_main_binary-amd64_Packages) (/var/lib/dpkg/status)
..
Dependencies:
4.4.0-1.1 - gnuplot-nox (2 4.4.0-1.1) gnuplot-x11 (2 4.4.0-1.1) gnuplot-doc (2 4.4.0-1.1)
Provides:
4.4.0-1.1 -
Reverse Provides: 

The bug affects the output from the print statement as well as the internal handling of numbers:


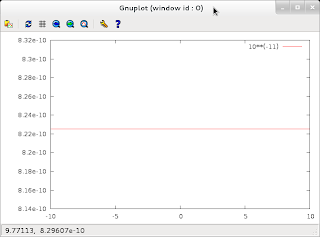
gnuplot> plot 10**(-11)
Warning: empty y range [8.22536e-10:8.22536e-10], adjusting to [8.14311e-10:8.30761e-10]


gnuplot> plot 10**(-12)
Warning: empty y range [-1.3748e-09:-1.3748e-09], adjusting to [-1.36105e-09:-1.38855e-09]
gnuplot> plot 10**(-12)/10**(-10)
Warning: empty y range [-1.93855:-1.93855], adjusting to [-1.91917:-1.95794]


gnuplot> set xrange [10**(-9):10**(-12)]
gnuplot> plot x 


The bug is similar to this: http://bugs.debian.org/cgi-bin/bugreport.cgi?bug=360087

Integer overflows are not reported. A hint could be printed that real
(float) numbers should (could) be used to avaid this problem.
gnuplot> print 1000000*100000
1215752192
gnuplot> print 1000000**2
-727379968
gnuplot> print 100000**2
1410065408
gnuplot> a=2000000**2
gnuplot> print a
1385447424
gnuplot> print 10000**2 # OK
100000000
which ended up with "Added tag(s) wontfix. "
Ergo, if you're using debian and you are using gnuplot for serious purposes (research, work), compile your own version of gnuplot as per below.


ANNOYING: there are packages such as maxima which depend on gnuplot. Remove the debian version of gnuplot using apt-get and you lose maxima too. Octave, which one would think would be a heavier user of gnuplot, does not depend on gnuplot but merely recommends it.


Package: maxima                        
State: not installed
Version: 5.26.0-3
Priority: optional
Section: math
Maintainer: Camm Maguire <camm@debian.org>
Uncompressed Size: 47.8 M
Depends: libc6 (>= 2.3), libgmp10, libreadline6 (>= 6.0), libx11-6, gnuplot-x11
Maybe time to build your own maxima.deb? In the end you will end up with a very inelegant system with mixed packages.


Upstreams:
I've compiled and checked the current upstreams version:

me@beryllium:~$ sudo apt-get autoremove gnuplot gnuplot-nox
cd ~/temp
wget http://downloads.sourceforge.net/project/gnuplot/gnuplot/4.4.4/gnuplot-4.4.4.tar.gz?r=http%3A%2F%2Fsourceforge.net%2Fprojects%2Fgnuplot%2Ffiles%2F&ts=1329439455&use_mirror=aarnet
 mv gnuplot-4.4.4.tar.gz\?r\=http\:%2F%2Fsourceforge.net%2Fprojects%2Fgnuplot%2Ffiles%2F gnuplot-4.4.4.tar.gz
tar -xvf gnuplot-4.4.4.tar.gz
./configure
make 
sudo checkinstall


me@beryllium:~/temp/gnuplot-4.4.4$ sudo dpkg -i gnuplot_4.4.4-1_amd64.deb
(Reading database ... 446323 files and directories currently installed.)
Preparing to replace gnuplot 4.4.4-1 (using gnuplot_4.4.4-1_amd64.deb) ...
Unpacking replacement gnuplot ...
Setting up gnuplot (4.4.4-1) ...
Processing triggers for man-db ...
me@beryllium:~/temp/gnuplot-4.4.4$ gnuplot
G N U P L O T
Version 4.4 patchlevel 4
last modified November 2011
System: Linux 3.2.0-1-amd64
Copyright (C) 1986-1993, 1998, 2004, 2007-2011
Thomas Williams, Colin Kelley and many others
gnuplot home:     http://www.gnuplot.info
faq, bugs, etc:   type "help seeking-assistance"
immediate help:   type "help"
plot window:      hit 'h'
Terminal type set to 'x11'
gnuplot> print 10**(-9)
1e-09
gnuplot> print 10**(-10)
1e-10
gnuplot> print 10**(-11)
1e-11
gnuplot> print 3.14*10**(-10)
3.14e-10
gnuplot> print 3.14*10**(-20)
3.14e-20
gnuplot> print 3.14*10**(-21)
3.14e-21
gnuplot> print 3*10**(-12)/(4*10**(-14))
75.0
gnuplot> 

Ergo, upstreams v 4.4.4 works.

Update: Here's my bug report:
http://bugs.debian.org/cgi-bin/bugreport.cgi?bug=660299

69. Reverse VNC using vncviewer and tightvnc

Reverse VNC is a good way of helping people remotely. It requires that your IP is remotely accessible, but it does NOT require that the client's IP is public.

This is based on http://ubuntuforums.org/showthread.php?t=299489 and https://caedesnotes.wordpress.com/2010/01/08/remote-administrationtech-support-with-reverse-vnc/ but with screenshots. If both of you are using linux but you for some reason prefer vnc over ssh, have a look at that link for how to do (i.e. using x11vnc on the client)

Like a lot of people I have parents. Like most of those people, my parents aren't too interested in augmenting their computer skills. Which is fine. But trying to explain over the phone where to click etc. gets old really fast -- VNC is an advantage here if they are running windows. Parents also tend to appreciate lots of screenshots -- so I've provided that. It's running on a French version of XP -- it's my way of indirectly learning and keeping my French alive.

-- START HERE --

The situation:
You're running linux. The client is running Windows. You are you, the person you're helping is The Client.
Set up your system before having the client follow the instructions here. I put the client instructions first so you can send them to this page.


The Client:
They are running Windows. They don't have a public IP. Here's what they should do:

1. Download tightvncviewer from here: http://www.tightvnc.com/download.php

2. Installation of tightvnc

a) Install both client and server or only server. It doesn't matter -- the server is important here.


b) During setup, make sure that you check all the boxes as shown below


You will not need to share your password with the person helping you. Make sure not to leave these blank.


c) Tightvnc requires the administrator password to be able to accept connections.

Right-click on the icon in the taskbar tray, and click on Configuration...

Change main server port to 5500. We're doing this to be consistent.
You may de-select 'Serve Java Viewer to Web clients)


The steps above you will only need to do once.

The following steps you will need to do each time you want to get help:
1. Right-click on the vnc icon in the taskbar tray. Select Attach Listening Viewer...

2. In Hostname or IP address of the viewer, type the IP address given to you by the person helping you. In this example it's 192.168.1.102, but it can be anything. Append ::5500 to the IP address. In our example, the input is 192.168.1.102::5500


That's it. If something not described here is happening, make sure to tell the person helping you. Especially if messages about Blocked programmes or Firewalls come up.

You (linux person):
Your public IP is 192.168.1.102 in the example above. Your port 5500 is open to the world.

sudo apt-get install vncviewer

Start your listening session by

vncviewer -compresslevel 9 -listen 0
vncviewer -listen: Listening on port 5500
vncviewer -listen: Command line errors are not reported until a connection comes in.


Once the connection is started by the client you get:
Connected to RFB server, using protocol version 3.8
Enabling TightVNC protocol extensions
No authentication needed
Authentication successful
Desktop name "tantalum"
VNC server default format:
  16 bits per pixel.
  Least significant byte first in each pixel.
  True colour: max red 31 green 63 blue 31, shift red 11 green 5 blue 0
Using default colormap which is TrueColor.  Pixel format:
  32 bits per pixel.
  Least significant byte first in each pixel.
  True colour: max red 255 green 255 blue 255, shift red 16 green 8 blue 0
You can play around with the compresslevels which runs from 0 to 9. Make sure to keep an eye on your firewall log -- your client/parent may easily get frustrated if things aren't working -- and you really don't want to be the cause of it.


Notes:
iptables
I tested this by running windows xp in virtualbox on one linux box, 192.168.1.1, and piped the vnc connection through to another linux box at 192.168.1.102. The firewall settings I had to do were:

On 192.168.1.1

Open port 17500 to tcp traffic from 192.168.1.102 to 255.255.255.255:
sudo iptables -A INPUT -i eth1 -s 192.168.1.102 -d 255.255.255.255 -p tcp --dport 17500 -j ACCEPT


On 192.168.1.102
Open port 5500 to tcp traffic destined for 192.168.1.102:
sudo iptables -A INPUT -d 192.168.1.102 -p tcp --dport 5500 -j ACCEPT

15 February 2012

68. Reverse ssh tunnel to access server behind firewall

This isn't so much a post to show how to do it as it is a post describing a specific example of it in use. I basically spent two minutes looking at http://www.howtoforge.com/reverse-ssh-tunneling and was up and running in no time. It's that simple.

The sitation:
I have a computer at work. Opening up a port to allow for remote access is a headache and a half, since it involves getting signatures from a range of people and drawing up an IT security plan etc. As an academic during grant season I don't have that kind of time. Nor do I want to put up with all that BS. I also  understand that opening up ports willy-nilly can leads to security threats.

Anyway, I have iinet at home and they leave port 22 open by default. I have a Linksys WRT54 running Tomato and I allow key-based ssh external access.

My IP address is not static but changes perhaps once per month at most.
On my main desktop at home I run  this as a cron job:


#!/bin/bash
ipaddr=`wget http://automation.whatismyip.com/n09230945.asp -O - -o /dev/null`
when=`date +%a' '%d' '%b' '%Y' '%H':'%M`
echo $when $ipaddr >>/home/me/Dropbox/currentip.dat
exit 0

That way I can easily look up the latest ip address in my dropbox folder.

I run debian testing on all boxes.
Connecting via ssh to my home router works flawlessly. The other way doesn't work at all.

The solution:
We'll pretend that my home ip is 124.54.34.23 and my work ip is 169.23.54.6

At work
While at work, I connect to my home router using
ssh -R 19999:localhost:22 root@124.54.34.23

This logs me in to my Tomato router. Once in, start
top -d 600

This will keep top running, updating every ten minutes. This is to prevent the connection from being dropped.

The alternative is of course to use autossh -- the basic usage is just to replace ssh.

Now, go home

At home
log in to your router from the local network, then connect to port 19999 on localhost:
me@niobium:~$ ssh root@192.168.2.1

Tomato v1.28.1816

BusyBox v1.14.4 (2010-06-27 20:11:16 PDT) built-in shell (ash)
Enter 'help' for a list of built-in commands.

# ssh me@localhost -p 19999
me@localhost's password:

Linux beryllium 3.2.0-1-amd64 #1 SMP Sun Feb 5 15:17:15 UTC 2012 x86_64

The programs included with the Debian GNU/Linux system are free software;
the exact distribution terms for each program are described in the
individual files in /usr/share/doc/*/copyright.

Debian GNU/Linux comes with ABSOLUTELY NO WARRANTY, to the extent
permitted by applicable law.
Last login: Wed Feb 15 18:55:45 2012 from localhost

me@beryllium:~$ 

Simple as that

67. Neat trick using reverse proxy -- several http hosts behind a firewall with only one port open

The situation: I was running two wireless webcams (Airlink101 AIC 250W) in order to monitor my laboratory. Both of these were connected to a linksys router. Only port 22 and 80 were opened by the university. We were forwarding port 80 to a Debian box running apache.

The goal: We wanted to have a page, e.g.www.externalhostname.com/image.html, serve up images from both the webcams. Using apache.

The solution:
A friend came up with this neat solution.

The following is assumed:
  • The external dns name is www.externalhostname.com
  • The cameras have the LAN ips 192.168.1.121 and 192.168.1.122


First the html file -- image.html:

<html>
<head>
<title>Lab Webcams</title>
<META HTTP-EQUIV="REFRESH" CONTENT="5">
</head>
<body bgcolor="rgb(0,0,122)" text="white">
<table border="1">
<tr>
<td>
Cam 1480
</td>
<td>
Cam 1485
</td>
<tr>
<td>
<img src="http://www.externalhostname.com/cam1/image.jpg" width="320" height="240"/>
</td>
<td>
<img src="http://www.externalhostname.com/cam2/image.jpg" width="320" height="240"/>
</td>
</table>
</body>
</htm>
Next, configure apache using /etc/apache2/httpd.conf:
LoadModule proxy_module /usr/lib/apache2/modules/mod_proxy.so
LoadModule proxy_http_module /usr/lib/apache2/modules/mod_proxy_http.so
LoadModule proxy_connect_module /usr/lib/apache2/modules/mod_proxy_connect.so
ProxyRequests Off
<Proxy *>
Order deny,allow
Allow from all
</Proxy>
ProxyPass /cam1 http://192.168.1.121
ProxyPassReverse /cam1 http://192.168.1.121
ProxyPass /cam2 http://192.168.1.122
ProxyPassReverse /cam2 http://192.168.1.122

Finally, copy the following from /etc/apache2/mods-available to /etc/apache2/mods-enabled:
proxy.conf
<IfModule mod_proxy.c>
</IfModule>
proxy_http.load

# Depends: proxy
LoadModule proxy_http_module /usr/lib/apache2/modules/mod_proxy_http.so
proxy.load


LoadModule proxy_module /usr/lib/apache2/modules/mod_proxy.so


That's it.

66. Minor bug: evolution 3.2.2 crashes, google chrome sync going crazy on debian testing

Symptom:

  • Evolution 3.2.2 crashes every few minutes -- presumably on retrieving new mail every ten minutes
  • Evolution uses 150% of your resources and becomes unresponsive if you try to recover messages lost in the crash
  • If you sync your Chrome/Chromium browser with google, you get a warning triangle saying that sync failed. On trying to log in again the log-in window keeps disappearing

Logging evolution using CAMEL_DEBUG=all evolution >&evo.log gives
(evolution:8112): evolution-mail-CRITICAL **: e_mail_folder_uri_from_folder: assertion `CAMEL_IS_FOLDER (folder)' failed
**
GLib-GIO:ERROR:/tmp/buildd/glib2.0-2.30.2/./gio/gdbusmessage.c:1986:append_value_to_blob: assertion failed: (g_utf8_validate (v, -1, &end) && (end == v + len))
[imapx:F] adding command, fmt = 'IDLE'
[imapx:F] completing command buffer is [4] 'IDLE'
[imapx:F] Starting command (active=1, literal) F00104 IDLE
[imapx:F] camel_imapx_write: 'F00104 IDLE
'
[imapx:F] camel_imapx_read: buffer is '+ idling
'
[imapx:F] token '+'
[imapx:F] token TOKEN 'idling'
[imapx:F] token '
'
[imapx:F] Got continuation response for IDLE
[imapx:F] ** Starting next command
[imapx:F] * no, no jobs
Here's the log from another crash:

(evolution:19158): evolution-mail-CRITICAL **: e_mail_folder_uri_from_folder: assertion `CAMEL_IS_FOLDER (folder)' failed
(evolution:19158): GLib-CRITICAL **: g_hash_table_lookup: assertion `hash_table != NULL' failed
(evolution:19158): evolution-mail-CRITICAL **: e_mail_folder_uri_from_folder: assertion `CAMEL_IS_FOLDER (folder)' failed
**

GLib-GIO:ERROR:/tmp/buildd/glib2.0-2.30.2/./gio/gdbusmessage.c:1986:append_value_to_blob: assertion failed: (g_utf8_validate (v, -1, &end) && (end == v + len))
Followed by instant Evolution disappearance

If I start evolution and disable all gmail related accounts, it stays stable. If I enable our university gmail-hosted account it crashes --

Icedove/thunderbird is not crashing.

The whole thing seems to be a combination of weird Google stuff and Evolution behaviour.


Solution - sort of:  
I solved the google chrome issue by signing out/disabling sync, then re-enabling again. I also removed my Online Accounts in gnome, then added them again.
I also installed libnss3-tools due to some errors chrome was throwing up, but it's probably unrelated.
Evolution was still unhappy though. I did the 'windows' thing and rebooted -- evolution crashed after about twenty minutes. After starting evolution again it ran without a hickup for 8 hours before I shut my system down.

65. LaTeX for 2013 ARC proposals

If you're in the limbo where you're not quite expert enough with LaTeX, but have happily said goodbye to MS Office, and you're an Australia scientist who annually has to fight the endless bureaucracy of the Australian Research Council (seriously -- 10 page limit about the science, followed by 70 pages about personal qualities?) you may find that you're in for a lot of grief.

If you collaborate with other people you will have to settle for a file format everyone can deal with ('everyone' except linux users), which is likely to be Word run in a virtual environment. If you're writing by yourself or together with more computer-savvy colleagues you will get away with using LaTeX for a fair number of the sections, while using gEdit for others.

I'm presuming that you will create a separate .tex file for each section.

The rules (http://www.arc.gov.au/ncgp/dp/dp_instructions.htm) says that you need

  • Black type
  • Single column
  • A4
  • 0.5 cm margin on all sides (top, bottom, right, left)
  • A 'highly legible font', preferably 12 pt Times New Roman


Also, reading between the lines, you shouldn't/needn't include page numbers since this will be generated by the RMS.

\usepackage{nopageno}

with \pagestyle{plain} just after \begin{document} may do the trick.


Black type and single column are defaults in LaTeX, so need no action. Everything below goes into the preamble.

For A4 and 12 point font, set that in the documentclass

\documentclass[12pt,a4paper]{article}\usepackage[latin1]{inputenc}\usepackage{amsmath}\usepackage{amsfonts}\usepackage{amssymb}\usepackage{mhchem}


For 0.5 cm margins on all sides 

\usepackage[margin=0.5cm]{geometry}
Additional for all sections:

\setlength\parindent{0pt} %no indent on first paragraph \usepackage{fullpage} % an alternative if you don't need 0.5 cm margins \author{} %we don't want author\date{} %we don't want date\begin{document}

Part C, section C1 Here you have several sections, such as AIMS AND BACKGROUND, RESEARCH PROJECT etc. To make sure that these DO NOT get numbered, use
\seccounter{secnumbdepth}{0}

Since the references are a separate document, set
\documentclass[10pt,a4paper]{article}
Part D is filled out online.

Part E, while a pain to write, uses regular 12 pt Times New Roman. If you don't want section numbering, use {secnumbdepth}{0}. If you want your sections to look like this
E1. Justification....
E2. Details of non-ARC contributions

Use
\seccounter{secnumbdepth}{1}\def\thesection{E\arabic{section}.}
As usual, this goes into the preamble, not the body. You should -- ideally -- never have to change the way you write. All changes should go into the documentclass style file or preamble.


Part F. Oh how we curse you.

F13.1 should be easy enough -- you can even skip sections and just use \title{F13.1. Justification} together with a \maketitle right after \begin{document}. Or you can use
\def\thesection{F13.\arabic{section.}


F14.2 offers potential for fun:
\setcounter{secnumdepth}{4}
\def\thesection{F14.2.\arabic{section}.}
\def\thesubsection{\alph{subsection})}
\title{F14.2 Recent significant publications (since 2007)}


This way if you put the following in the body:
\maketitle
\section{Research publications}
\subsection{Scholarly books}
\subsection{Scholarly book chapters}

you get
F14.2 Recent significant publications (since 2007) F14.2.1. Research publications a) Scholarly books b) Scholarly book chapters

For your reference list you may use 
25.* Blow, Joe; Doe, John; \textbf{Hill, Vera}. \emph{One page derivation of the GUT}, Phys. Rev., \textbf{2012}, \emph{108(3)}, 234-235 \\
For F14.3 use
\def\thesection{F\arabic{section}.} \def\thesubsection{14.\arabic{subsection}}
without \maketitle but with 
\subsection{Ten career-best publications}
in the body
G1 is difficult in latex if you want to do it properly. I gave up and used libreoffice for this one since I couldn't figure out how 
Put this in the preamble
\usepackage{rotating} %rotate text in narrow tables...\usepackage{array} % for vertical centering in tables...hacky...
and this in the body:
\section{Research support for Vera Hill}
\begin{table}[h]
 \begin{tabular}{b{4cm} p{0.5cm} p{0.5cm} l c  c c c c}
\textbf{ Description} & \begin{sideways}Same Research area \end{sideways}  &  \begin{sideways}Support type \end{sideways}& ARC Project ID & 2010 (k\$) & 2011 (k\$) & 2012 (k\$) & 2013 (k\$) & 2014 (k\$) \\
 \hline
 "Unifying general relativity with quantum mechanics" & N & C  & DP100202921 & 120 & 190 & 180 & 170 & 120 \\
 \hline
 \end{tabular}
\end{table}

It doesn't look quite right. You may also want to try e.g. m{0.5cm} for the rotated header captions The remaining sections should be fairly straightforward, formatting-wise. Ultimately, the ARC application process is one of the most ridiculous one I've had the misfortune to be subjected to.

13 February 2012

64. Two network cards on the same network, splitting traffic

Some thoughts on using two LAN network cards: While it sounds instinctively neat, the main issue here is to decide how it should actually work i.e. where is what traffic going.

One idea is send traffic to one subset (e.g. 192.168.1.1-100) of IP addresses via one card, and another subset (e.g. 192.168.1.101-255) to another.

This isn't a job for a firewall (other than to restrict/allow traffic) but a situation where you use routing.

Some background
To see your routing table, run
sudo route 
(or sudo route -n if you want to resolve names)

Here's the routing table of the gateway in this post where eth0 is connected to the Outside World, and eth1 is connected (and acting as the gateway of) a subnet of 192.168.0.-255:

Kernel IP routing table
Destination     Gateway            Genmask   Flags Metric Ref    Use Iface
default             xxx.xxx.xx7.254    0.0.0.0           UG     0        0        0    eth0
xxx.xxx.xx0.0     *                      255.255.248.0   U     0         0        0    eth0
link-local            *                      255.255.0.0       U     1000   0        0    eth1
192.168.1.0       *                      255.255.255.0   U     0         0        0    eth1

It says:
Route everything by default to the gw at xxx.xxx.xx7.254,
unless the target is in network xxx.xxx.xx0.0-255 or
unless the target is in 169.254.0.0 - 169.254.255.255 (link-local is 169.254.0.0) or
unless the target is in 192.168.1.0-255

Here's the routing table of a box with a single card attached to the LAN:

Kernel IP routing table
Destination     Gateway              Genmask   lags Metric Ref    Use Iface
default          192.168.1.1             0.0.0.0          UG    0      0        0 eth0
192.168.1.0     *                    255.255.255.0      U     0      0       0 eth0

Finally, here's the routing table of a box with two cards connected to different LANs:

Kernel IP routing table
Destination     Gateway             Genmask         Flags Metric Ref    Use Iface
default         192.168.2.1            0.0.0.0         UG     0      0        0 eth3
default         192.168.1.1            0.0.0.0         UG     0      0        0 eth2
192.168.1.0     *                     255.255.255.0   U     0      0        0 eth2
192.168.2.0     *                     255.255.255.0   U     0      0        0 eth3
Default and * both equal 0.0.0.0 using sudo route -n.


SOLUTIONS
1. Two cards on the same network using /etc/network/interfaces -- very simple:
Yup, I talked about route before, but this is a less granular method using /etc/network/interfaces:

auto eth2
iface eth2 inet static
address 192.168.1.105
netmask 255.255.255.0
gateway 192.168.1.1
auto eth3
iface eth3 inet static
address 192.168.1.130
netmask 255.255.255.128
gateway 192.168.1.1


This configuration gives the following sudo route -n:

Kernel IP routing table
Destination         Gateway         Genmask      Flags Metric    Ref    Use   Iface
0.0.0.0                192.168.1.1           0.0.0.0           UG       0         0        0      eth2
192.168.1.0           0.0.0.0        255.255.255.0     U        0         0        0      eth2
192.168.1.128        0.0.0.0       255.255.255.128     U        0         0        0      eth3

Which is exactly what we wanted.


Solution 1.b using network-manager
In gnome 3/gnome-shell, go to system settings/network/select your interface (e.g. eth1), click on Configure (bottom right corner), and select the IP v4 tab and change the address and netmask as shown in solution 2. Or hit 'Routes...' in the lower left corner and do your configuration there...


Solution 2. Two cards on the same network and another card connected to 'internet'

eth0 is connected to the outside world, eth1 acts as the gateway for 192.168.1.0-127, and eth2 acts as the gateway for 192.168.1.128-255

I configured this in network-manager by setting:
eth0 to dhcp
eth1 to 192.168.1.1, mask 255.255.255.0, gw 192.168.1.1
eth2 to 192.168.1.129, mask 255.255.255.128, gw 192.168.1.129
I didn't edit route settings.

The corresponding /etc/network/interfaces settings would probably be:
auto eth0
iface eth0 inet dhcp
auto eth1
iface eth1 inet static
address 192.168.1.1
netmask 255.255.255.0
gateway 192.168.1.1
auto eth2
iface eth2 inet static
address 192.168.1.129
netmask 255.255.255.128
gateway 192.168.1.129


Anyway, here's the sudo route -n:
Kernel IP routing table
Destination        Gateway         Genmask         Flags Metric Ref    Use Iface
0.0.0.0            130.194.167.254 0.0.0.0          UG    0         0        0 eth0
130.194.160.0   0.0.0.0         255.255.248.0     U     0         0        0 eth0
169.254.0.0       0.0.0.0         255.255.0.0         U     1000   0        0 eth1
192.168.1.0       0.0.0.0         255.255.255.0     U     0         0        0 eth1
192.168.1.128   0.0.0.0         255.255.255.128 U     0         0        0 eth2


Using this configuration you should probably set the gateway for eth3 in solution 1 to 192.168.1.128 -- that way you split all the traffic and in effect create two subnets (so technically, the 'same LAN' isn't really true)

Don't forget to open up your firewall to allow broadcasting from both 192.168.1.127 and 192.168.1.255

09 February 2012

63. Iptables for LAN with one internet connected gateway; sharing internet connection using iptables

Here I show how to share an internet connection with clients on a LAN. It's based in part on the iptables which firestarter generates when setting up connection sharing -- I think one could probably get away with dropping the INBOUND/OUTBOUND sections for the gateway server.

You will probably find that you need to open more ports, depending on your network services. Hopefully it's obvious from the instructions below how to do that. As always, use what you find below as a starting point and expand and correct it as you fool around with it.

While it's easier to use a gui like gufw or firestarter (see previous post), it's easier to get an absolute overview of your firewall configuration if you define each rule using iptables. It's also not that difficult and with a bit of trial and error you can work it out.

The usual caveats apply -- a good 2/3 of my posts are written as I'm teaching myself, while the remainder describe easy, useful, but not always obvious, things and programmes which makes life easier. This lands in the former category.

--- START HERE ---

My network:
One computer has two cards. eth0 is connected to the outside world, eth1 is connected to a switch making up a LAN. Each client is connected to the switch and has static IP (set in /etc/network/interfaces)

The clients are the easiest, so we'll start with them

Client:
create /etc/firewall-rules.sh (e.g. sudo vim /etc/firewall-rules.sh) and put the following in it:

sudo iptables -F #FLUSH

#INPUT
sudo iptables -A INPUT -m conntrack --ctstate ESTABLISHED,RELATED -j ACCEPT #network access
sudo iptables -A INPUT -i lo -j ACCEPT                        #127.0.0.1
sudo iptables -A INPUT -p tcp --dport ssh -j ACCEPT -s 192.168.1.0/24 #ssh
sudo iptables -A INPUT -p tcp --dport www -j ACCEPT -s 192.168.1.0/24 #web server
sudo iptables -A INPUT -p tcp --dport nfs -j ACCEPT -s 192.168.1.0/24 #needed for nfs
sudo iptables -A INPUT -p udp --dport nfs -j ACCEPT -s 192.168.1.0/24 #needed for nfs
sudo iptables -A INPUT -p tcp --dport sunrpc -j ACCEPT -s 192.168.1.0/24 #needed for nfs 
sudo iptables -A INPUT -p udp --dport sunrpc -j ACCEPT -s 192.168.1.0/24 #needed for nfs 
sudo iptables -A INPUT -p icmp --icmp-type 8 -j ACCEPT -s 192.168.1.0/24 #ping
sudo iptables -A INPUT -p udp --dport 60003 -j ACCEPT -s 192.168.1.0/24 #sinfo/d
sudo iptables -A INPUT -m limit --limit 15/minute -j LOG --log-level 7 --log-prefix " Dropped by firewall "
sudo iptables -A INPUT -j DROP                          #drop all else

#OUTPUT
sudo iptables -A OUTPUT -o lo -j ACCEPT #127.0.0.1
sudo iptables -A OUTPUT -j ACCEPT          #all outgoing ok

#FORWARD
sudo iptables -A FORWARD -p icmp --icmp-type 8 -j ACCEPT

#Default behaviour
sudo iptables -P INPUT DROP
sudo iptables -P OUTPUT DROP 
sudo iptables -P FORWARD DROP
Next, change ownership and permission

sudo chown root firewall-rules.sh
sudo chmod 700 firewall-rules.sh

Finally, edit /etc/network/interfaces and put
post-up sh /etc/firewall-rules.sh
as the last line. If you use post-up routing rules as well you can put those before or after.

Done!


The Gateway:
We need to allow the local network access to the services of the gateway, such as apt-cache. We also need to pass through traffic to the outside world.

Here's the gateway's /etc/firewall-rules.sh:

sudo iptables -F #FLUSH
# T1 -> eth0 --> inet, eth1 --> LAN (192.168.0/24)

#table nat
sudo iptables -t nat -P PREROUTING ACCEPT
sudo iptables -t nat -P INPUT ACCEPT
sudo iptables -t nat -P OUTPUT ACCEPT
sudo iptables -t nat -P POSTROUTING ACCEPT
sudo iptables -t nat -A POSTROUTING -o eth0 -j MASQUERADE

#table mangle
sudo iptables -t mangle -P PREROUTING ACCEPT
sudo iptables -t mangle -P INPUT ACCEPT
sudo iptables -t mangle -P FORWARD ACCEPT
sudo iptables -t mangle -P OUTPUT ACCEPT
sudo iptables -t mangle -P POSTROUTING ACCEPT 

#main table
sudo iptables -N OUTBOUND
sudo iptables -N INBOUND

#INPUT
sudo iptables -A INPUT -i eth0 -m conntrack --ctstate ESTABLISHED,RELATED -j ACCEPT #allows network access
sudo iptables -A INPUT -i lo -j ACCEPT                                                #127.0.0.1
sudo iptables -A INPUT -i eth1 -p tcp --dport ssh -j ACCEPT -s 192.168.1.0/24 #ssh
sudo iptables -A INPUT -i eth1 -p tcp --dport www -j ACCEPT -s 192.168.1.0/24 #web server
sudo iptables -A INPUT -i eth1 -p tcp --dport nfs -j ACCEPT -s 192.168.1.0/24 #needed for nfs
sudo iptables -A INPUT -i eth1 -p udp --dport nfs -j ACCEPT -s 192.168.1.0/24 #needed for nfs
sudo iptables -A INPUT -i eth1 -p tcp --dport sunrpc -j ACCEPT -s 192.168.1.0/24  #needed for nfs 
sudo iptables -A INPUT -i eth1 -p udp --dport sunrpc -j ACCEPT -s 192.168.1.0/24 #needed for nfs 
sudo iptables -A INPUT -i eth1 -p icmp --icmp-type 8 -j ACCEPT -s 192.168.1.0/24  #ping
sudo iptables -A INPUT -i eth1 -p udp --dport 60003 -j ACCEPT -s 192.168.1.0/24 #sinfo/d
sudo iptables -A INPUT -i eth1 -p tcp --dport 3142 -j ACCEPT -s 192.168.1.0/24             #apt-cache
sudo iptables -A INPUT -i eth1 -d 192.168.1.1 -j INBOUND                                                   #needed for gw -> clients
sudo iptables -A INPUT -i eth0 -s 192.168.1.0/24 -j REJECT 
sudo iptables -A INPUT -m limit --limit 15/minute -j LOG --log-level 7 --log-prefix " Dropped by firewall "
sudo iptables -A INPUT -j DROP                                                       #drop all else


#OUTPUT
sudo iptables -A OUTPUT -o lo -j ACCEPT #localhost 127.0.0.1
sudo iptables -A OUTPUT -o eth0 -j ACCEPT #eth0: all outgoing ok
sudo iptables -A OUTPUT -o eth1 -j ACCEPT                               #eth1: all outgoing ok

#FORWARD
sudo iptables -A FORWARD -p icmp -j ACCEPT 
sudo iptables -A FORWARD -p tcp -s 192.168.1.0/24 -j ACCEPT     #forward everything from local LAN
sudo iptables -A FORWARD -p udp -s 192.168.1.0/24 -j ACCEPT    #forward everything from local LAN
sudo iptables -A FORWARD -i eth0 -j OUTBOUND                           #need both for pass-through
sudo iptables -A FORWARD -i eth1 -j OUTBOUND                           #need both for pass-through


#INBOUND
sudo iptables -A INBOUND -j ACCEPT -m state --state RELATED,ESTABLISHED                              
sudo iptables -A INBOUND -s beryllium -j ACCEPT
sudo iptables -A INBOUND -j ACCEPT -s 192.168.1.0/24

#OUTBOUND
sudo iptables -A OUTBOUND -j ACCEPT

#Default behaviour
sudo iptables -P INPUT DROP
sudo iptables -P OUTPUT DROP 
sudo iptables -P FORWARD DROP

And that's about it.

To check that it loaded do

sudo iptables -L -n -v

The -n is because of this.

Keep on checking what goes into /var/log/firewall.log to see whether you should open more ports or use a more generous (or strict) firewall policy.


Edit: the following was the old way of doing it. The downside is that
1. it gets loaded very late in the boot sequence
2. it doesn't reload on sudo service networking restart

I've migrated away from network-manager, but it might require the method below. Use if the first method doesn't load the firewall rules.

edit /etc/rc.local and put 
sh /etc/firewall-rules.sh
as the second-to-last line to make the rules be added on each boot.

Remember the sudo iptables -m limit --limit 15/minute -j LOG --log-level 7 --log-prefix " Dropped by firewall " line? It doesn't actually do anything yet.

Edit /etc/rsyslog.conf and put
kern.=debug /var/log/firewall.log
anywhere. Restart the service:

sudo service rsyslog restart

There's now a firewall.log in your  /var/log dir.


There is one caveat:

IMPORTANT: for some reason receiving large files via sftp in filezilla FROM a client to the gateway gives

Error: Incorrect MAC received on packet
Error: File transfer failed after transferring 32,768 bytes in 1 second
or
Error: Server sent disconnect message
Error: type 2 (protocol error):
Error: "Packet corrupt"
Error: File transfer failed

Transferring large files TO a client works fine from the gateway and is blazingly fast. Transferring files between clients also works fast and securely.

i.e. on a client I can easily receive files from the gateway. On the gateway I can easily put a file on a client. The opposite directions don't work, whether I do it on the client or on the gateway. It seems like there should be an obvious iptables fix. My network cards are rtl-8169 gigabit pci cards and/or intel e1000 pro

NFS works fine for filetransfer (see this post) but I'm working on figuring out the incorrect MAC problem.

I've already tried with
sudo iptables -t mangle -A FORWARD -p tcp --tcp-flags SYN,RST SYN -j TCPMSS --clamp-mss-to-pmtu

Also, even a firewall consisting of nothing but (apart from flush):

sudo iptables -P INPUT ACCEPTsudo iptables -P OUTPUT ACCEPTsudo iptables -P FORWARD ACCEPT

doesn't solve it

Links to this post:
http://www.debian-srbija.iz.rs/p/kako-da.html

62. Sharing a folder between computers using nfs on Debian

A year ago I posted about getting nfs set up for a local network as part of a longer post -- here it is reposted, with minimal changes to make up for the substitution of portmap for rpcbind in debian. Hopefully it'll be clearer. Also, nfs is such a universally useful thing that it should be promoted among a wider audience.

I followed this post to get up and running (scroll down) with nfs. Here's my take on it:

UPDATE: with the first comment below in mind, I changed this post a little bit. The folder /shared on the master node is shared with the client, which mounts it under /home/me/shared, instead of sharing the folder /home/me/shared on the host and mounting it as /home/me/shared on the client. I basically want to drive home the message that you're mounting an NFS share in the same way as any other disk resource -- you can mount it in whatever location you want, regardless of where the folder is found on the host.

Server
On the master node (here: 192.168.1.1 - beryllium) which hosts the shared folder on its harddrive:
sudo apt-get install nfs-kernel-server nfs-common rpcbind

Let's share /shared

Create it
sudo mkdir /shared

Set permissions for 'all' to be read, write and execute
sudo chmod a+wrx /shared

Edit /etc/exports by adding a line to the end of the file
/shared *(rw,sync)


[Note that this (the *) is inherently insecure. You should restrict access to the NFS mounts via your firewall (e.g. using iptables with -A INPUT -s 192.168.1.0/24 -p udp -m udp --dport 2049 -j ACCEPT;  -A INPUT -s 192.168.1.0/24 -p udp -m udp --dport 111 -j ACCEPT for a local subnet 192.168.1.1-255).  You can also use 
/shared 192.168.1.0/24(rw,sync)

to restrict it similarly directly via /etc/exports. There are more things that can be done, see e.g. here and here. If you are running a cluster with a separate subnet, this is not a great worry. If you are in a situation where security is important, consider using sshfs instead.]

Make stuff happen:
sudo /etc/init.d/nfs-kernel-server restart
sudo exportfs -a

Client
On each client node:
sudo apt-get install rpcbind nfs-common
mkdir ~/shared

Add the following line to the end of /etc/fstab
beryllium:/shared /home/me/shared nfs   rw   0   0

You can mount in a different location if needed -- server:serverfolder localfolder nfs rw 0 0

To get it up and running immediately instead of waiting for reboot:
sudo mount ~/shared


That's it!

Links to this page:
http://forums.debian.net/viewtopic.php?f=5&t=84889

08 February 2012

61. Keeping time with ntp on debian


Set-up
NTP is used to accurately sync the clock on your computer and keep it current.

Install ntp if you haven't already
sudo apt-get install ntp ntpdate
the configuration file is in /etc/ntp.conf

You can have a look through the ntp.conf file and change the server lines to something closer to home if necessary -- you can find server pools for different regions here: http://www.pool.ntp.org/en/

If your clock is off by too much, syncing won't work, so you might want to do this to sync up the first time:

sudo service ntp stop
sudo ntpdate -u 0.pool.ntp.org

 8 Feb 16:28:42 ntpdate[10484]: step time server 121.0.0.41 offset -648.353916 sec

compare the output of date with e.g http://worldtimeserver.com


Now, start the ntp server again:

sudo service ntp start


Running your own local ntp server for your LAN

The NTP daemon will (presumably) run happily in the background and gradually adjust the time if it's off.
For a sub-LAN  you may want to sync e.g. the gateway to the ntp pool, then sync all the local computers to the gateway in order to cut down on traffic, like so.

Here's my version of that link:
server:
Here's /etc/ntp.conf on my server, which is seen as 192.168.1.1 by the local subnet (connected to inet on eth0 and subnet on eth1) . The last two lines were important to get it to work.

driftfile /var/lib/ntp/ntp.drift
statistics loopstats peerstats clockstats
filegen loopstats file loopstats type day enable
filegen peerstats file peerstats type day enable
filegen clockstats file clockstats type day enable
server 0.oceania.pool.ntp.org
server 1.oceania.pool.ntp.org
server 2.oceania.pool.ntp.org
server 3.oceania.pool.ntp.org
restrict -4 default kod notrap nomodify nopeer noquery
restrict -6 default kod notrap nomodify nopeer noquery
restrict 127.0.0.1
restrict ::1
restrict 192.168.1.0 mask 255.255.255.0 nomodify notrap
broadcast 192.168.1.255
server 127.127.1.0
fudge 127.127.1.0 stratum 10

sudo service ntp restart
and you're good to go

client:
/etc/ntp.conf
driftfile /var/lib/ntp/ntp.drift
statistics loopstats peerstats clockstats
filegen loopstats file loopstats type day enable
filegen peerstats file peerstats type day enable
filegen clockstats file clockstats type day enable
server 192.168.1.1
restrict -4 default kod notrap nomodify nopeer noquery
restrict -6 default kod notrap nomodify nopeer noquery
restrict 127.0.0.1
restrict ::1
restrict 192.168.1.0 mask 255.255.255.0 nomodify notrap
disable auth
broadcastclient
sudo service ntp restart

Checking if the client is connecting to the server.
me@kookaburra:~$ sudo service ntp stop
Stopping NTP server: ntpd.
me@kookaburra:~$ sudo ntpdate 192.168.1.1
 8 Feb 17:22:35 ntpdate[12846]: adjust time server 192.168.1.1 offset -0.008602 sec
me@kookaburra:~$ sudo service ntp start
Starting NTP server: ntpd.
me@kookaburra:~$ sudo ntpq -p
     remote           refid      st t when poll reach   delay   offset  jitter
==============================================================================
 beryllium       LOCAL(0)        11 u    2   64    1    0.189   -7.332   0.000

(beryllium is the name of my 192.168.1.1 server.)

60. i18n_translation and no Package:Header error on Debian Testing 32 bit

I'm doing this via an apt-cache server (i.e. the 192.168.1.1 rather than ftp.au.debian.org) -- but the problem is unrelated to the apt-cache server.

Symptom:

Get:1 http://192.168.1.1 testing InRelease [179 kB]
Ign http://192.168.1.1 testing/contrib TranslationIndex
Get:2 http://192.168.1.1 testing/main TranslationIndex [2,154 B]
Ign http://192.168.1.1 testing/non-free TranslationIndex
Get:3 http://192.168.1.1 testing/main i386 Packages [7,146 kB]
Get:4 http://192.168.1.1 testing/contrib i386 Packages [48.9 kB]
Get:5 http://192.168.1.1 testing/non-free i386 Packages [87.5 kB]
Ign http://192.168.1.1 testing/contrib Translation-en_AU
Get:6 http://192.168.1.1 testing/contrib Translation-en [34.8 kB]
Get:7 http://192.168.1.1 testing/main Translation-en [3,722 kB]
Ign http://192.168.1.1 testing/non-free Translation-en_AU                                
Get:8 http://192.168.1.1 testing/non-free Translation-en [62.5 kB]
Fetched 11.3 MB in 2s (4,348 kB/s)                                                          
W: Failed to fetch copy:/var/lib/apt/lists/partial/192.168.1.1:3142_ftp.au.debian.org_debian_dists_testing_main_i18n_Translation-en  Encountered a section with no Package: header

E: Some index files failed to download. They have been ignored, or old ones used instead.

Reason:
ftp://ftp.au.debian.org/debian/dists/wheezy/main/i18n/
All the files in that directory are compressed (bz2) -- you need to enable apt-get to decompress .bz2 files.

Solution:
Install bzip2

sudo apt-get install bzip2

at this point gives

Reading package lists... Error!
E: Encountered a section with no Package: header
E: Problem with MergeList /var/lib/apt/lists/192.168.1.1:3142_ftp.au.debian.org_debian_dists_testing_contrib_i18n_Translation-en
E: The package lists or status file could not be parsed or opened.

So remove the offending files (2 lines):
sudo rm  /var/lib/apt/lists/192.168.1.1:3142_ftp.au.debian.org_debian_dists_testing_contrib_i18n_Translation-en
sudo rm /var/lib/apt/lists/192.168.1.1:3142_ftp.au.debian.org_debian_dists_testing_non-free_i18n_Translation-en

Now you can 

sudo apt-get install bzip2

followed by

sudo apt-get update
Hit http://192.168.1.1 testing InRelease
Get:1 http://192.168.1.1 testing/main i386 Packages/DiffIndex [2,038 B]
Get:2 http://192.168.1.1 testing/contrib i386 Packages/DiffIndex [2,023 B]
Get:3 http://192.168.1.1 testing/non-free i386 Packages/DiffIndex [2,023 B]
Ign http://192.168.1.1 testing/contrib TranslationIndex
Hit http://192.168.1.1 testing/main TranslationIndex
Ign http://192.168.1.1 testing/non-free TranslationIndex
Get:4 http://192.168.1.1 testing/contrib Translation-en [34.8 kB]
Get:5 http://192.168.1.1 testing/main Translation-en [3,722 kB]
Get:6 http://192.168.1.1 testing/non-free Translation-en [62.5 kB]
Ign http://192.168.1.1 testing/contrib Translation-en_AU        
Ign http://192.168.1.1 testing/non-free Translation-en_AU
Fetched 103 kB in 4s (25.3 kB/s)
Reading package lists... Done

Done indeed!

07 February 2012

59. Some problems with a headless box with four ethernet cards

I'll put this here more as general information rather than a solution to anything.

The situation:
I got my hands on a tiny WAN server with four ethernet cards (Intel Pro 100). Two of the ports light up when attaching CAT5 cables (eth3 and eth4), two of them remain dead (eth0 and eth1).

I thought I was clever:

/etc/network/interfaces

auto eth0
iface eth0 inet static
address 192.168.1.103
netmask 255.255.255.0
gateway 192.168.1.1
auto eth1
iface eth1 inet static
address 192.168.1.104
netmask 255.255.255.0
gateway 192.168.1.1
auto eth2
iface eth2 inet static
address 192.168.1.105
netmask 255.255.255.0
gateway 192.168.1.1
auto eth3
iface eth3 inet static
address 192.168.1.106
netmask 255.255.255.0
gateway 192.168.1.1

/etc/hosts
127.0.0.1 localhost
192.168.1.103 garfish
192.168.1.104 salmon
192.168.1.105 wallaby
192.168.1.106 kookaburra
192.168.1.1 beryllium
192.168.1.101 boron
192.168.1.102 tantalum
# The following lines are desirable for IPv6 capable hosts
::1     ip6-localhost ip6-loopback
fe00::0 ip6-localnet
ff00::0 ip6-mcastprefix
ff02::1 ip6-allnodes
ff02::2 ip6-allrouters

Well, here's what happened:
I installed Debian Stable on the HDD using virtualbox -- it's a tried an tested method by which instead of creating a virtual HD you attach an external HD via USB and pass it through to a new virtualbox instance which only has a CD or DVD image of a Debian installation medium mounted. I might explain this in more detail in a separate post.

Anyway, installation was fine. I installed the basic tools, ssh-server, file-server etc., but no desktop environment.

I knew that I had to manually set the IP address since the server would be attached to a switch, not a router, so I attached the HDD as an external USB HDD to a tower with a display attached to it, hit F9 during boot to boot from the external harddrive, and things looked ok. Well, the network card hadn't been brought up  -- I guess this is normally done by network-manager even if you don't configure your /etc/network/interfaces

sudo ifconfig eth0 192.168.1.103 netmask 255.255.255.0 up

was enough to get me connected, after which I edited the /etc/apt/sources.list, upgraded to testing, and installed a few network tools and a collecting of non-free drivers for good luck.

I edited the /etc/hosts and /etc/network/interfaces as shown above

What I saw (using tshark -i eth1 on another box on the same local network):
23.630357 192.168.1.103 -> 130.194.1.99 DNS 69 Standard query AAAA
garfish
 23.631220 130.194.1.99 -> 192.168.1.103 DNS 144 Standard query
response, No such name

Anyway, odd, but let's leave it at that.

I put the HDD in the server, then tried to log in via ssh. Nothing. And no response to pinging. Can't reach the apache server running.

Hmm...pulled out the hdd put a crontab script to run once every minute which would run lspci, ip addr and ping back to one of my boxes. Put the hdd back in, started and listened with tshark. Well, the server was pinging away, but I couldn't ping back, nor ssh in, nor connect to port 80.

Looking at the ip addr output:
2: eth0: <NO-CARRIER,BROADCAST,MULTICAST,UP> mtu 1500 qdisc pfifo_fast state DOWN qlen 1000
    link/ether xx:xx:xx:xx:xx:xx brd ff:ff:ff:ff:ff:ff
    inet 192.168.1.103/24 brd 192.168.1.255 scope global eth0
3: eth1: <NO-CARRIER,BROADCAST,MULTICAST,UP> mtu 1500 qdisc pfifo_fast state DOWN qlen 1000
    link/etherxx:xx:xx:xx:xx:xx brd ff:ff:ff:ff:ff:ff
    inet 192.168.1.104/24 brd 192.168.1.255 scope global eth1
4: eth2: <NO-CARRIER,BROADCAST,MULTICAST,UP> mtu 1500 qdisc pfifo_fast state DOWN qlen 1000
    link/ether xx:xx:xx:xx:xx:xx brd ff:ff:ff:ff:ff:ff
    inet 192.168.1.105/24 brd 192.168.1.255 scope global eth2
5: eth3: <BROADCAST,MULTICAST,UP,LOWER_UP> mtu 1500 qdisc pfifo_fast state UP qlen 1000
    link/ether xx:xx:xx:xx:xx:xx brd ff:ff:ff:ff:ff:ff
    inet 192.168.1.106/24 brd 192.168.1.255 scope global eth3
    inet6 fe80::20e:b6ff:fe2a:a830/64 scope link
       valid_lft forever preferred_lft forever

Not too shabby looking - eth0 and eth1 are down, but at least the server isn't turning green and projectile vomiting.

But /var/mail/me:
Date: Mon, 06 Feb 2012 17:28:04 +1100
PING 192.168.1.1 (192.168.1.1) 56(84) bytes of data.
>From 192.168.1.103 icmp_seq=1 Destination Host Unreachable
Odd, since I could SEE the pings using wireshark/tshark - but from 192.168.1.106.

Anyway, to make a very long story short -- the solution was to remove eth0 and eth1 from /etc/network/interfaces -- they are dead, and initialising them were causing odd behaviour.


There isn't much of a moral to this story, and the usefulness to other people is perhaps limited, but just in case you do recognise the situation, try limiting yourself to good ethernet ports, then take it from there...


58. Higher resolution on a Dell E177FPb monitor using modelines in xorg.conf on Debian Testing

Update 24 May 2013: this still works fine on the optiplex (with intel onboard graphics) but when trying it on a different machine with an external nvidia card I couldn't get it to work. There only "xrandr --output VGA-0 --scale 1.1x1.1" worked.

Original post:
I've hooked up my fancy new-ish optiplex 990 to an old Dell E177FPb monitor which I bought back in 2007. For various reasons I've also removed the nvidia quattro graphics card that the optiplex 990 came with -- the main reasons being 1) I hate displayport and _need_ vga and 2) the bios forces you to press 'any key' on each boot if you leave the card in, even though you've configured the OS to use the integrated onboard graphics.

At any rate, hooking my old screen to my dell lead to a less than overwhelming experience -- and querying the 'Displays' setting in gnome showed only two resolution options: 1024x768 and 800x600. Well, I knew for a fact that the maximum resolution should be 1280x1024.

This was a bit of a surprise given that the same xorg.conf had been used together with a fancy widescreen 1920x1080 display -- yet it would not handle a 1280x1024 display? I guess this might say more about my lack of understanding how display drivers work, but whatever.

Well, in the end it turned out to be easy to enable the missing resolution mode.

First, a minimal amount of googling told me that the max resolution was 1280x1024 at 75 Hz.
"Preset Resolution: 1280 x 1024 @ 75 Hz"

Next, using gtf I generated a Modeline line.

gtf 1280 1024 75
Modeline     "1280x1024_75.00" 138.54 1280 1368 1504 1728 1024 1025 1028 1069 -HSync +Vsync

Finally, I then edited the xorg.conf (again, see this post for the entire xorg.conf), changing


Section "Monitor"
Identifier   "Monitor0"
VendorName   "Monitor Vendor"
ModelName    "Monitor Model"
EndSection

to


Section "Monitor"
Identifier   "Monitor0"
VendorName   "Monitor Vendor"
ModelName    "Monitor Model"
Modeline     "1280x1024_75.00" 138.54 1280 1368 1504 1728 1024 1025 1028 1069 -HSync +Vsync
EndSection

Doing startx to start up gnome, followed by selecting Displays, then selecting Resolution: 1280x1024 (5:4) yielded a beautifully satisfying  user experience.

I'm not one to fiddle with xorg.conf, but this time it turned out that the fix was easy once I had figured out what to do.